The BellaDati Connector SDK is an API written in Java. The main goal is to provide ability for customers to implement their own data connector and integrate it with BellaDati. There are 3 prerequisites to make it work:
- You have to have full access to on-premise installation of BellaDati (otherwise contact your admin or cloud provider)
- Well defined Java package structure and class names that do not interfere with other classes used by BellaDati (will be described in sections below).
- You have prepared JAR file package that contains all necessary parts and was correctly built as it is described in following documentation
Setting up the Connector SDK
The Connector SDK consists of two parts:
- API containing the SDK's interface declarations (Javadoc download)
- example implementation for better understanding of SDK including tests
To use the SDK, download the API jar. The SDK source is available on GitHub.
Before implementation of your first data connector we highly recommend to clone example implementation from GitHub and explore this existing Maven project at first.
Setting up the IDE
You will need Java IDE to implement your own connector, for example Eclipse. No special configuration is required for setting up IDE for BellaDati Connector SDK.
Setting up the project
Your custom connector has to be located in package with prefix "com.belladati.sdk.connector" (due to simpler class path scanning) followed by your package name. Usage of company web address as a suffix of Java package structure is good idea. Example:
com.belladati.sdk.connector.my.awesome.company
Your Java project needs at least one dependency - latest Connector SDK API containing the SDK's interface declarations. You can manually set up the dependencies or configure your build tool (Maven, Gradle, etc.) to do it for you.
Using Maven
In your pom.xml file, add the following dependency:
  <dependencies>
      ...
      <dependency>
          <groupId>com.belladati</groupId>
          <artifactId>sdk-connector-api</artifactId>
          <version>0.0.6</version>
          <scope>provided</scope>
      </dependency>
      ...
  </dependencies>
Using Gradle
In your build.gradle file, add the following dependency:
dependencies {
	...
	provided 'com.belladati:sdk-connector-api:0.0.6'
    ...
}
Usage, versions and scopes of all other dependencies need to be discussed with BellaDati team before first deployment of your custom connector into BellaDati.
Overview of classes in SDK
This section contains high overview of classes and interfaces that are bundled in SDK. Please see online Javadoc or source code on GitHub for more details.
DataProviderApi
Provides import data (including preview data and data definition) based on given configuration. This is the main entry point to your connector. You have to extend this abstract class in your custom connector and implement also public static method getName (see below for more details).
RowApi
One source row represented as array of String values. You have to implement this interface in your custom connector.
RowsApi
Iterable and Closeable definition of source rows. You have to implement this interface in your custom connector.
PropertyValueApi
Class representing value of property used in DataProviderApi configuration. Contains value, default value and flag if this property is required. String, Integer and Boolean value types are supported. You can use this class to manage parameters for your custom connector.
ProgressBarApi
Progress bar displayed on user interface during import. You can use this reference in your custom connector to update progress status of import action.
ConnectorUtils
Utilities for connector SDK. You can use helper methods in this class to simplify your implementation.
Implementation
Your custom connector must implement the following abstract types: RowApi, RowsApi and DataProviderApi. There is also one additional static method "getMetadata" that has to be implemented in DataProviderApi with following definition:
import org.json.JSONObject;

...
/**
 * Optional. Returns JSONObject containing metadata for the custom connector.
 * @return Data provider metadata
 */
public static JSONObject getMetadata() {
	JSONObject metadata = new JSONObject();
    metadata.put("name", "Name of your custom connector");
	metadata.put("description", "Some description");
    metadata.put("logo", "com/belladati/sdk/connector/icon.png");
    //or read from file/string
    //String json = "{ \"description\" : \"This is custom data connector\", \"name\" : \"Custom connector\"}";
    //JSONObject metadata = new JSONObject(json);
	return metadata;
}

/**
 * Optional. Returns name of this data provider that should be displayed on the user interface.
 * @return Data provider name if not defined in metadata
 */
public static String getName() {
    return "Name of my your custom connector";
}

...
Using metadata
In Connector SDK 1.0+ and BellaDati 2.9.7+ advanced connector behavior can be provided inside metadata. Metadata are defined as org.json.JSONObject instance and are returned by static getMetadata() method defined in your custom connector DataProviderApi implementation class.
Metadata allows you to define:
- Connector name and description
- Connector logo
- Wizard mode
- Steps with name and description
- Elements of various types: input fields, HTML code, links
Example:
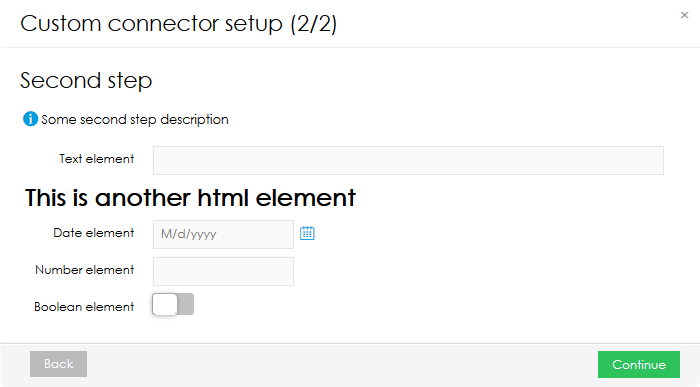
For detailed metadata description, continue to Connector metadata.
Building
Your custom connector has to be packaged as JAR (Java Archive) with all necessary dependencies. Please discuss usage, versions and scopes of all dependencies with BellaDati team. When you're ready, call your preferred tool to build this project:
Using Maven
mvn clean install
Using Gradle
gradle clean install
Directory "target" will contain the project's jar file and other build artifacts.
Testing
Your custom connector project has to contain tests to verify behavior. You are responsible for your code. Tests should contain also negative scenarios.
Please see sample tests implemented in example.
Deployment
Search for the lib directory located in your <belladati_installation_folder>/belladati/WEB-INF/lib. Installation folder can differ according the installation path of your application server and according type of application server that you use. To deploy your custom connector to BellaDati please copy built JAR (including dependencies) file into the belladati/WEB-INF/lib folder and do not forget to restart your Application server.
You can try to deploy JAR file with dependencies from our example to test this step.
Backup your custom connectors into the separate folder out of BellaDati. With each new installation of BellaDati you will have to deploy your connectors into the BellaDati again.
Usage
Custom connectors available on classpath are listed at the end of data sources list:

After you select one of connectors you can customize parameters for selected connector.

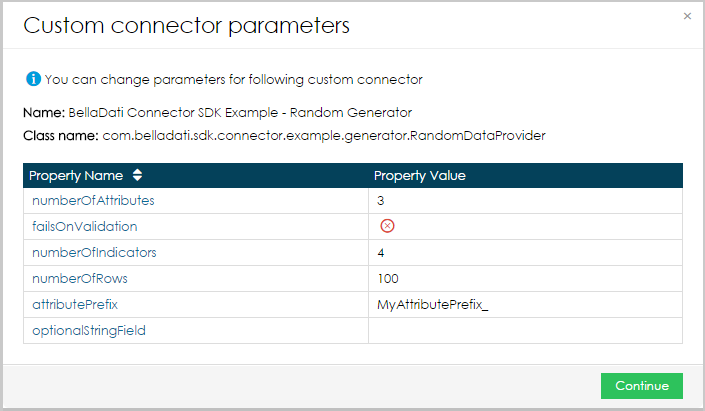
After you enter valid parameters and click "Continue" button you can continue with import workflow on common Import Settings page.
Overview
Content Tools