Versions Compared

Key

  • This line was added.
  • This line was removed.
  • Formatting was changed.
Comment: Removed translated content for 'zh'
Sv translation
languageen
Note

You need to be in view mode in order to export report.

Export allows you to Save report, Publish it to dashboard or schedule Emailing.

Click Export or select Save as document from report toolbox list in the upper right corner to open Export report dialog.


Export report dialog allows you to save report in following formats:

  • PDF: You can specify Orientation and Size option.
  • Microsoft PowerPoint
  • Microsoft Excel


Note

Maximum table rows count in the exports is currently limited to 1000 due to performance reasons. This limit can be raised for BellaDati Enterprise tariffs or licenses.


Publishing to Dashboard

For pinning report/view to dashboard - continue by Publishing to Dashboard.

Emailing report

Select Schedule email from report toolbox list to open Send report as e-mail dialog.

Dialog allows you to:

  • Create Subject.
  • Select Views that will be displayed in email body. Attachment will still contain all views. In the email body, there will be used ordering of selected views.
  • Add Recipients.
  • Add Recipients groups.
  • Set up Frequency of delivery.
  • Append Message.
  • Select if report should be attached as attachment (views will be included in email body and attachment).
  • Select if report will be sent to all recipients at once (other recipients will be put on cc).
  • Select Export typeSize and Orientation.
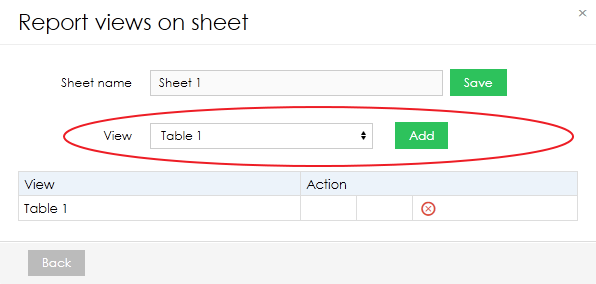
    • if XLS is selected and email is scheduled (not sent immediately), it is possible to specify content of Excel sheets.
      1. Schedule your export and then click on Setup sheets.
      2. Type Sheet name and click on Add.
      3. Select views that you want to include on this sheet.
      4. Repeat for all sheets.
  • Send email to all recipients at once - all users will receive one email (they will see other users in the cc)
  • Compress attachment - exported file will be attached as .zip file
  • Require password - exported zip file will be protected with password (this option is displayed only if option compress attachment is enabled)


Info

 You can also send multiple reports via one email. For more info proceed to Export schedule.

Info

You can also set custom email and PDF layout. For more info proceed to separate page adjusting layout in email and PDF export.

Note

Correctly set Application URL is necessary for scheduled export of maps.


Schedule report export to FTP

For scheduling report export to FTP - continue by Schedule report export.

Fullscreen mode

Choose option Fullscreen from report toolbox list to enter fullscreen mode, which will display only the report itself. This mode should be used mainly for presentation of reports.

Note

Fullscreen mode is available only in following browsers:

  • Firefox 10 and newer versions
  •  Chrome 15 and newer versions
  • Opera 12.1 and newer versions
  • Internet Explorer 11

Export to XML

Click Backup to file to create report XML backup. XML file will be promptly downloaded to your hard drive. If you would like to reimport other version of report go to data set summary.

Next Steps

Customizing PDF Stylesheet

Sv translation
languagesk
Note

Pre pridanie premenných a filtrov musíte byť v móde prehliadania.

Export Vám umožňuje Uložiť report, Publikovať ho na dashboard a nastaviť automatické posielanie Emailom.

Pre otvorenie okna exportu kliknite priamo na položku Export alebo následne na Uložiť dokument z hornej lišty nástrojov.


Okno exportu Vám umožňuje uložiť report v nasledujúcich formátoch:

  • PDF: Možné nastaviť Orientáciu a Veľkosť.
  • Microsoft PowerPoint
  • Microsoft Excel
Info

Geo mapnebudú exportované. Exporto do Microsoft Excel bude zahrňovať len tabuľky.

Note

Maximálny počet riadkov pri exporte je z výkonnostných dôvodov obmedzený na 1000 riadkov. Tento limit môže byť zvýšený pre majiteľov BellaDati Enterprise.


Publikovanie na Dashboard

Pre pridanie reportu/pohľadu na dashboard pokračujte na časť publikovanie na dashboard.

Emailovanie reportu

Z hornej lišty nástrojov vyberte možnosť Plánovať import

Novootvorené okno Vám umožní:

  • Zadať predmet
  • Pridať prijímateľov 
  • Nastaviť frekvenciu zasielania
  • Pridať správu
  • Vybrať či by mal byť report pridaný ako príloha (ak táto možnosť nie je zaškrtnutá, bude report pridaný do tela emailu - v tomto prípade budú zaslané len tabuľky a KPI popisy.)
  • Vybrať typ exportu, veľkosť orientáciu.

Naplánovať export reportu na FTP

Pre plánovanie exportu na FTP prejdite na plánovanie exportu reportu.

Kam ďalej

Sv translation
languageja
Note

レポートをエクスポートするには、表示モードにする必要があります。

エクスポートにより、レポートの保存、ダッシュボードへの公開電子メール送信のスケジュールを設定できます。

[エクスポート]をクリックするか、右上隅のレポートツールボックスリストから[ドキュメントとして保存]を選択して、[レポートのエクスポート]ダイアログを開きます。


[レポートのエクスポート]ダイアログでは、次の形式でレポートを保存できます:

  • PDF: 方向サイズのオプションを指定できます。
  • Microsoft PowerPoint
  • Microsoft Excel


Note

現在、エクスポートの最大テーブル行数は、パフォーマンス上の理由により1000までに制限されています。この制限は、BellaDati Enterpriseの料金やライセンスに対して引き上げられます。


ダッシュボードへの公開

レポート/ビューをダッシュボードに固定するには - Publishing to Dashboardに進みます。

レポートのメール送信

レポートツールボックスリストから[メールをスケジュール]を選択して、[レポートをメールで送信]ダイアログを開きます。

ダイアログでは以下のことができます:

  • 件名を作成します。
  • メール本文に表示されるビューを選択します。添付には引き続きすべてのビューが含まれます。メールの本文では、選択したビューの順序が使用されます。
  • 受信者を追加します。
  • 受信者グループを追加します。
  • 配信頻度を設定します。
  • メッセージを追加します。
  • レポートを添付ファイルとして添付する必要がある場合に選択します(ビューは電子メールの本文と添付ファイルに含まれます)。

  • レポートをすべての受信者に一度に送信するかどうかを選択します(他の受信者はccに入れられます)。
  • エクスポートの種類サイズ方向を選択します。
    • XLSが選択され、電子メールがスケジュールされている(すぐに送信されない)場合、Excelシートのコンテンツを指定できます。
      1. エクスポートをスケジュールしてから、セットアップシートをクリックします。
      2. シート名を入力し、追加をクリックします。
      3. このシートに含めるビューを選択します。
      4. すべてのシートについて繰り返します。
  • すべての受信者に一度にメールを送信 - すべてのユーザーが同一のメールを受信します(ccで他のユーザーが表示されます)。
  • 圧縮添付ファイル - エクスポートされたファイルは.zipファイルとして添付されます。
  • パスワードが必要 - エクスポートされたzipファイルはパスワードで保護されます(このオプションは、添付ファイルの圧縮オプションが有効な場合にのみ表示されます)。


Info

1つのメールで複数のレポートを送信することもできます。詳細については、Export scheduleに進んでください。

Info

カスタム電子メールとPDFレイアウトを設定することもできます。詳細については、電子メールとPDFエクスポートのレイアウトを調整する別のページに進んでください。 

Note

地図を正しくエクスポートするには、アプリケーションURLを正しく設定する必要があります。


FTPへのレポートエクスポートのスケジューリング

FTPへのレポートのエクスポートをスケジュールするには - Export scheduleに進みます。

フルスクリーンモード

レポートツールボックスリストから[フルスクリーン]オプションを選択して、レポート自体のみを表示する全画面モードに入ります。このモードは、主にレポートの表示に使用する必要があります。

Note

フルスクリーンモードは、以下のブラウザーのみ利用可能です:

  • Firefox 10 以降のバージョン
  • Chrome 15 以降の新バージョン
  • Opera 12.1 以降のバージョン
  • Internet Explorer 11

XMLへのエクスポート

[ファイルにバックアップ]をクリックして、レポートXMLバックアップを作成します。 XMLファイルがすぐにハードドライブにダウンロードされます。他のバージョンのレポートを再インポートする場合は、データセットの概要に移動してください。

次に

Sv translation
languagede
Note

Sie müssen sich im View-modus befinden, um den Report zu exportieren.

Der Export ermöglicht es Ihnen, den Report zu speichern, ihn im Dashboard zu veröffentlichen oder E-Mailing zu planen.

Klicken Sie auf Export oder wählen Sie Als Dokument speichern from report toolbox list in der oberen rechten Ecke, um das Dialogfenster Export report zu öffnen.


Das Dialogfenster Export des Report ermöglicht es Ihnen, den Report in folgenden Formaten zu speichern:

  • PDF: Sie können die Option Ausrichtung und Größe angeben.
  • Microsoft PowerPoint
  • Microsoft Excel


Note

Die maximale Anzahl der Tabellenzeilen in den Exporten ist derzeit aus Performancegründen auf 1000 begrenzt. Diese Grenze kann für BellaDati Enterprise Tarife oder Lizenzen erhöht werden.


Publizieren im Dashboard

Für das Pinning des Reports/View im Dashboard - weiter mit Dashboard publizieren.

Emailing report

Wählen Sie E-Mail aus der Liste der Report-Toolboxen einplanen, um den Dialog Report als E-Mail senden zu öffnen.

Dialog ermöglicht es Ihnen,:

  • Betreff erstellen.
  • Select Views that will be displayed in email body. Attachment will still contain all views. In the email body, there will be used ordering of selected views.
  • Empfänger hinzufügen.
  • Hinzufügen von Empfängergruppen.
  • Richten Sie die Lieferfrequenz ein.

  • Nachricht anhängen.

  • Wählen Sie aus, ob der Report als Anhang angehängt werden soll (Views werden im E-Mail-Text und im Anhang enthalten sein).

  • Wählen Sie aus, ob der Report an alle Empfänger auf einmal gesendet werden soll (andere Empfänger werden auf cc gesetzt).

  • Wählen Sie Exporttyp, Größe und Ausrichtung.

    • Wenn XLS ausgewählt ist und die E-Mail geplant ist (nicht sofort gesendet), ist es möglich, den Inhalt von Excel-Tabellen festzulegen

      1. Planen Sie Ihren Export und klicken Sie dann auf Setup Sheets.
      2. Geben Sie den Blattnamen ein und klicken Sie auf Hinzufügen.
      3. Select views that you want to include on this sheet.
      4. Wiederholen Sie dies für alle Blätter.
  • Senden Sie E-Mails an alle Empfänger auf einmal - alle Benutzer erhalten eine E-Mail (sie sehen andere Benutzer im cc).
  • Anhang komprimieren - exportierte Datei wird als Zip-Datei angehängt.
  • Passwort erforderlich - exportierte Zip-Datei wird mit einem Passwort geschützt (diese Option wird nur angezeigt, wenn die Option Datei komprimieren aktiviert ist).


Info

 Sie können auch mehrere Reports über eine E-Mail versenden. Für weitere Informationen gehen Sie zu Zeitplan exportieren.

Info

Sie können auch benutzerdefinierte E-Mail- und PDF-Layouts festlegen. Für weitere Informationen gehen Sie zu einem separaten Seitenanpassungslayout in E-Mail und PDF-Export.

Note

Für den geplanten Export von Karten ist eine korrekt eingestellte Anwendungs-URL erforderlich.


Zeitplan für den Export von Reports nach FTP

Zur Planung des Reportexports nach FTP - weiter mit Planen Sie den Reportexport.

Vollbildmodus

Wählen Sie die Option Vollbild aus der Liste der Reports-Toolboxen, um in den Vollbildmodus zu gelangen, der nur den Report selbst anzeigt. Dieser Modus sollte hauptsächlich für die Präsentation von Reports verwendet werden.

Note

Der Vollbildmodus ist nur in folgenden Browsern verfügbar:

  •  Firefox 10 und neuere Versionen 
  • Chrome 15 und neuere Versionen 
  • Opera 12.1 und neuere Versionen
  • Internet Explorer 11

Export nach XML

Klicken Sie auf Backup to file, um ein XML-Backup des Reports zu erstellen. Die XML-Datei wird umgehend auf Ihre Festplatte heruntergeladen. Wenn Sie eine andere Version des Reports reimportieren möchten, gehen Sie zu Datensatzzusammenfassung.

Nächste Schritte

Anpassen des PDF-Stylesheets