| Sv translation |
|---|
|
Click Users |
| Section |
|---|
| Column |
|---|
Click "Users" in the main menu to display the list of users in the current domain. This table shows: - User name (surname, title)
- Login name (usually e-mail)
- Lat login date and time
- Phone
- User group each user belongs to
- Authentication source
- Domain (more domains are relevant for global BellaDati administrator only)
- Active/Inactive user
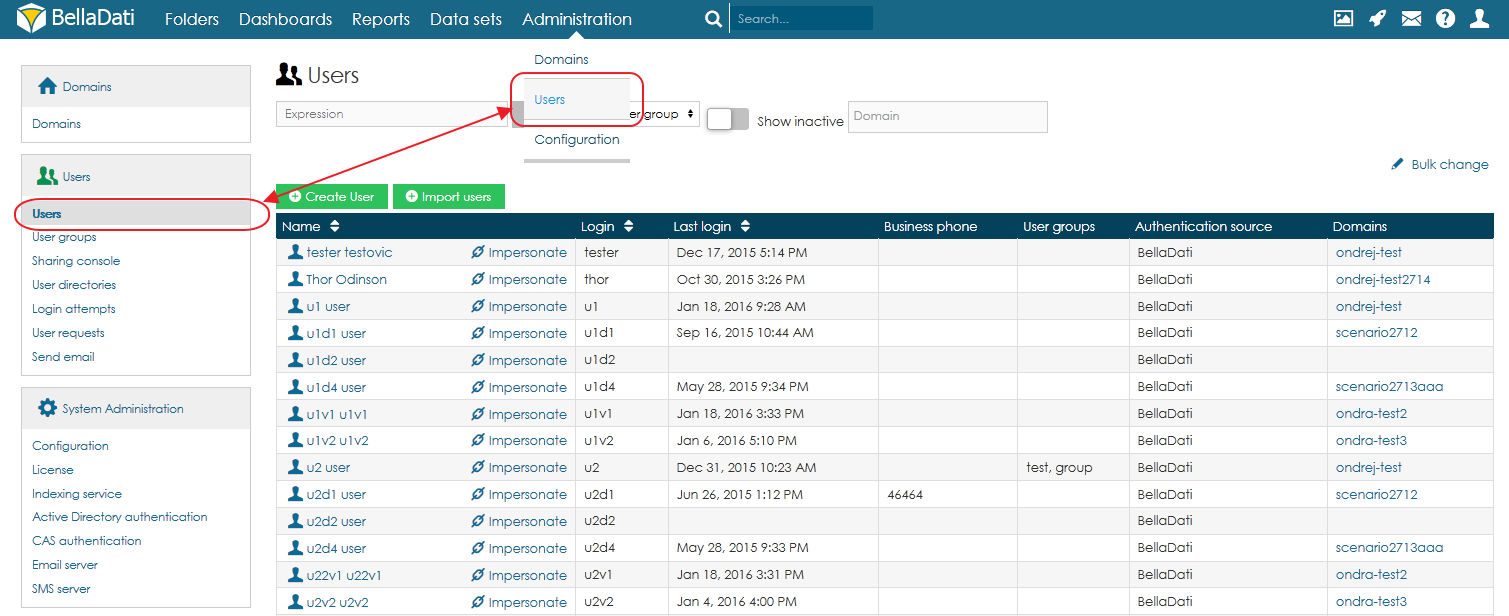 Image Added Image Added
Actions available: - Sort existing users by name, login, last login date and phone.
- Filter users by: expression (match within name or login), user group, show deactivated users
- Search user
- Create new user
- Bulk user import using the CSV file
Creating user- Click
|
...
...
- in the left submenu. The popup appears.
- Enter the information and set the options below.
- Click
|
...
...
- . New user has been created now in the actual domain.
Enter the following information in the popup (bold are mandatory): |
...
- Name: 2 characters minimum
- Surname: 2 characters minimum
|
...
...
...
You can immediately assign these basic roles to the user: - Report editor
- Data manager
| Tip |
|---|
Check "Send notification" option to let the new user know about his new account in BellaDati via automatic e-mail. |
| Note |
|---|
Some options can be accessed directly from popup menu. Those options can be hidden by default. See here under "Changing popup menu" how to display them. |
Tutorial video |
...
...
...
embed/HkUOeDNdKZo" frameborder="0" allow="accelerometer; autoplay; encrypted-media; gyroscope; picture-in-picture" allowfullscreen></iframe> |
Next Steps |
| Sv translation |
|---|
|
メインメニューの[ユーザー]をクリックして、現在のドメインのユーザーのリストを表示します。 以下の表が表示されます: - ユーザー名(姓、役職)
- ログイン名(通常はメールアドレス)
- 最終ログイン日時
- 電話
- 各ユーザーが所属しているユーザーグループ
- 認証元のソース
- ドメイン(複数のドメインは、グローバルBellaDati管理者のみに関連します)
- アクティブ/非アクティブユーザー
Image Added 利用可能なアクション: - 名前、ログイン、最終ログイン日、電話で既存ユーザーを並べ替え
- 式(名前またはログイン内で一致)、ユーザーグループ、非アクティブユーザーを表示することによってユーザーをフィルター
- ユーザーの検索
- 新しいユーザー作成
- CSVファイルを使用した一括ユーザーインポート
- 一括変更削除
ユーザーを作成- 左側のサブメニューで[ユーザーの作成]をクリックします。ポップアップが表示されます。
- 情報を入力し、以下のオプションを設定します。
- [作成]をクリックします。これで、実際のドメインに新しいユーザーが作成されました。
ポップアップに以下の情報を入力します(太字は必須)。 - 名: 最小2文字
- 姓: 最小2文字
- メール
- ユーザーグループ
すぐにユーザーにこれらの基本的な役割を割り当てることができます:
| Tip |
|---|
[通知を送信]オプションをオンにして、新しいユーザーにBellaDatiの新しいアカウントについて自動メールで通知します。 |
| Note |
|---|
一部のオプションは、ポップアップメニューから直接アクセスできます。これらのオプションはデフォルトで非表示にすることもできます。「ポップアップメニューの変更」の下で、それらを表示する方法をご覧ください。 |
チュートリアルビデオ| HTML |
|---|
<iframe width="560" height="315" src="https://www.youtube.com/embed/HkUOeDNdKZo" frameborder="0" allow="accelerometer; autoplay; encrypted-media; gyroscope; picture-in-picture" allowfullscreen></iframe> |
次に |
| Sv translation |
|---|
|
Klicken Sie im Hauptmenü auf Benutzer, um die Liste der Benutzer in der aktuellen Domäne anzuzeigen. Diese Tabelle zeigt: - Benutzername (Nachname, Titel)
Login-Name (in der Regel E-Mail) Datum und Uhrzeit der letzten Anmeldung Telefon Benutzergruppe, zu der jeder Benutzer gehört Authentifizierungsquelle Domain (weitere Domains sind nur für den globalen BellaDati-Administrator relevant) Aktiver/Inaktiver Benutzer
Image Added Verfügbare Aktionen: Sortieren Sie bestehende Benutzer nach Name, Login, Datum der letzten Anmeldung und Telefon. Benutzer filtern nach: Ausdruck (Übereinstimmung innerhalb des Namens oder der Anmeldung), Benutzergruppe, deaktivierte Benutzer anzeigen Benutzer suchen Neuen Benutzer anlegen Massenimport von Benutzern über die CSV-Datei Massenänderung löschen
nutzer anlegenKlicken Sie im linken Untermenü auf Benutzer erstellen. Das Popup erscheint - Geben Sie die Informationen ein und stellen Sie die folgenden Optionen ein.
- Klicken Sie auf Erstellen. Ein neuer Benutzer wurde nun in der aktuellen Domäne angelegt.
Geben Sie die folgenden Informationen in das Popup ein (fett gedruckt sind Pflichtfelder): - Name: Mindestens 2 Zeichen
- Nachname: mindestens 2 Zeichen
- E-mail
- Benutzergruppe
Diese Basisrollen können Sie dem Benutzer sofort zuordnen: - Report Editor
- Datenverwalter
| Tip |
|---|
Aktivieren Sie die Option "Benachrichtigung senden", um den neuen Benutzer per automatischer E-Mail über sein neues Konto in BellaDati zu informieren. |
Tutorial-Video| HTML |
|---|
<iframe width="560" height="315" src="https |
|
Importing users
 Image Removed
BellaDati offers bulk import from text (CSV) file. This is a fast way to create new users when you are migrating from an old BellaDati domain or another application and you already have the list of users.
- Click "Import users" in the left submenu. The popup appears.
- Select the text file to upload.
- Set encoding: UTF-8, Win-1250, Win-1252, ISO-8859-1 or Auto
- Optionally set roles: Report editor, Data manager
- Check the "Send notification" option will let the new users know about their new account in BellaDati via automatic e-mail.
The file structure:
| Code Block |
|---|
Name;Surname;Title before;Title after;Group;Email;
|
| Note |
|---|
- Name, surname and e-mail are mandatory.
- The e-mail will serve also as login name. The password will be generated randomly.
- When requested user group does not exist, it will be created during the import.
- The selected roles will be assigned to all users in the list. When no role has been selected, all users will have only the common BellaDati user role.
|
Tutorial video
...
...
embed/HkUOeDNdKZo" frameborder="0" allow="accelerometer; autoplay; encrypted-media; gyroscope; picture-in-picture" allowfullscreen></iframe> |
Nächste Schritte |
Next Steps
...