Page History
| Sv translation | |||||||||||||||||||||||||||||||||||||||||||||||||||||||
|---|---|---|---|---|---|---|---|---|---|---|---|---|---|---|---|---|---|---|---|---|---|---|---|---|---|---|---|---|---|---|---|---|---|---|---|---|---|---|---|---|---|---|---|---|---|---|---|---|---|---|---|---|---|---|---|
| |||||||||||||||||||||||||||||||||||||||||||||||||||||||
Data Collection module allows you to create and publish forms connected to BellaDati Data Sets. |
| Tip |
|---|
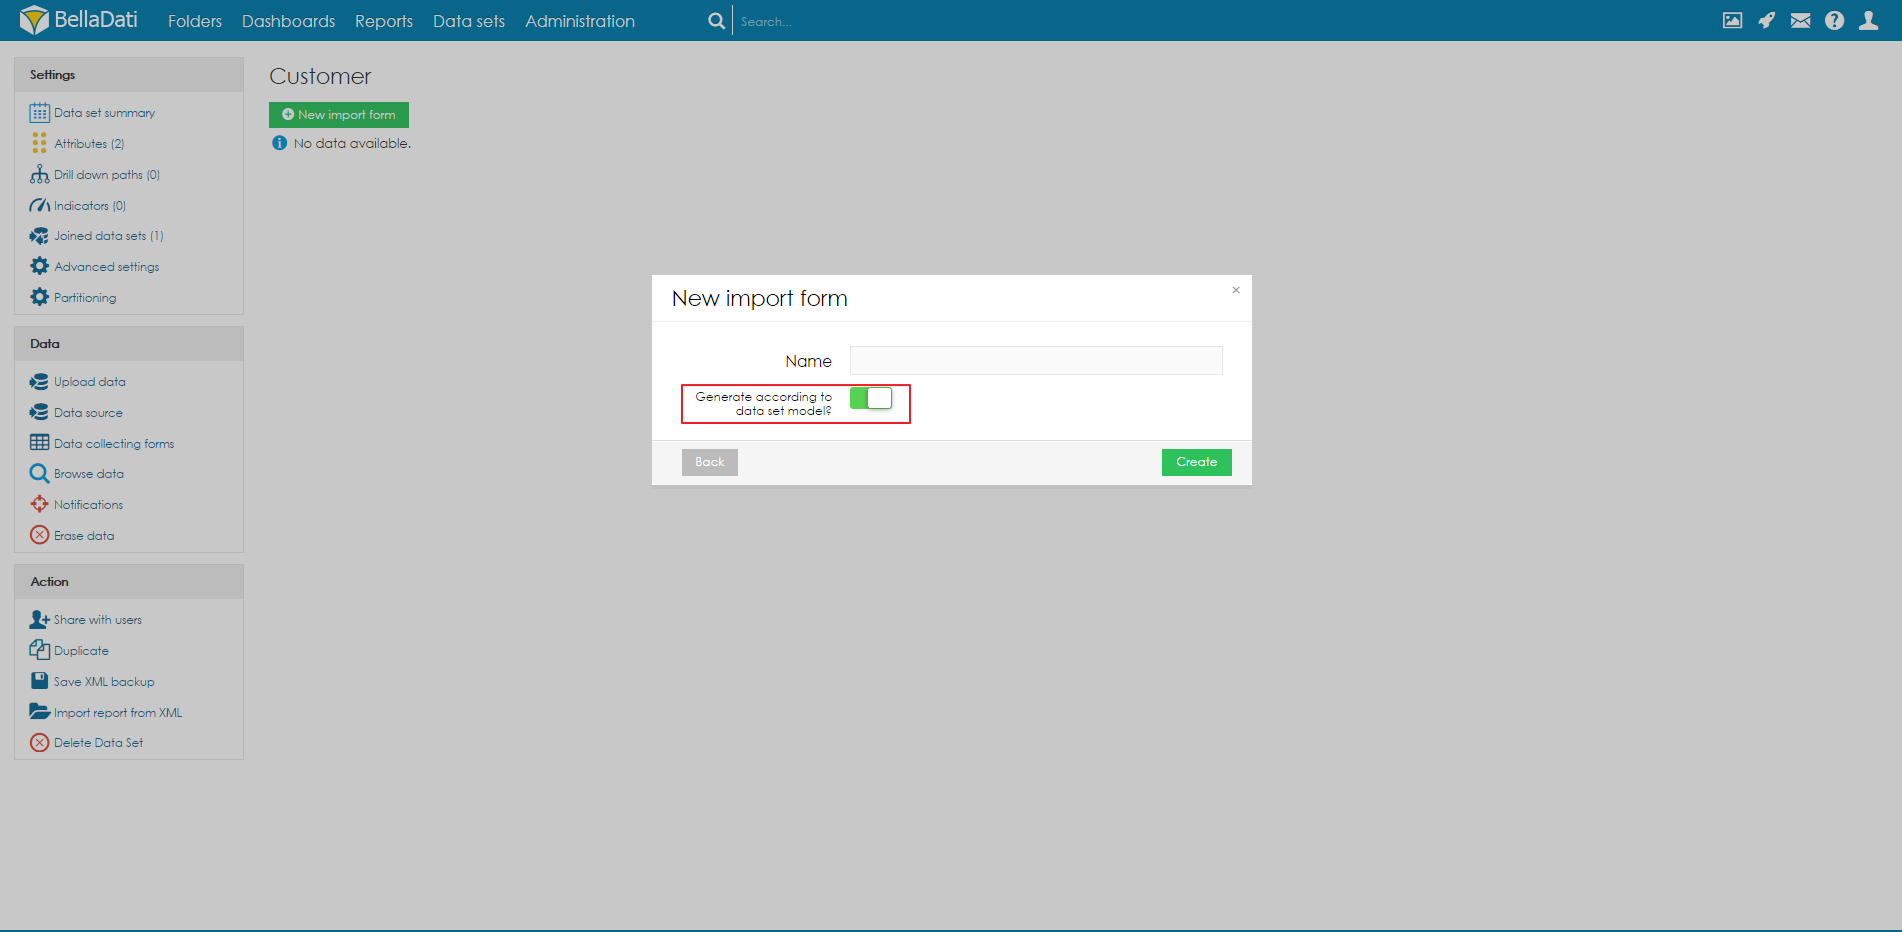
You can generate form based formbased on existing table existingtable structure. Check Generate according to data set structuremodel to have form prepared for you. |

Creating Form Elements
To create form element, provide its name, type and click Add button. BellaDati offers following input types:
- Date field
- Text Field - It can be maped also on datetime attribute and then it will store datetime value.
- Checkbox
- Select
- Username
- Timestamp
- Hidden - Creates hidden field, that can be handled using formula.
- Can be rendered as disabled instead of hidden using Render as disabled input
- Unique ID - Will insert new value or overwrite empty value with unique identifikator. This input is hidden.
- Text Area - Useful for multi-line or long text.
- File - Allows you to upload file to media gallery. ID of file is then stored in dataset.
- Radio - Allows to select only one of multiple predefined options.
- HTML - Allows you to create your own HTML code with JavaScript as an element of form.
- QR - You must allow browser to use your device camera. If QR code is presented to camera, it will be decoded and all data will be sent dataset, after submitting.
- Group of fields - Items created in a group are displayed as a single group horizontally, not vertically.
Data selector - Allows you to copy data from one dataset column to current dataset and set column. When value is avaiable in destination dataset, it is no longer offered to be transfered. Data will not be deleted from source dataset. When different drilldown for selected value is avaiable, value can be copied again. Data selector also contains search, for better orientation. Selecting values from source dataset is done using formula.
example:Code Block language groovy filter("L_USER is not Null"){allValuesTranslated('MULTISELECT_SOURCE','L_USER_ID')}
(Default values can be set for text, select boxes, and dates)
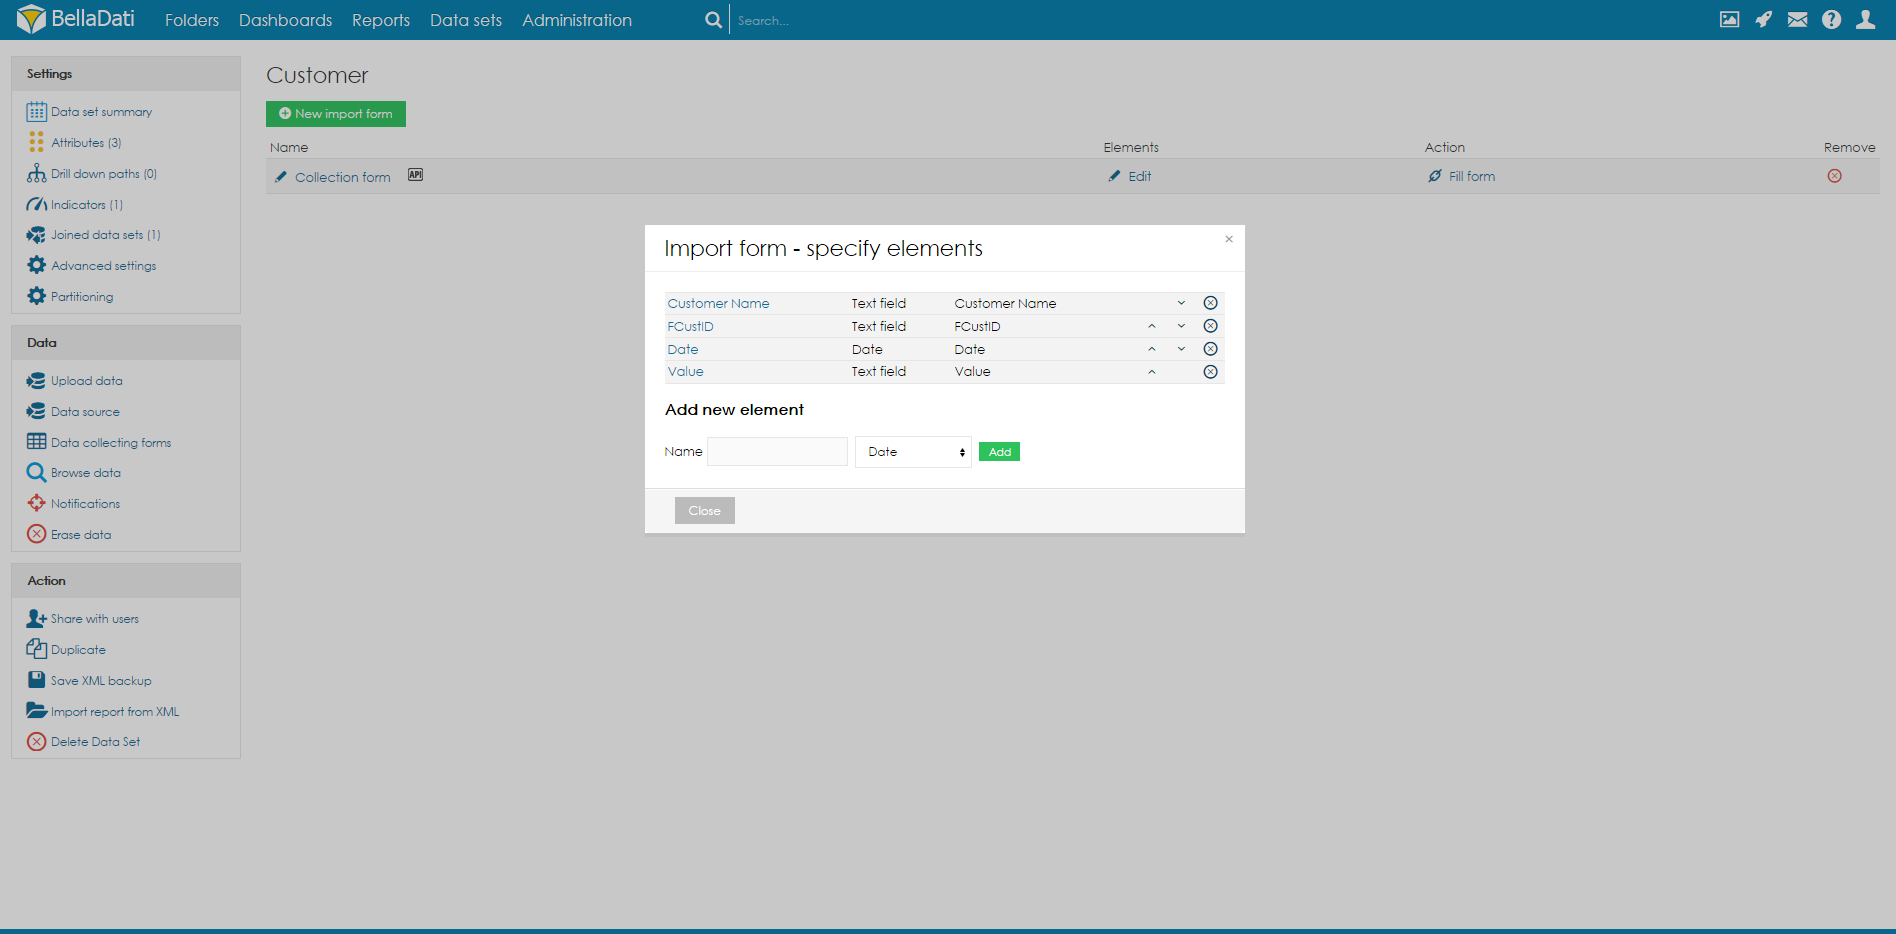

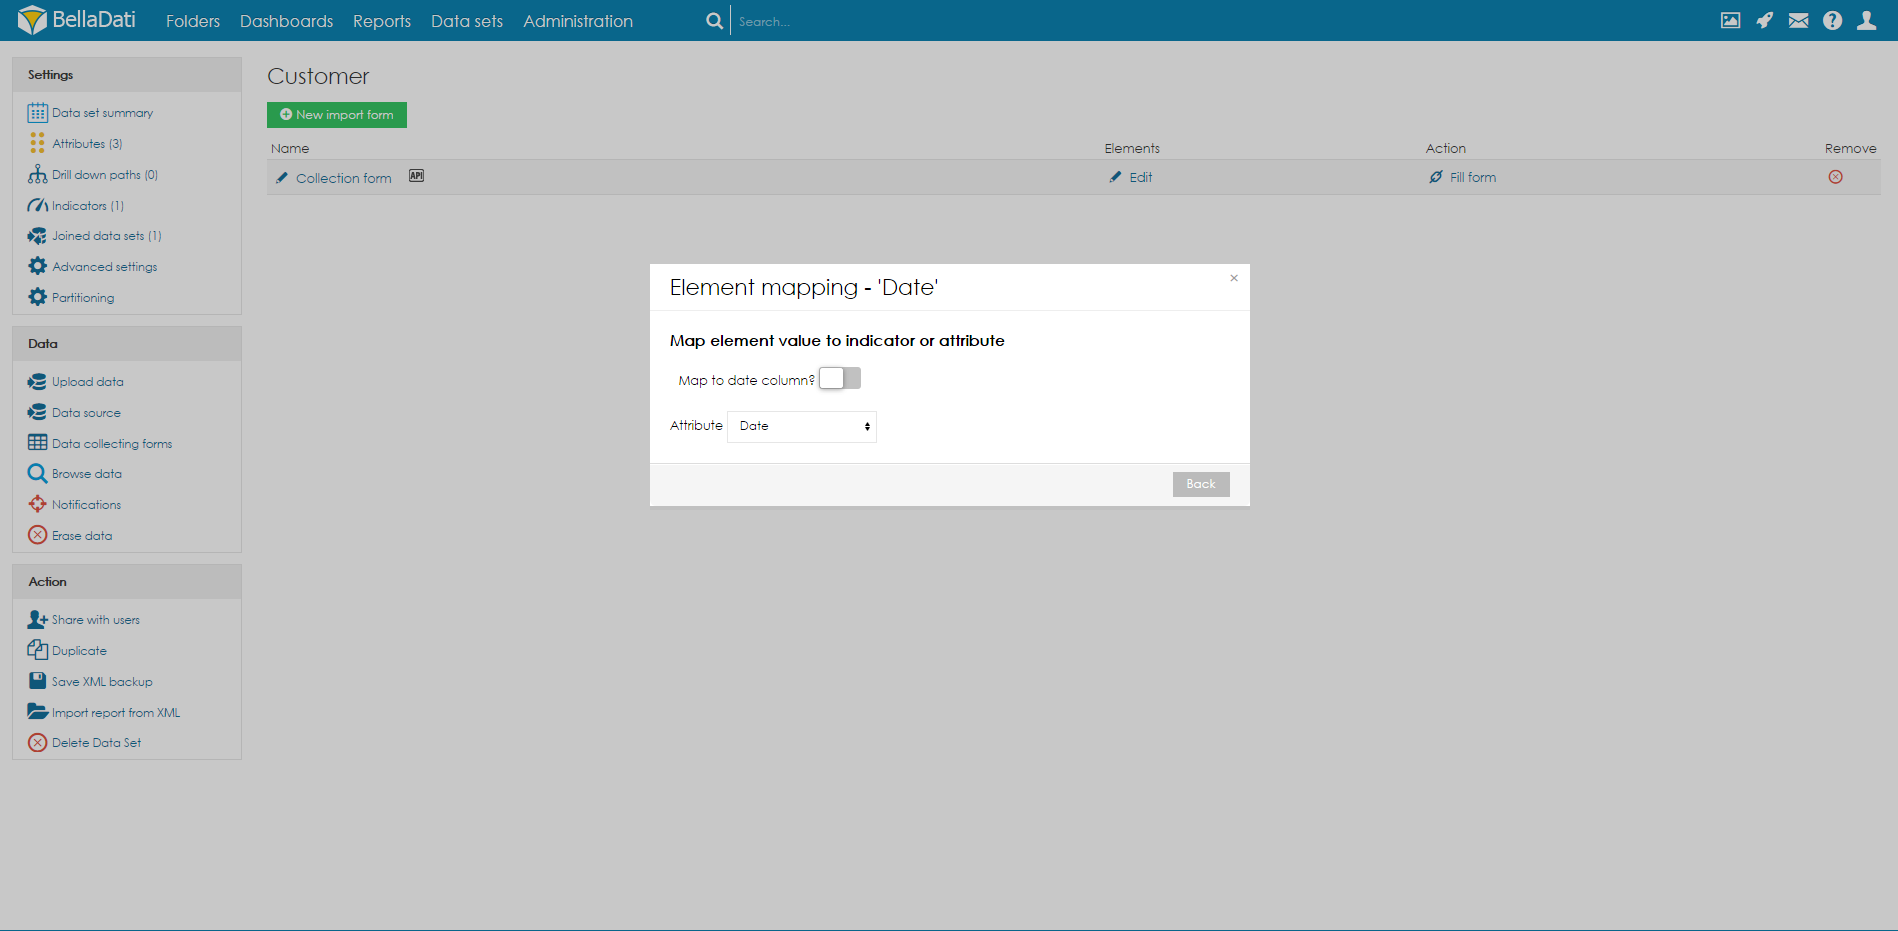
Mapping Elements to Data Set Columns
In order to map form element to data set column, click on the element name and select one of the Attributes or Indicators.
Endpoint URL - Executes endpoint after form submitting. If "ERROR;any text" is returned, validation will fail and text will be displayed
Store value to report variable - When activated, new input with Variable name will appear. Set name of variable from report. After form is submitted, value of element will be set to report variable
Required - Will set element as required.

If value for element will not be set when submitting, element will highlight red and form submit will not be executed.
Default value - If default value is set, this value will be set when form is loaded. Function can be also used (for example now())
Autosubmit form after selection - This functionality is useful when selecting value in one select box should invoke some operation. For example you can select month and according to selected month you can display using formula on second item how many days it has.
Format - For time element it is possible to specify format type. e.g. HH:00, HH:mm etc
General settings
To edit general settings, click on Name of your Form collection.
Save button label - Allows you to set any text for your save button. You can also do localization.
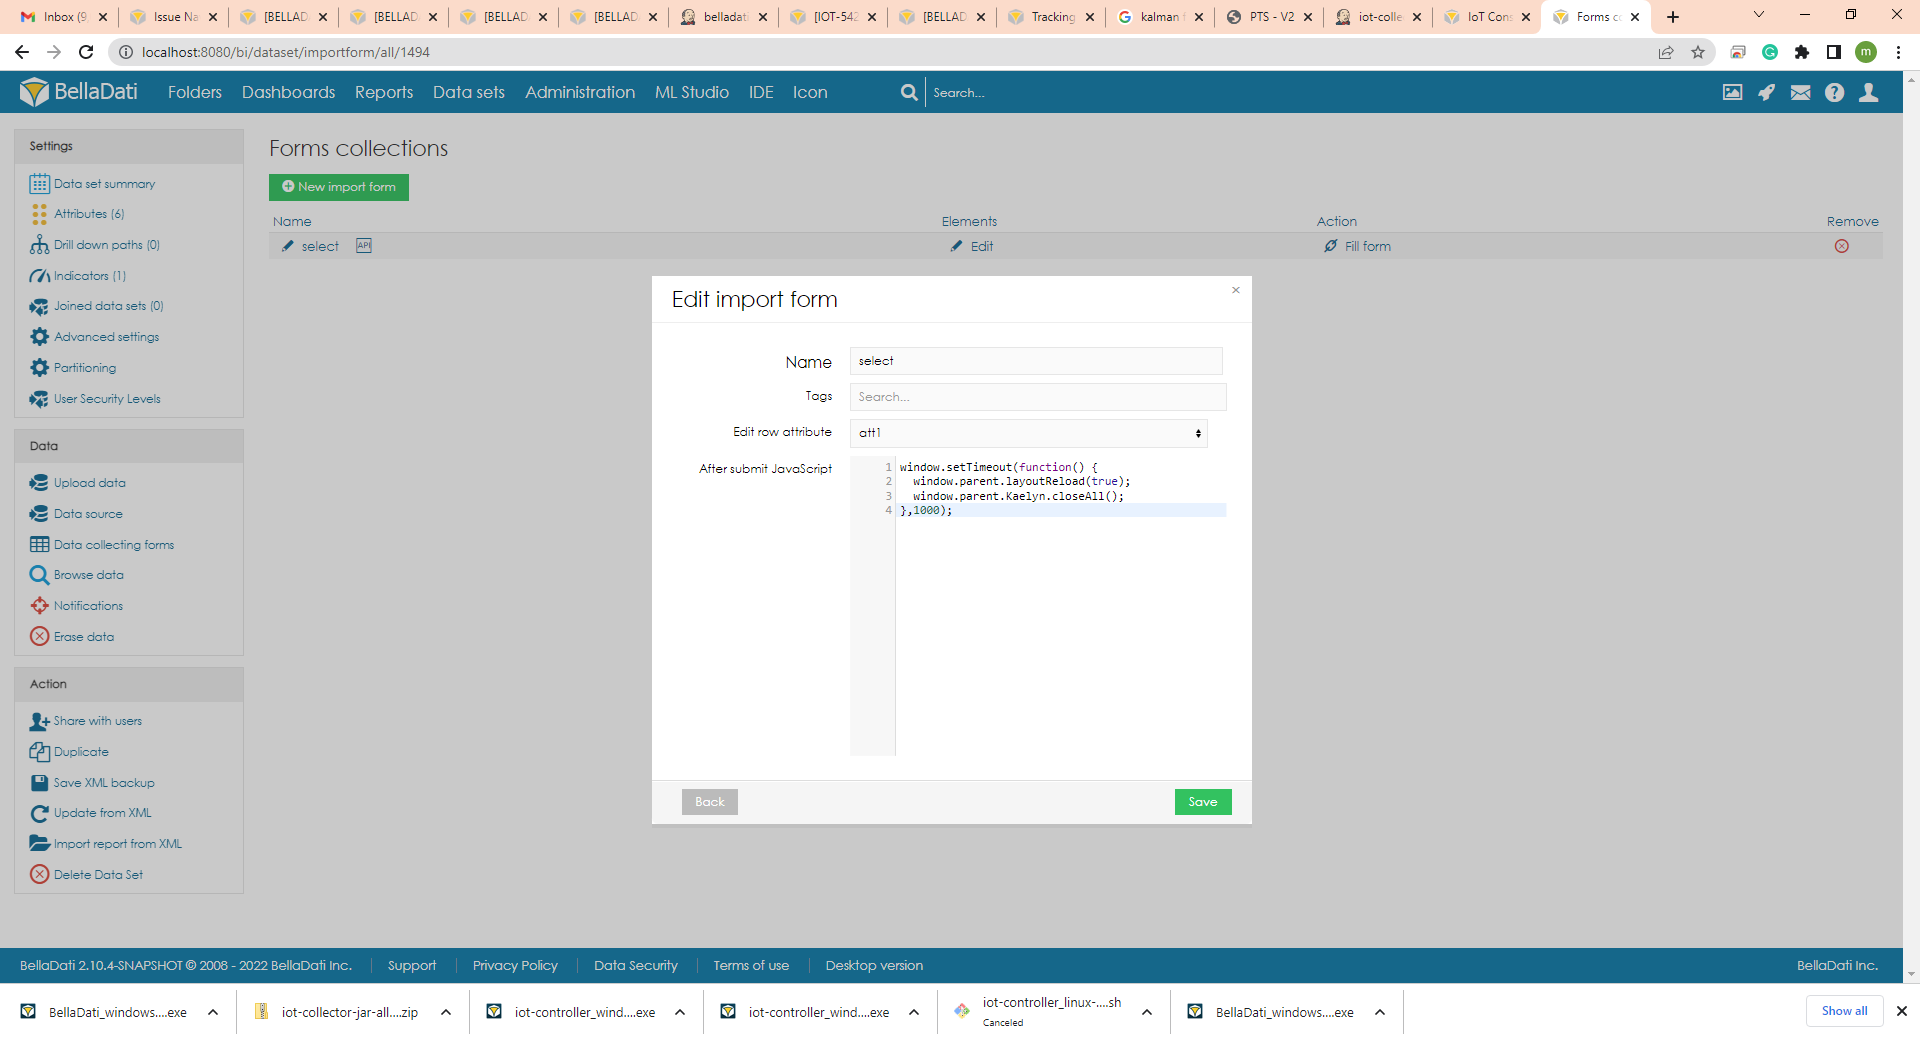
Edit row attribute - you can set the matching of attribute. According to match value row will be edited. Match only unique value attribute.
You can load our report containing Form with parameter http://localhost:8080/bi/report/detail/965?vr:rowUid=3. When Edit row attribute is set to any attribute, and this attribute contains record with value 3, this row will be edited.
After submit JavaScript - when form is submited this JavaScript will be executed. See example
| Code Block | ||
|---|---|---|
| ||
window.setTimeout(function() {
  window.parent.layoutReload(true);
  window.parent.Kaelyn.closeAll();
},1000); |
After submiting Form in pop-up, this pop-up will be closed, and report will be updated.
Formula can also be used here. See example
| Code Block | ||
|---|---|---|
| ||
var x = '{formula}filter("L_ATT2 in (\'A1\')") {return L_ATT3_FIRSTVALUE;}{formula}';
window.parent.open("http://localhost:8080/bi/report/detail/123?parameter2="+x); |
After submit formula - when form is submited this groovy formula will be executed. This is same analogy as After submit JavaScript
Here is an example of groovy formula reading and writing data to dataset.
When "ROW_UID" is present in the data, it does update
| Code Block | ||
|---|---|---|
| ||
def rows = readDataset(450, -1, filter).collect { row ->
    def r = [ROW_UID:row.rowId]
    r.putAll(row.getValues())
    r
} |
Hide form on success - This will display only success message and will hide all forms elements.
Success message - Success message can be edited. Can be set differently for any language.
Edit items formula
Select and Hidden item can use formula to dynamically load values. Only if Select does not have any default values set, formula can be used.
Here is an example of loading value from variable, filtering data in different dataset (FORMS_2) and using allValues function to retrieve all values from L_ATT2, where L_ATT1 is our selected variable.
| Code Block | ||
|---|---|---|
| ||
def cV = []
def val = @sel1
if (val=='' || val == null){val="A"}
filter("L_ATT1 IN ('"+val+"')") {
      cV=allValues('FORMS_2','L_ATT2')
}
return cV |
Publishing Form
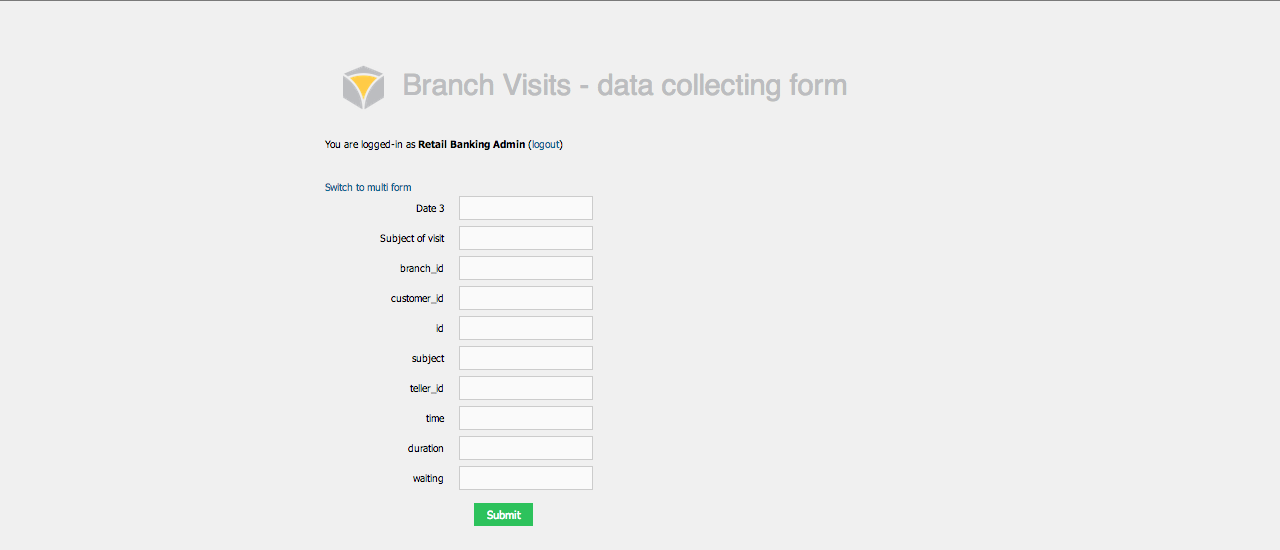
Click on Fill form from Data Collecting Forms list. BellaDati will open new window.
| Tip |
|---|
Distribute URL of this form to all users responsible for collecting data. |
| Note |
|---|
Field with type username is not visible. Username of logged in user will be recorded. |
| Info | ||||||||||||
|---|---|---|---|---|---|---|---|---|---|---|---|---|
Default formats for date/time columns:
|
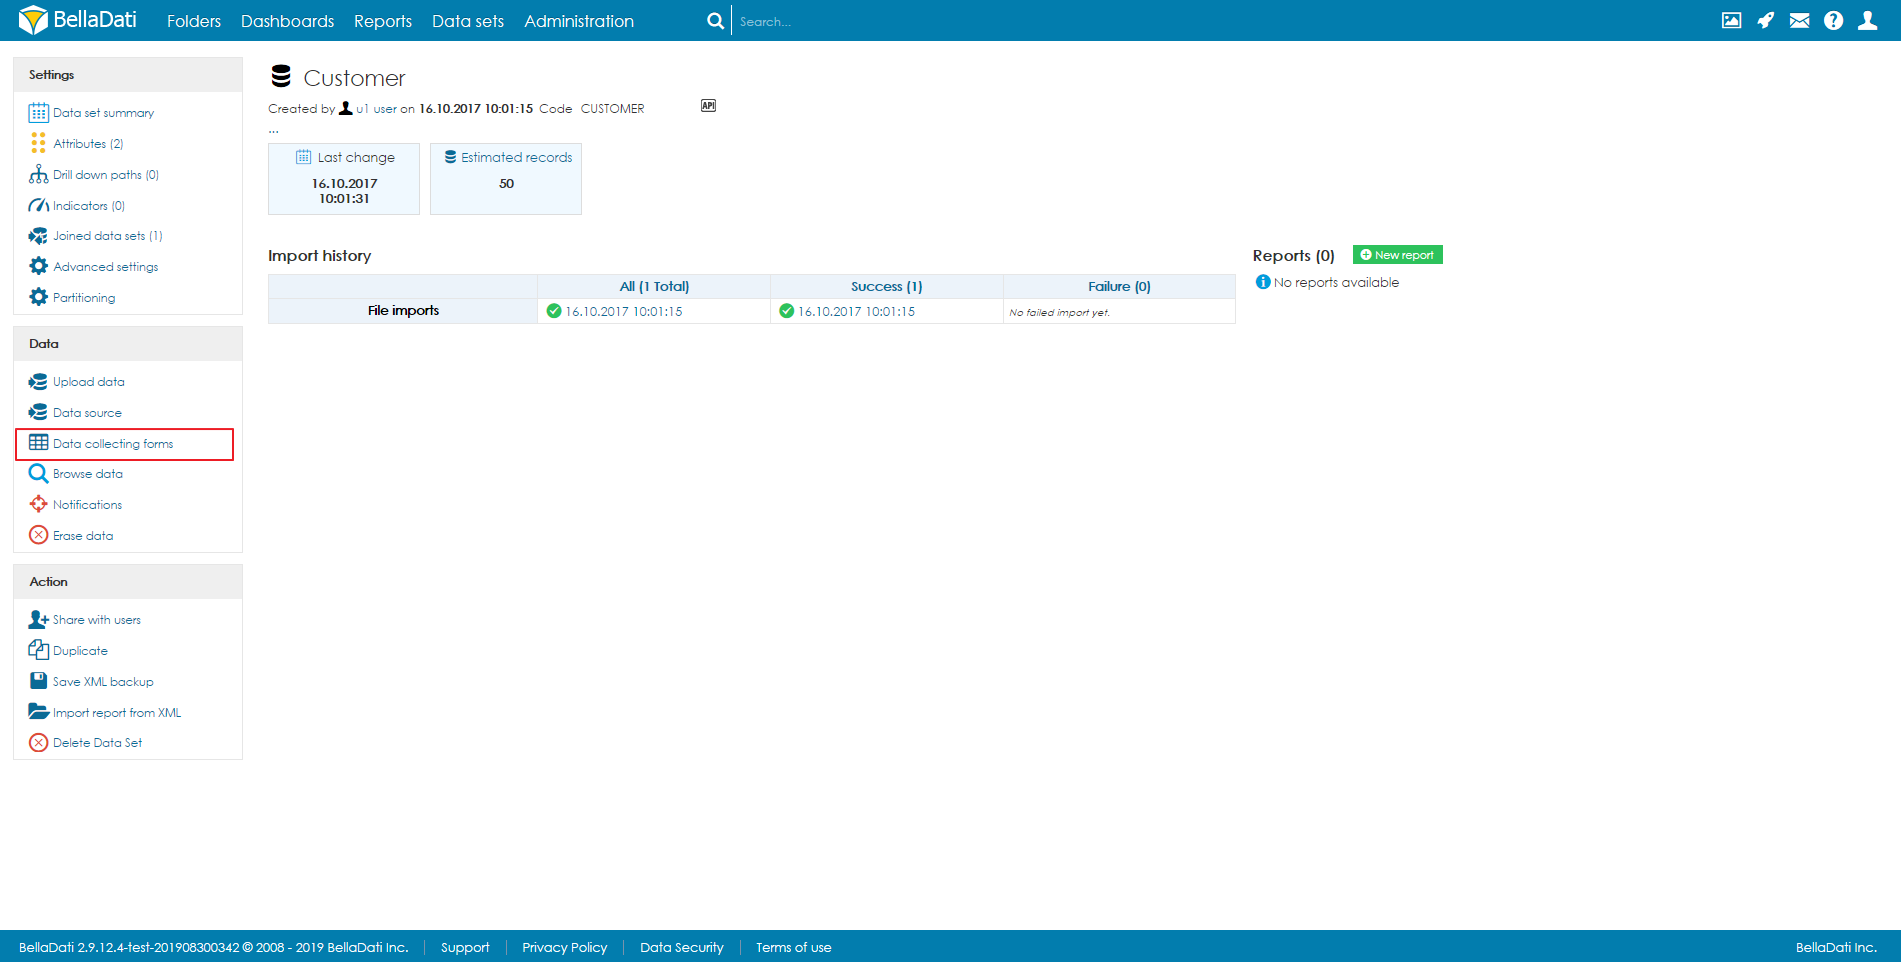
Managing Forms
You can create multiple forms. Click on Create new New import form to add new one.
You can modify form anytime by clicking on its name.
Watch VIDEO TUTORIAL
| Widget Connector | |
|---|---|
|
|
|
Visit BellaDati YouTube channel for more tutorials
| Sv translation | |||||||||
|---|---|---|---|---|---|---|---|---|---|
| |||||||||
Data Collection module allows you to create and publish forms connected to BellaDati Data Sets. |
| Tip |
|---|
You can generate form based on existing table structure. Check Generate according data set structure to have form prepared for you. |
Creating Form Elements
To create form element, provide its name, type and click Add button. BellaDati offers following input types:
- Date field
- Text Field
- Checkbox
- Select
- Username
Mapping Elements to Data Set Columns
In order to map form element to data set column, click on the element name and select one of theAttributes or Indicators.
Publishing Form
Click on Fill form from Data Collecting Forms list. BellaDati will open new window.
| Tip |
|---|
Distribute URL of this form to all users responsible for collecting data. |
| Note |
|---|
Field with type username is not visible. Username of logged in user will be recorded. |
Managing Forms
You can create multiple forms. Click on Create new form to add new one.
You can modify form anytime by clicking on its name.
Next Steps
| List siblings |
|---|
| Sv translation | ||||||||||||||||||||||||||||||||||||||||||||||||||||
|---|---|---|---|---|---|---|---|---|---|---|---|---|---|---|---|---|---|---|---|---|---|---|---|---|---|---|---|---|---|---|---|---|---|---|---|---|---|---|---|---|---|---|---|---|---|---|---|---|---|---|---|---|
| ||||||||||||||||||||||||||||||||||||||||||||||||||||
データ収集モジュールではモジュールでは、BellaDatiデータセットに接続されたフォームを作成して公開することができます。  |
| Tip |
|---|
既存テーブルの構成に基づく、フォームを作成できます。データセット構造に従って生成にチェックを入れてフォームを準備します。 |
フォームの要素の作成
フォーム要素を作成するには、名前、タイプを提供し、追加ボタンをクリックします。BellaDatiは以下のインプットタイプを提供します。
既存テーブルの構成に基づいてフォームを生成できます。データセットモデルに従って生成しますか?にチェックを入れて、フォームを準備します。 |
フォーム要素の作成
フォーム要素を作成するには、名前、タイプを入力し、追加するボタンをクリックします。BellaDatiは以下の入力タイプを提供します:
- 日付
- 日付フィールド
- テキストフィールド
- チェックボックス
- グループ表示 - グループ内に作成された項目は縦ではなく、横に一つのグループとして表示されます
- 選択
- ユーザー名
データセットカラムへの要素のマッピング
フォーム要素をデータセットカラムにマップするには、要素名をクリックし、属性またはインジケータのいずれかを選択します。
フォームの公開
データ収集フォームからフォーム記入のリストをクリックします。BellaDatiが新しいウィンドウを開きます。
| Tip |
|---|
データの収集を担当するすべてのユーザーにこのフォームのURLを配布します。 |
| Note |
|---|
usernameタイプがあるフィールドは表示されません。ログインしたユーザーのユーザー名が記録されます。 |
- タイムスタンプ
- 隠す - 数式で処理できる隠しフィールドを作成します。
- ユニークID - 新しい値を挿入するか、または空の値を一意の識別子で上書きします。この入力は非表示です。
- テキストエリア - 複数行のテキストや長いテキストに有効です。
- ファイル - メディアギャラリーにファイルをアップロードすることができます。ファイルのIDは、データセットに保存されます。
- Radio - あらかじめ定義された複数の選択肢の中から1つだけを選択することができます。
- HTML - フォームの要素として、独自のHTMLコードとJavaScriptを作成することができます。
- QR - デバイスのカメラを使用するためにブラウザを許可する必要があります。QRコードがカメラに表示された場合、送信後にデコードされ、すべてのデータがデータセットとして送信されます。
- フィールドのグループ - グループ内で作成されたアイテムは、垂直ではなく水平に1つのグループとして表示されます。
データセレクター - 1つのデータセットの列からデータを現在のデータセットと設定することができます。目的のデータセットに値が存在する場合、それはもはや転送の対象とされません。元のデータセットからデータは削除されません。選択した値に対して異なるドリルダウンが可能な場合、値は再度コピーできます。データセレクターには検索も含まれており、より良い方向性を提供します。元のデータセットから値を選択するには、式を使用します。
例:Code Block language groovy filter("L_USER is not Null"){allValuesTranslated('MULTISELECT_SOURCE','L_USER_ID')}
(テキスト、セレクトボックス、日付に関してはデフォルト値が設定できます)
データセット列への要素のマッピング
フォーム要素をデータセット列にマップするには、要素名をクリックし、属性またはインジケータのいずれかを選択します。
エンドポイントURL - フォーム送信後にエンドポイントを実行します。ERROR;任意のテキスト "が返された場合、バリデーションは失敗し、テキストが表示されます。
レポート変数に値を保存 - 起動すると、変数名の新しい入力が表示されます。レポートから変数名を設定します。フォームが送信された後、要素の値は、レポート変数に設定されます。
必須項目 - 要素を必須として設定します。送信時に要素の値が設定されていない場合、要素は赤くハイライトされ、フォームの送信は実行されません。
デフォルト値 - デフォルト値が設定されている場合、この値はフォームがロードされたときに設定されます。関数も使用できます(例:now())
選択後にフォームを自動送信 - この機能は、1つのセレクトボックスで値を選択すると何らかの操作を呼び出す必要がある場合に便利です。たとえば、月を選択し、選択した月に基づいて、2番目のアイテム上で式を使用してその月が何日あるかを表示できます。
フォーマット - 時間要素に対してフォーマットタイプを指定することが可能です。例: HH:00、HH:mm など
一般的な設定
一般設定を編集するには、「フォームコレクションの名前」をクリックします。
保存ボタンラベル - 保存ボタンに任意のテキストを設定できます。ローカライズも可能です。
行属性の編集 - 属性のマッチングを設定することができます。マッチした値に応じて、行が編集されます。一意な値の属性にのみマッチします。
フォームを含むレポートをパラメータで読み込むことができます。 http://localhost:8080/bi/report/detail/965?vr:rowUid=3. "行の属性を編集する"が任意の属性に設定され、この属性に値3のレコードが含まれている場合、この行が編集されます。
入力後のJavaScript - フォームが送信されると、このJavaScriptが実行されます。例をご覧ください。
|
ポップアップでフォームを送信すると、このポップアップが閉じられ、レポートが更新されます。
ここでは、{formula}を用いて数式も使用できます。
例:
|
送信後数式 -フォームが送信されると、このgroovy数式が実行されます。これは「入力後のJavaScript」」と同じようなものです。
ここでは、groovy式でdatasetにデータを読み書きする例を紹介します。
データ内に "ROW_UID "が存在する場合、更新を行います。
|
成功時にフォームを非表示にする-これにより、成功メッセージのみが表示され、すべてのフォーム要素が非表示になります。
成功メッセージ - 成功メッセージは編集可能。どの言語でも異なる設定が可能です。
編集項目式
選択項目と非表示項目は、値を動的に読み込むために数式を使用することができます。Selectにデフォルト値が設定されていない場合のみ、数式を使用することができます。
ここでは、変数から値をロードし、別のデータセット(FORMS_2)でデータをフィルタリングし、allValues関数を使ってL_ATT2からすべての値を取得する例を示します(L_ATT1は選択した変数)。
|
フォームの公開
データ収集フォームリストから入力用フォームを使うをクリックします。BellaDatiが新しいウィンドウを開きます。
| Tip |
|---|
データの収集を担当するすべてのユーザーにこのフォームのURLを配布します。 |
| Note |
|---|
ユーザー名タイプのフィールドは表示されません。ログインしたユーザーのユーザー名が記録されます。 |
| Info | ||||||||||||
|---|---|---|---|---|---|---|---|---|---|---|---|---|
日付/時刻列のデフォルト形式:
| ||||||||||||
| Info | ||||||||||||
日にち/時間コラムのデフォルトフォーマット: Type | Format | Example |
|
フォームの管理
複数のフォームを作成できます。新しいフォーム追加のため、新フォーム作成複数のフォームを作成できます。新しいフォーム追加のために、新しいインポートフォームをクリックします。
名前をクリックすると、いつでもフォームを変更できます。
カスタムデータクリーニングフォーム
カスタムデータクリーニングフォームをBellaDatiで作成できます。詳細にはCustom Data Cleaning Formにご参考してください。

チュートリアルビデオ
| Widget Connector | |
|---|---|
|
|
|
| Info |
|---|
BellaDatiのビデオチュートリアルいくつかの事例を見るには、チュートリアルビデオセクションで使用されたケースを閲覧するためです。 |
次に
をご覧ください。 |
| Sv translation | ||||||||||||||||||||||||||||||
|---|---|---|---|---|---|---|---|---|---|---|---|---|---|---|---|---|---|---|---|---|---|---|---|---|---|---|---|---|---|---|
| ||||||||||||||||||||||||||||||
Mit dem Datenerfassungsmodul können Sie Formulare erstellen und veröffentlichen, die mit BellaDati-Datensätzen verbunden sind. |
| Tip |
|---|
| Sie können ein Formular basierend auf der vorhandenen Tabellenstruktur generieren. Aktivieren Sie das Kontrollkästchen Generieren Sie die entsprechende Datasetstruktur, damit das Formular für Sie vorbereitet wird. |
Formularelemente erstellen
Um ein Formularelement zu erstellen, geben Sie seinen Namen und Typ ein und klicken Sie auf die Schaltfläche Hinzufügen. BellaDati bietet folgende Eingabetypen:
- Datumsfeld
- Textfeld
- Ankreuzfeld
- Wählen
- Nutzername
Elemente den Datasetspalten zuordnen
Um ein Formularelement einer Datasetspalte zuzuordnen, klicken Sie auf den Elementnamen und wählen Sie eines der Attribute oder Indikatoren aus.
Anmeldeformular
Klicken Sie in der Liste der Datenerfassungsformulare auf Formular ausfüllen. BellaDati öffnet ein neues Fenster.
| Tip |
|---|
| Verteilen Sie die URL dieses Formulars an alle Benutzer, die für die Datenerhebung verantwortlich sind. |
| Note |
|---|
Feld mit dem Typ Benutzername ist nicht sichtbar. Der Benutzername des angemeldeten Benutzers wird aufgezeichnet. |
| Info | ||||||||||||
|---|---|---|---|---|---|---|---|---|---|---|---|---|
Default formats for date/time columns:
|
Formulare verwalten
Sie können mehrere Formulare erstellen. Klicken Sie auf Neues Formular erstellen, um ein neues hinzuzufügen.
Sie können das Formular jederzeit ändern, indem Sie auf den Namen klicken.
Formular Benutzerdefinierte Datenreinigung
Sie können auch benutzerdefinierte Datenbereinigungsformulare in BellaDati erstellen. Weitere Informationen finden Sie im benutzerdefinierten Datenbereinigungsformular .
Schauen Sie sich das VIDEO TUTORIAL an
| HTML |
|---|
<iframe width="560" height="315" src=" |
https://www.youtube.com/embed/ |
aX8SO5BT_jo" frameborder="0" allow="accelerometer; autoplay; encrypted-media; gyroscope; picture-in-picture" allowfullscreen></iframe> |
| Info |
|---|
Um einige Anwendungsfälle zu sehen, besuchen Sie unsere Video-Tutorials. |
Nächste schritte
Overview
Content Tools