This page will show you step by step how to install BellaDati on 64-bit Linux using BellaDati linux installer. The description uses an example with BellaDati 2.9.20 version but the process is the same for BellaDati 2.10+ versions running over Payara a.s. with java 11.
Introduction
BellaDati platform is complex of
- Java application BellaDati (java 8, starting BellaDati version 2.10 java 11)
- Aplication server (GlassFish server , Payara server (starting Belladati 2.10 version) )
- Database Engine (PostgreSQL 10,(PostgreSQL 12 starting BellaDati 2.10) , MSSQL)
The BellaDati linux installer file delivers / installs JRE (java run time environment ), Application server and BellaDati Java application belladati.war . Unlike of windows installer it does not contain any SQL database engine data. The SQL engine is required to install before the script is applied.
...................................................
BellaDati 2.10 java version
openjdk version "11.0.2" 2019-01-15
OpenJDK Runtime Environment 18.9 (build 11.0.2+9)
OpenJDK 64-Bit Server VM 18.9 (build 11.0.2+9, mixed mode)
BellaDati 2.10 application server
Version = Payara Server 5.2021.4 #badassfish (build 740)
or ( higher BellaDati releases )
Version = Payara Server 5.2022.5 #badassfish (build 492)
Before You Begin
Please read the following important notes before you begin installing BellaDati:
- You need to have successfully downloaded the BellaDati Linux installer from the BellaDati website.
see https://my.belladati.com/mybelladati/product/downloaditemarchive/1
- Check that your machine meets (at least) the minimal system requirements.
take into account Operating System requirements too
minimal hw is 4 vCPU, 8 GB ram and 30 GB storage
it is recommended to use 8 vCPU ,16 GB ram and 50 GB storage if not only BellaDati but also PostgtreSQL engine and IoT controller are intended to share the same server
( the base heapspace requirements for IoT is 4 GB, PostgreSQL also require several GB ram to use)
- Install database engine PostgreSQL for linux - see: https://www.postgresql.org
e.g. https://www.postgresql.org/download/linux/ubuntu/ ( installation on Ubuntu )
PostgreSQL 12 is recommended for BellaDati 2.10+
- Set up PostgreSQL Database - see Setting up the PostgreSQL Database
e.g. for PostgreSQL most important are pg_hba.conf and postgresql.conf files
remember host identification (IP, DNS), dbs engine port , database name, username, password
- Check that default ports reserved for BellaDati (4848, 8080, 8181, 443) are available and not used by any other applications.
port for Database engine is required as well ( e.g. 5432)
- (Ubuntu only) Check the libfontconfig1 is installed (required for map exports). If not, install using apt-get install libfontconfig1
- (Red Hat distributions) Make sure, that your system contains FreeType2 package. If not, you can try to install it by commad yum install freetype. Here is workflow how to install it without internet also.
on pc with internet:

sudo su
yum update

yum install yum-utils

mkdir bzip2
cd bzip2
yumdownloader --resolve bzip2
cd ..

mkdir libpng
cd libpng
yumdownloader --resolve libpng
cd..

mkdir zlib
cd zlib
yumdownloader --resolve zlib
cd ..

mkdir libicu
cd libicu
yumdownloader --resolve libicu
cd ..

mkdir pg12
cd pg12
yumdownloader --resolve postgresql12
cd ..

mkdir freetype
cd freetype
yumdownloader --resolve freetype
curl http://www.oss4aix.org/download/RPMS/freetype2/freetype2-2.8.1-1.aix5.1.ppc.rpm --output freetype2-2.8.1-1.aix5.1.ppc.rpm
cd ..

get belladati installer
move data to PC without internet


ON PC without internet
edit and set enabled=0
/etc/yum/pluginconf.d/subscription-manager.conf (I used vi, insert to edit, :wq to write and quit)

go to each folder and execute this command. Do freetype last
sudo yum --disablerepo=* localinstall *.rpm

for freetype2 use this command
rpm -Uvh freetype2-2.8.1-1.aix5.1.ppc.rpm

before installing pg12 try the first command with disabling module, if timeouted, continue with other commands
sudo dnf -qy module disable postgresql
sudo yum --disablerepo=* localinstall postgresql12-libs-12.16-1PGDG.rhel8.x86_64.rpm
sudo yum --disablerepo=* localinstall postgresql12-12.16-1PGDG.rhel8.x86_64.rpm
sudo yum --disablerepo=* localinstall postgresql12-server-12.16-1PGDG.rhel8.x86_64.rpm

initiate db and activate db
sudo /usr/pgsql-12/bin/postgresql-12-setup initdb
sudo systemctl enable postgresql-12
sudo systemctl start postgresql-12
To run installer (root):
- Please make sure the installer has execute privileges. You can use following command to add execute rights:
chmod +x BellaDati_linux_x64_x_y_z.sh
- Execute following command (you can use argument -c if you want to run installer in console mode):
sudo ./BellaDati_linux_x64_x_y_z.sh
1. Starting & checking host parameters
The script will check your machine against the minimal system requirements.
Upgrade to a higher-performance machine in case your configuration does not meet the criteria, to avoid experiencing a decreased performance of BellaDati.
Start installation : ./Belladati_linux-x64_X_Y_Z.sh
example: the machine does not meet minimal requirements and it is recommended to change computer configuration :
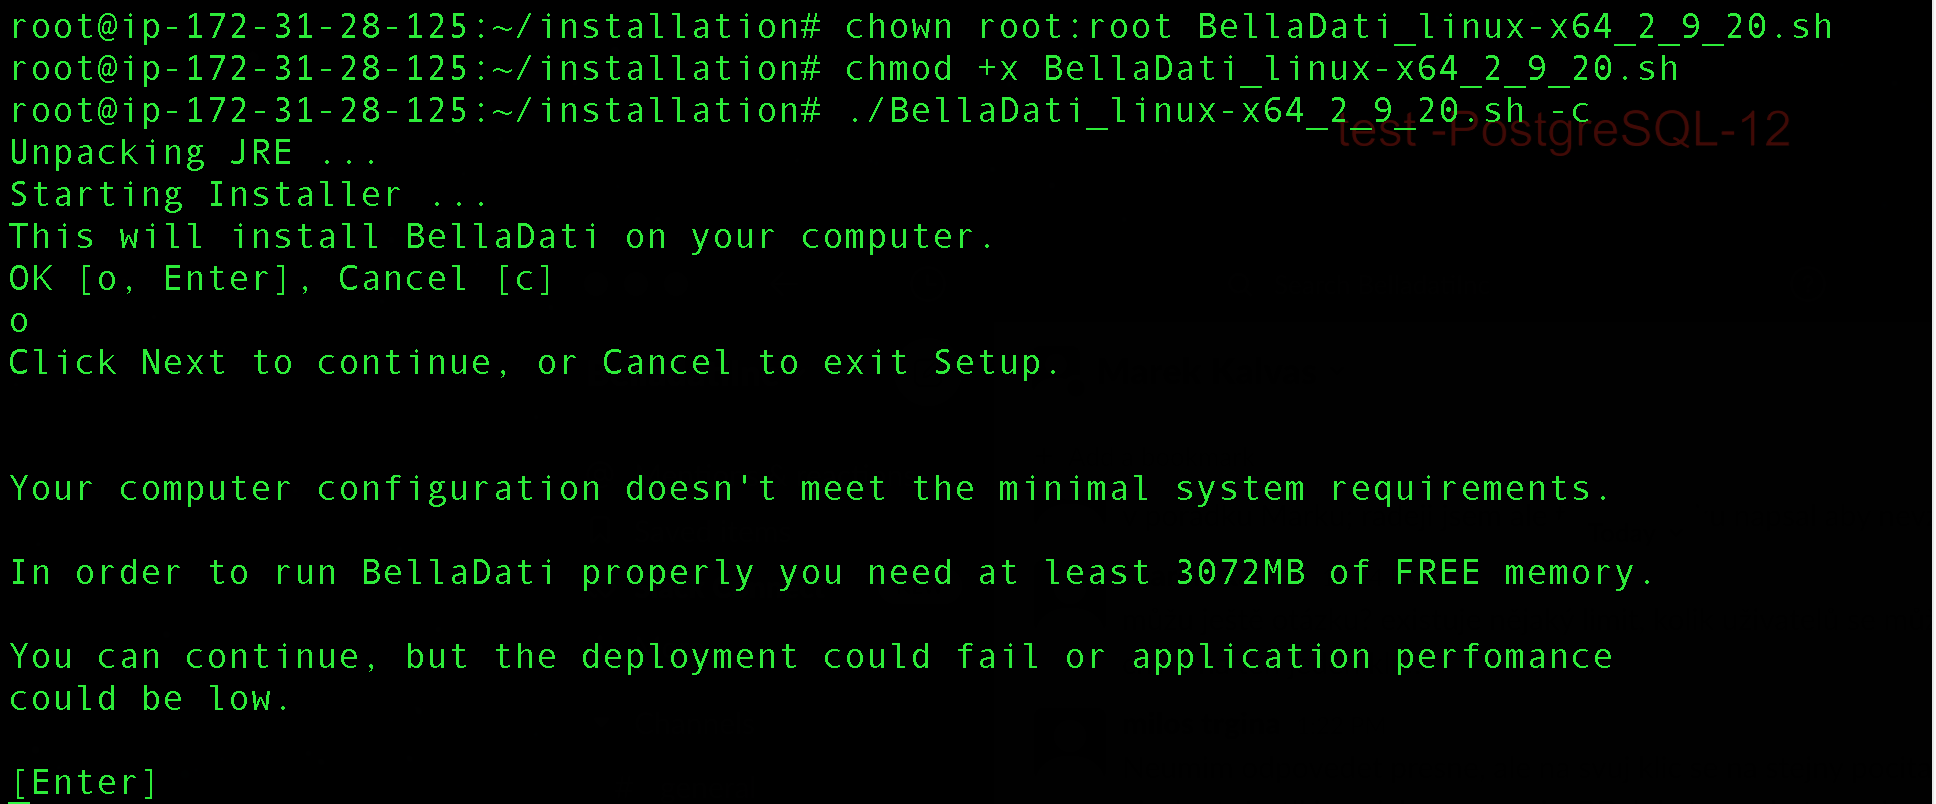
The host machine configuration has been changed and the installation process started again;
2. License Terms
The new machine meets minimal requirements.
Start installation and read and Accept the license agreement.
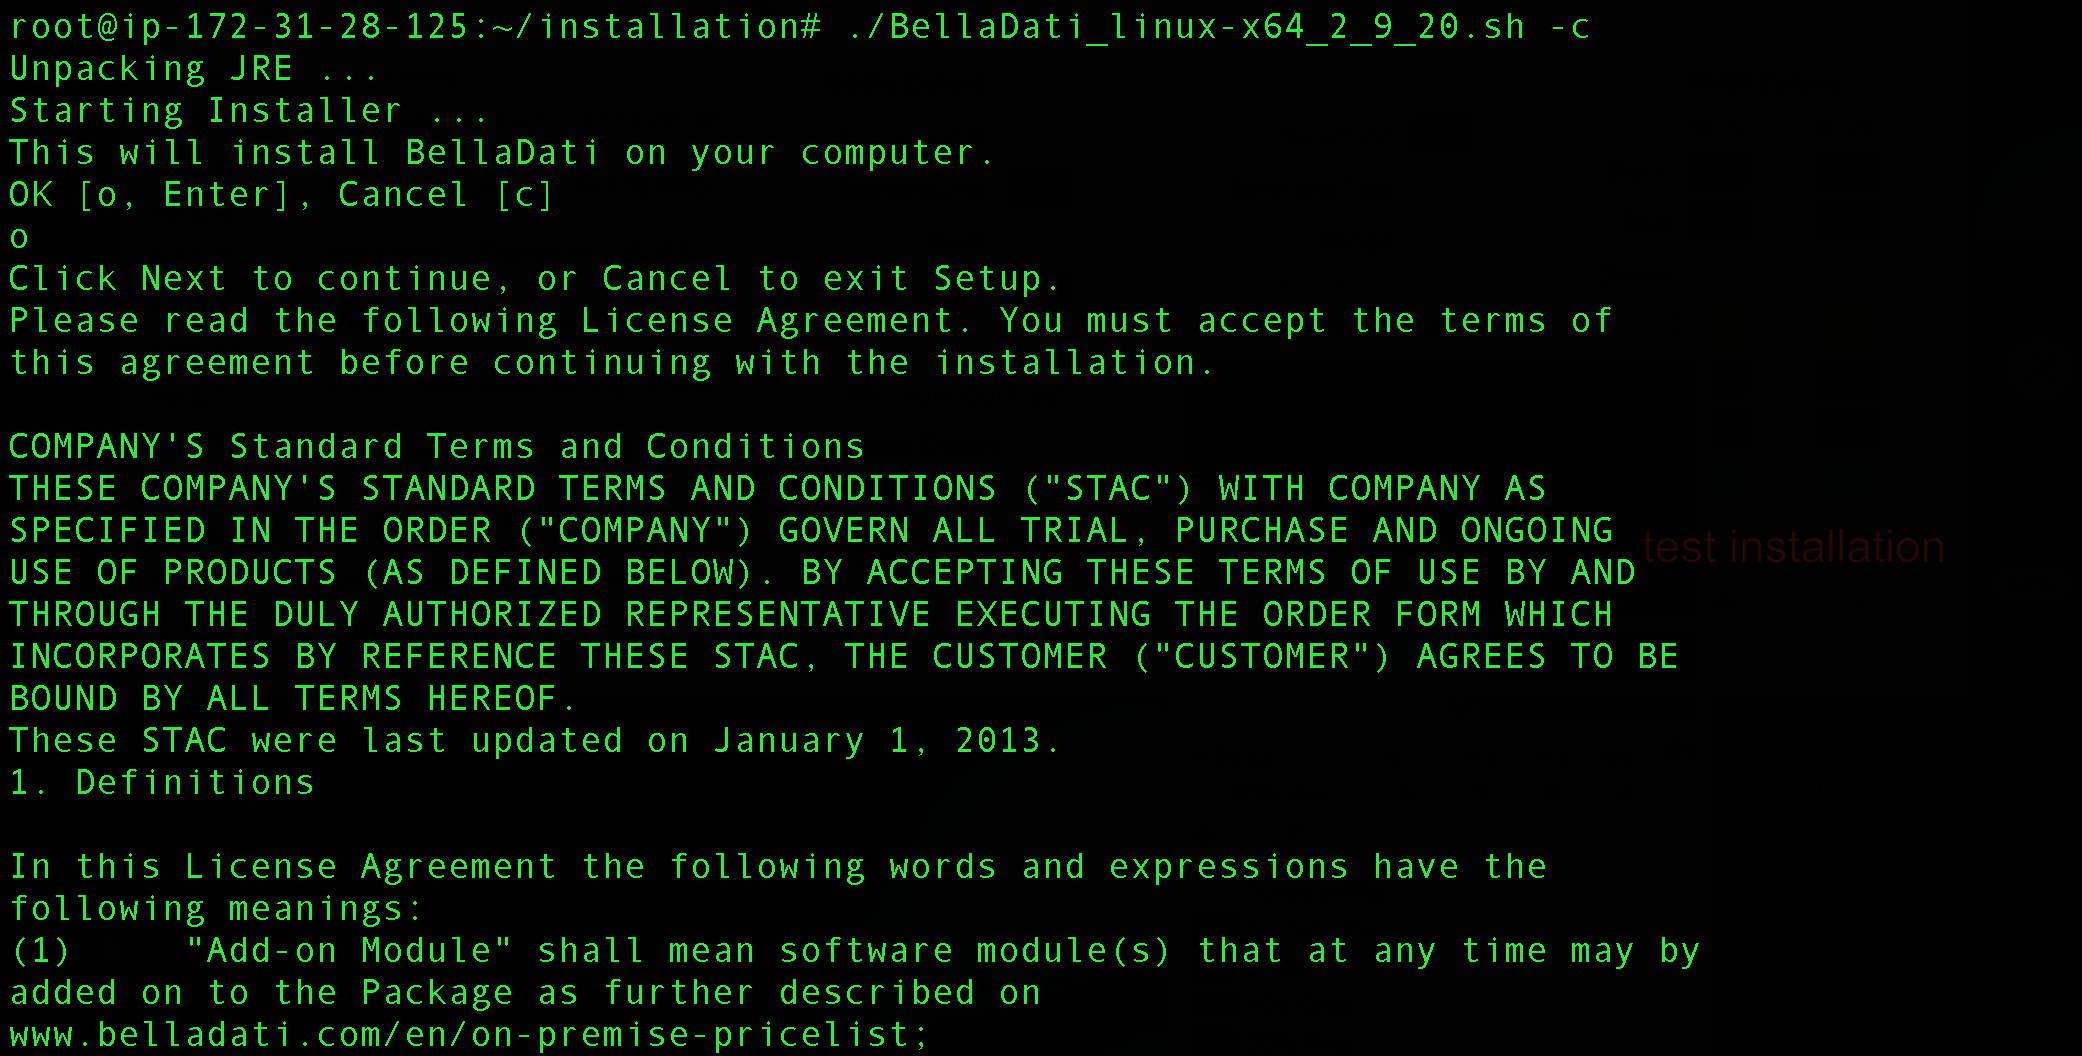
Continue up to license agreement acceptation.
3. Select Destination Directory
License agreement is accepted and process continue to installation directory selection :
destination directory
By default, BellaDati is installed into a predefined installation directory. Insert different folder if you want to modify these settings.
BellaDati installation script will check your free disk capacity to ensure enough space is available.

4. Database Setup
Linux installer does not install database for BellaDati, and therefore a PostgreSQL or MSSQL database has to be installed and configured manually.
Please see our documentation for instructions how to accomplish this step.
This example uses running PostgreSQL dbs engine available on separate machine :
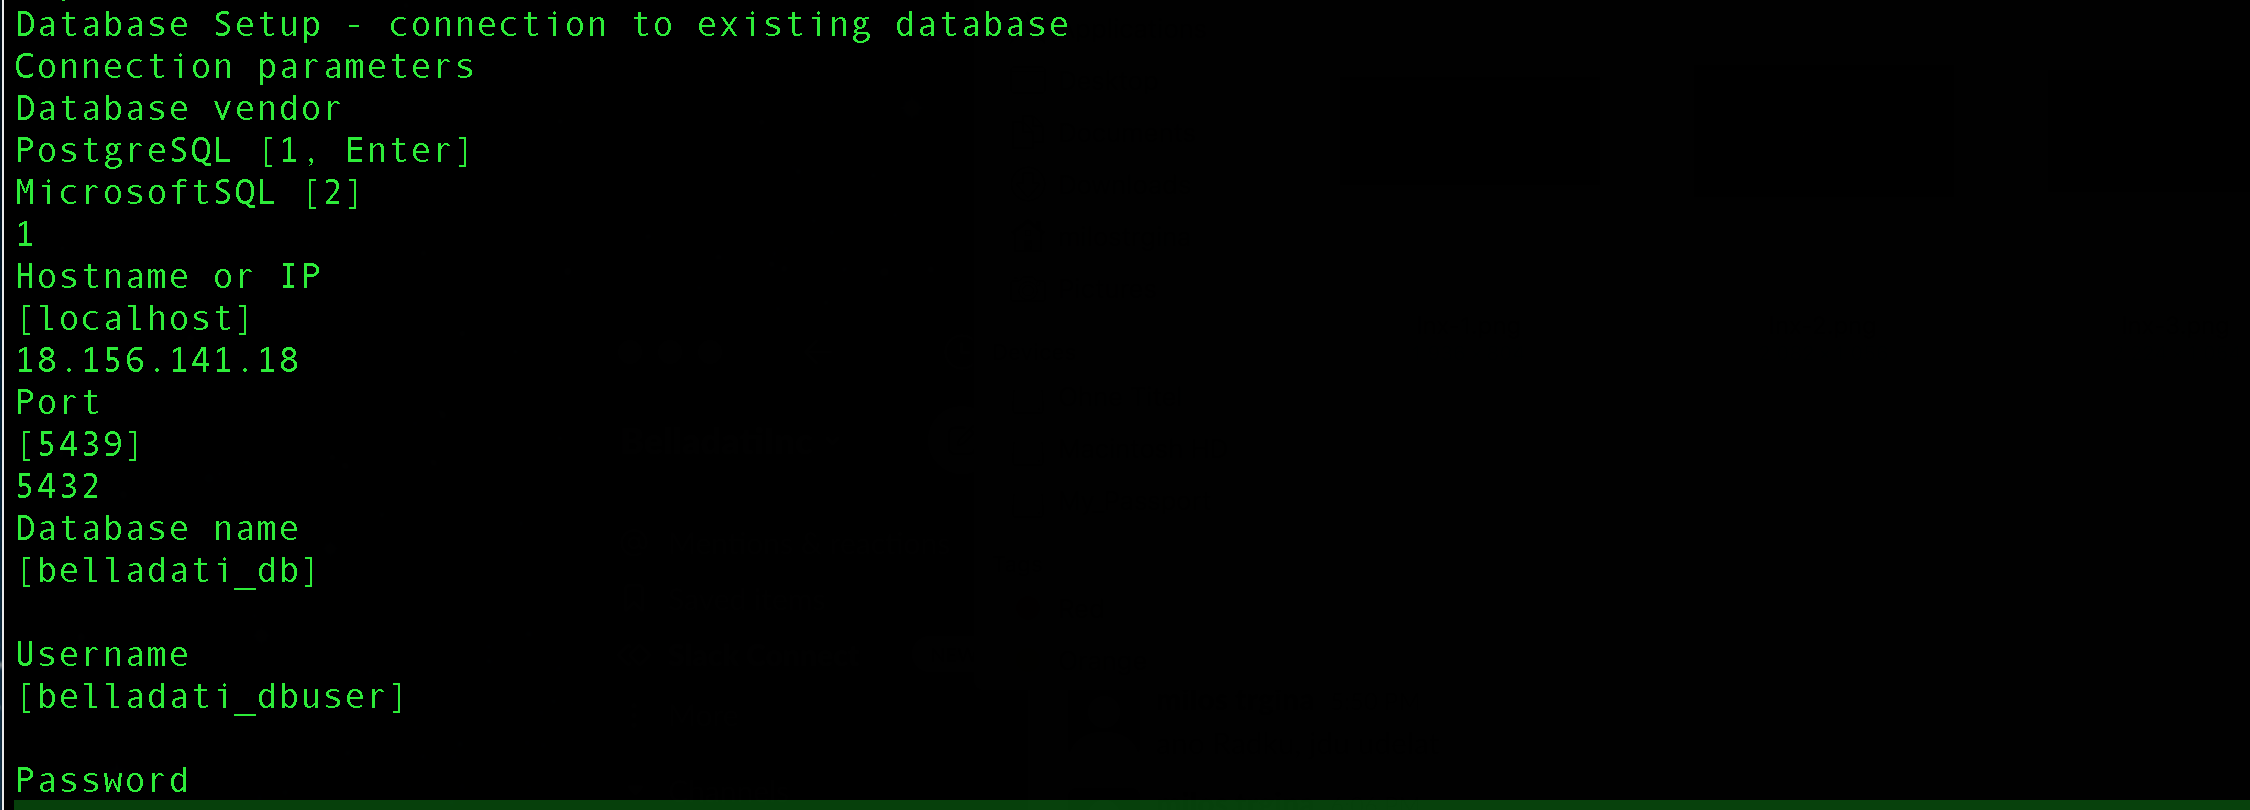
5. Connecting to an Existing Database
Specify the following connection parameters relating to running database engine/ database:
- Hostname or IP
- Port
- Database name
- Username
- Password
The installer process checks connectivity to the dbs environment...
6. Application Server Parameters
Continue and set up parameters needed for application server.
Approve or edit the following default settings:
- Port. Make sure this port is not being used by other applications or services.
- Xmx
- Maximum Pool Size
- Validate at most once in
- HTTP Thread Pool Max Size
- Thread Pool 1 Max Size
parameters
Port host IP:port ; Xmx (-Xmx) JavaVirtualMachine heap space size; Maximum Pool Size (-Djdbc.pool.maxActive) maximum number of connections ;
Please see our documentation for more details. Leave the default values if you are unsure about the configuration.
The parameters can be modified later after installation completed by tools available in application server GlassFish (or Payara used with BellaDati 2.10... )
e.g. CL commands asadmin... or GUI application server console.
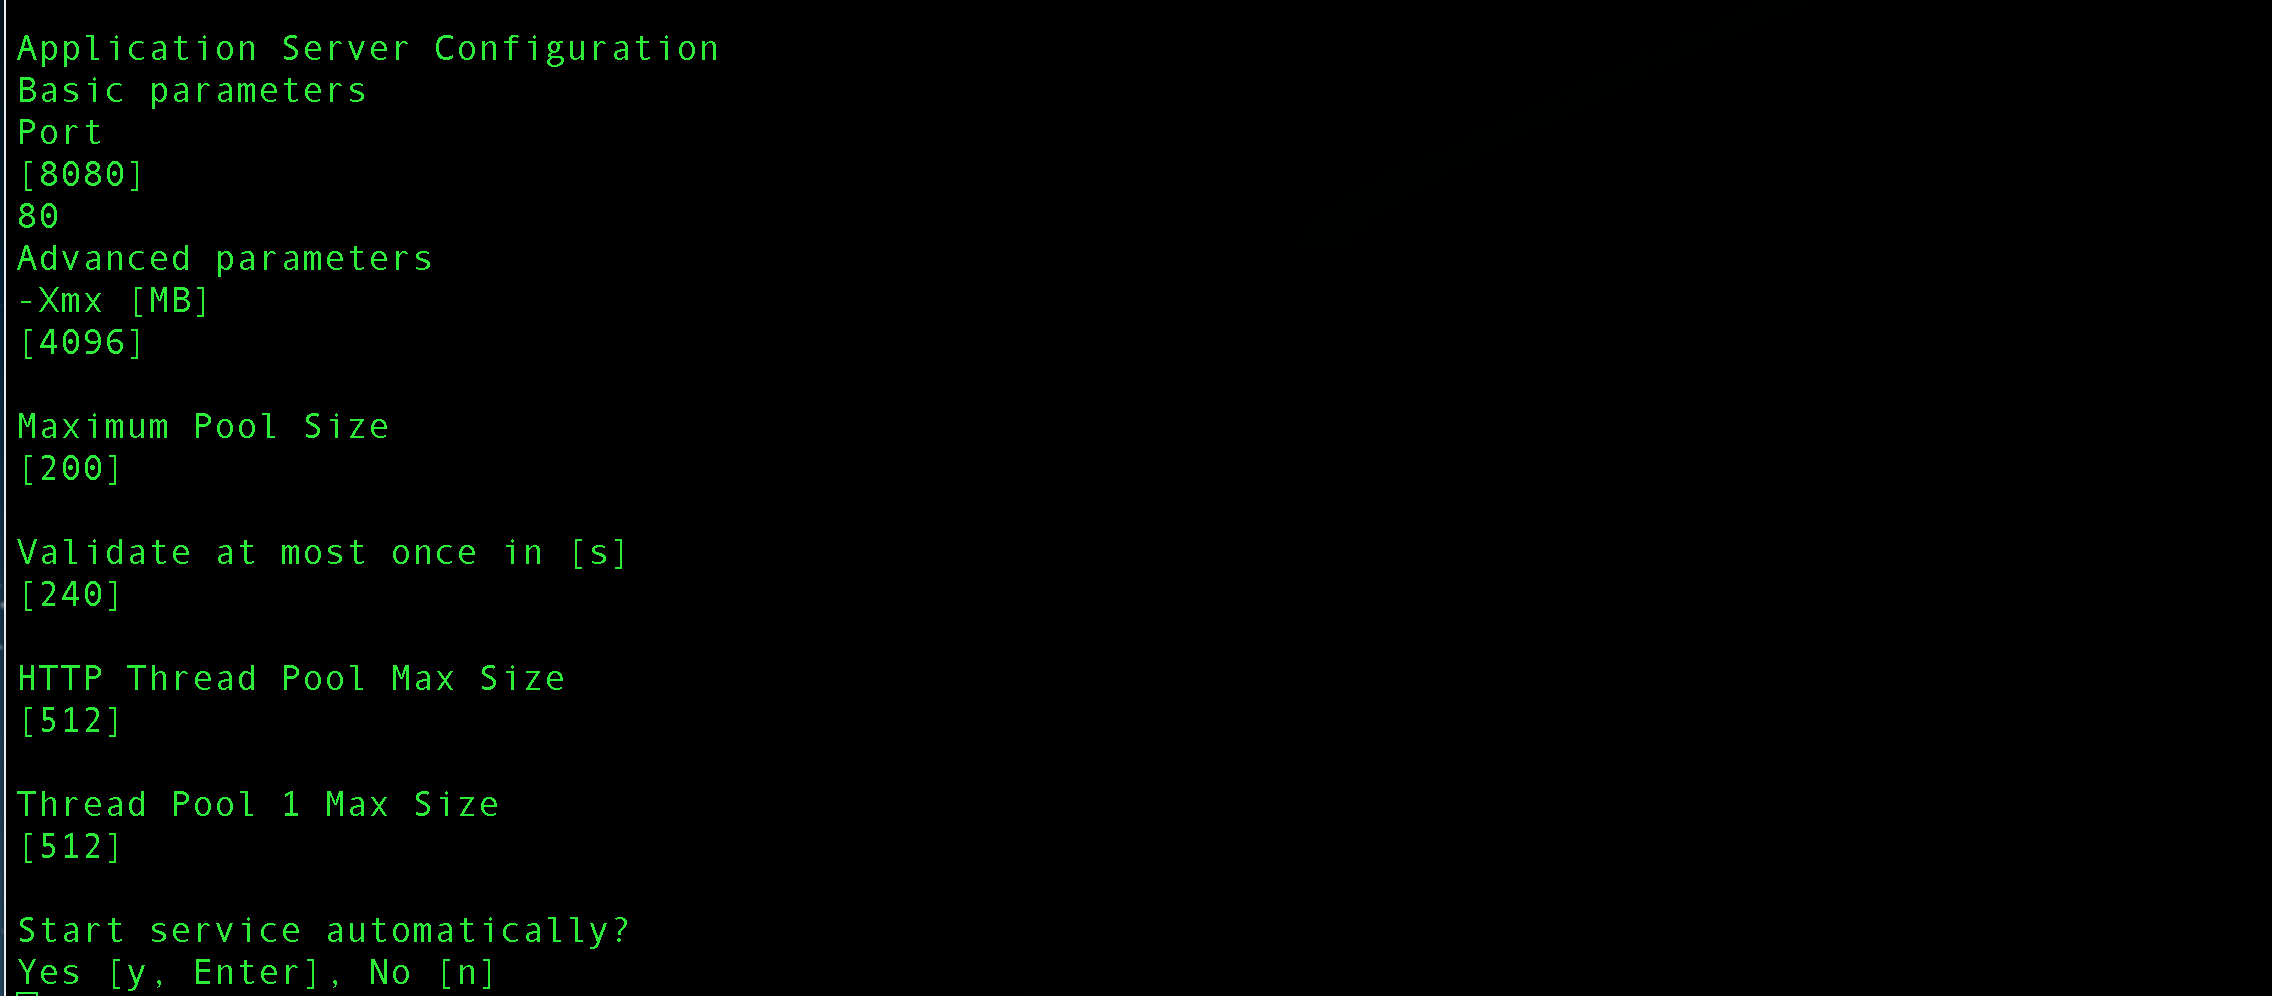
Check Start service automatically to have BellaDati up and running right after the installation.
7. Directory for Symlinks and final part of installation
Select additional options:
- Create symlinks
- Destination directory
Continue and wait while BellaDati is installed on your computer
Executive part of installation script process
-installing BellaDati data & metadata into sql database , i.e. schemas, tables and initial data are implemented into SQL dbs template,
-installing application server (GlassFish or Payara (with BellaDati 2.10+) ); parameters setting before are used and can be modified later
-deploying application file belladati.war
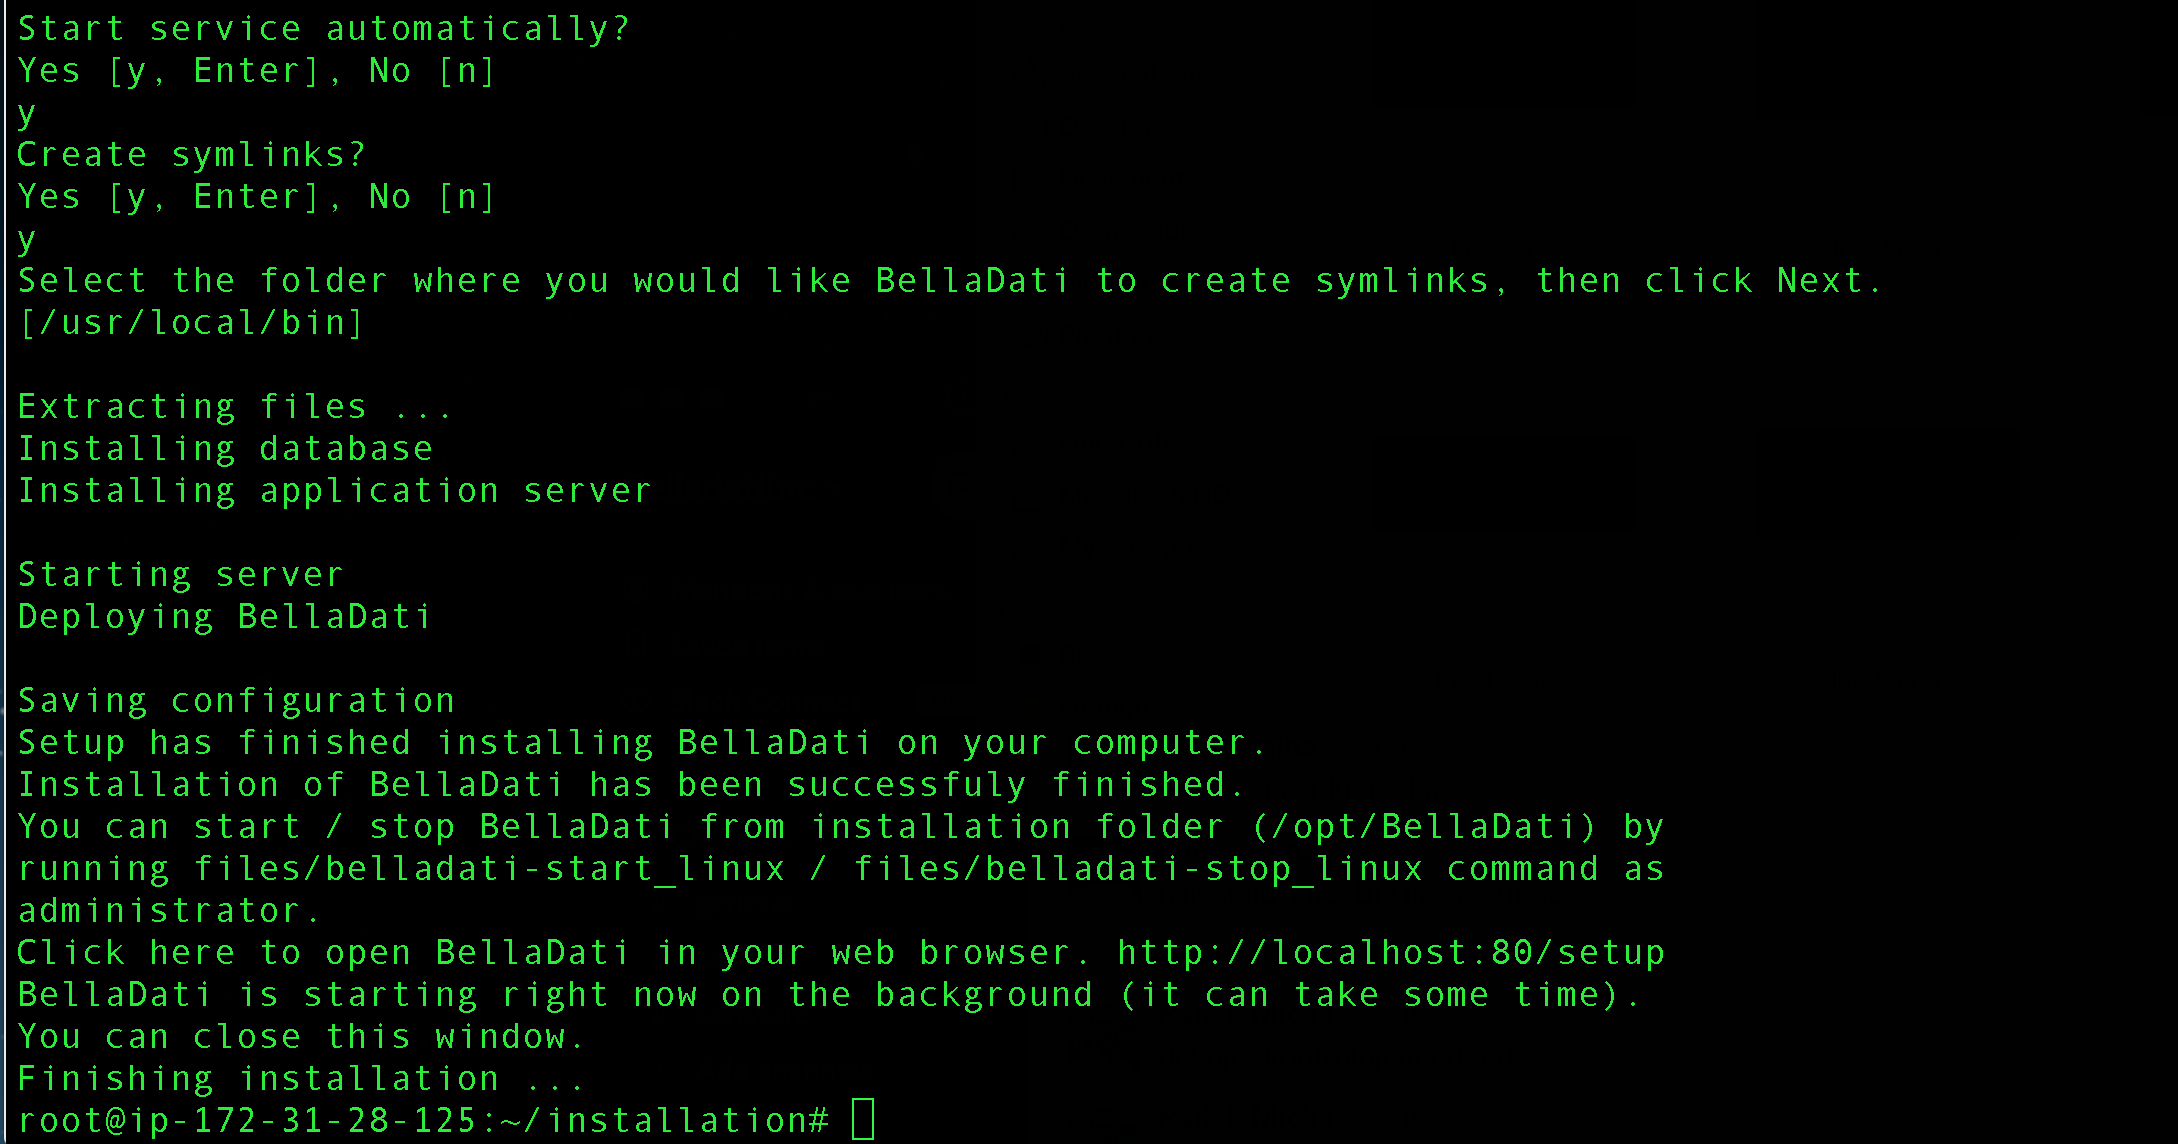
8. Finishing Installation
The installation is complete now.
It could take some time to start BellaDati for a first time. Then continue with the BellaDati Setup Wizard.
9. Troubleshooting
- If BellaDati is not running then check if database is running and if it is accessible at first.
- If your BellaDati has issues with exporting PDF documents, make sure, you have installed fontconfig.
- To check if fontconfig is installed use command fc-list. If command not found is returned, install it using this command
- apt install fontconfig
- If you have disabled automatically starting the server in the web server configuration, or starting the server failed, you can run it manually from terminal:
- To start BellaDati run following command from installation directory:
sudo ./belladati-start_linux
- To stop BellaDati run following command from installation directory:
sudo ./belladati-stop_linux
- To start BellaDati run following command from installation directory:
- To open BellaDati after the installation is complete, point your browser to
http://localhost:8080. This is the default URL, which may differ depending on the data you entered in step 6 of the installation. - If you have any problems during installation, please try to complete installation (retry or ignore errors) and then send us following log file:
<installation-directory>/.install4j/installation.log
Next Steps
Overview
Content Tools