This use case describes the following user flow:
- Load truck license plate
- Display information based on the license plate
- Enter username ticket to open the bin with the delivery and mark the order as completed
- Display screen with the process completion
For each step, there will be defined a report view and BellaDati endpoint config.
Step 1 - Load truck license plate

Endpoint configuration
Create BellaDati endpoint with the following configuration:
- URL: checkRegistrationPlate/.*
Configuration:
def registrations_ds_id = 263
//define ID of the data set with license plates

def registrationPlate = request.getPath().split("/").last()
//load the registration plate based on the entered value

def filter = isEqualFilter('L_REGISTRATION_PLATE', registrationPlate)
//define filter to be applied to the data set

def rows = readDataset(registrations_ds_id , 1, filter, com.belladati.common.sort.Sort.descending('row_uid'))
if (rows.size() == 0) {
	return Response.ok('error;var1=wrong license plate',"text/plan").build()
//if the input value does not exist in the target data set, the specified error will be displayed
}
else {
  return Response.ok('success;var2='+rows[0].getValues()['L_ORDER_ID']+'',"text/plain").build()
}
//if the value exists, the exists, the value from column L_ORDER_ID will be loaded to the variable var2
Report configuration
Define custom content view
you can apply your own configuration to the custom content view
the element "value" is used to load the values when the user navigates between the views
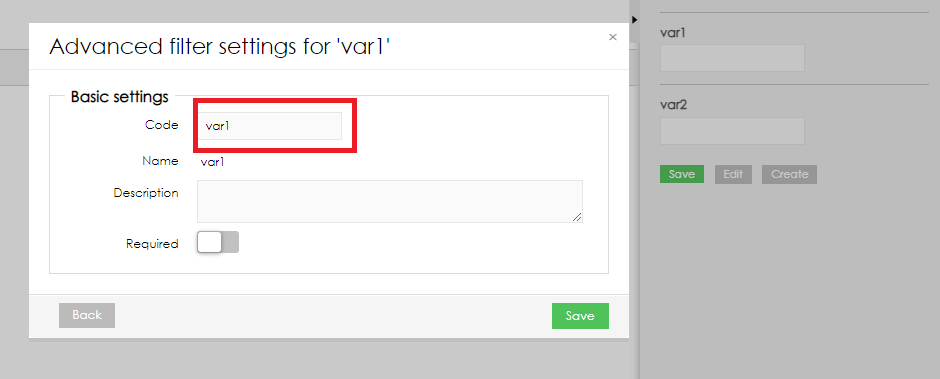
 <form>
  <label for="var1">Registration plate:</label>
  <input type="text" id="var1" name="var1" value={formula}res = @var1 as String
if (res == null){
  return ""
}
else {
  return res}{formula}><br><br>
</form>
- Create a report variable with the ID used in the custom form (in the example, the ID is "var1". In our configuration, there is also value var2. Include it in the report view as well.
- Apply config to the tab settings:
- Label settings: apply text based on your requirements. These labels supports translations.
- Transition view: select view with the custom content
- Transition action HTTP method: GET (parameter is configured in the URL)
- Transition action URL: define URL of your endpoint, include entered form value as parameter (e.g. $var1 for the report variable with code var1)
if you use name of BellaDati endpoint type. Then the endpoint is invoked internally, so domain and user context is preserved. 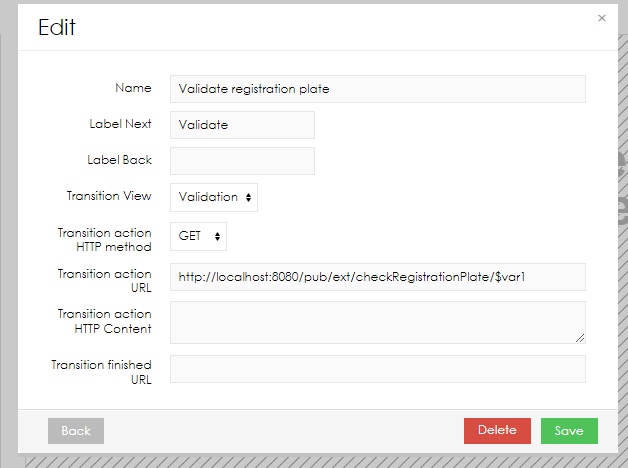
Step 2 - Open the box with the order and save the information about completed order
Endpoint configuration
This endpoint will be used to open the box with the order and saved the information about completing to the data set:
Create BellaDati endpoint with the following configuration:
- URL: openBox
Configuration:
registrations_ds_id = 263
request_config_id = 12
//ID of the request for publishing the data
def body = JSON.fromJSONString(body)
processed_order_ds_id = 264

def rows = readDataset(registrations_ds_id , 1, filter, com.belladati.common.sort.Sort.descending('row_uid'))
//first load the ID of the box to be opened
if (rows.size() == 0) {
	return Response.ok('error;var1=wrong license plate',"text/plan").build()
}
else {
box='+rows[0].getValues()['L_BASKET']+'
//returns ID of the box to open

  def data = [
      	L_ORDER : body.getString("order"),
		L_USERNAME : body.getString("username")
      	L_DATETIME : currentLocalDateTime(),
    	L_BOX : box,
]
	httpRequestAsync(request_config_id, null, box)
  //sends command to close the box
    storeDataset(processed_order_ds_id, [data])
  //saved the information about completed order to the selected data set
    return Response.ok('success').build()
}
Report configuration
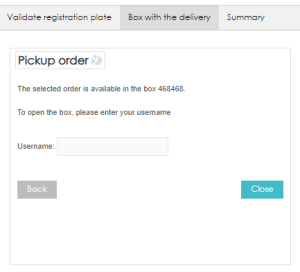
Inside this view, the user will be able to see the ID of the box that will be opened. After entering his username, the required request is created and used to open the box and save the required information to the data set.
Define custom content view
<p>The selected order is available in the box {formula}@var2{formula}.</p> <br> <p>To open the box, please enter your username<p> <br> <form> <label for="var1">Username:</label> <input type="text" id="var3" name="var3" value={formula}res = @var3 as String if (res == null){ return "" } else { return res}{formula}><br><br> </form>- Apply config to the tab settings:
- Label settings: apply text based on your requirements
- Transition view: select view with the custom content
- Transition action HTTP method: POST (parameters are configured in the Transition action HTTP content)
- Transition action URL: apply URL from the current endpoint config
Transition action HTTP content
{"order" : "$var1", "username" : "$var3"}
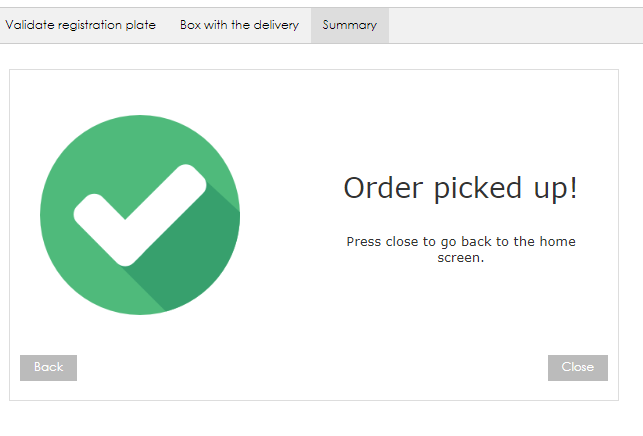
Step 3 - Summary
Define the HTML content as per your app requirements to display the last screen:
Report configuration
Define the Transition finished URL that will redirect the user to the required screen after completing the flow.
Overview
Content Tools