Versions Compared

Key

  • This line was added.
  • This line was removed.
  • Formatting was changed.

...

Sv translation
languageja

このレポート出力ページはFTP、ダッシュボードメール出力、レポートメール出力にスケジュールに出力する機能です。また、これら全てのレポートを管理できます。

Note

このページはドメインアドミニストレータにのみ利用できます。

レポート出力ページはBellaDatiのトップページアクセスするためにできます。レポートオプションにコンソールを置いて、レポート出力スケジュール表示したリンクをクリックしてください。
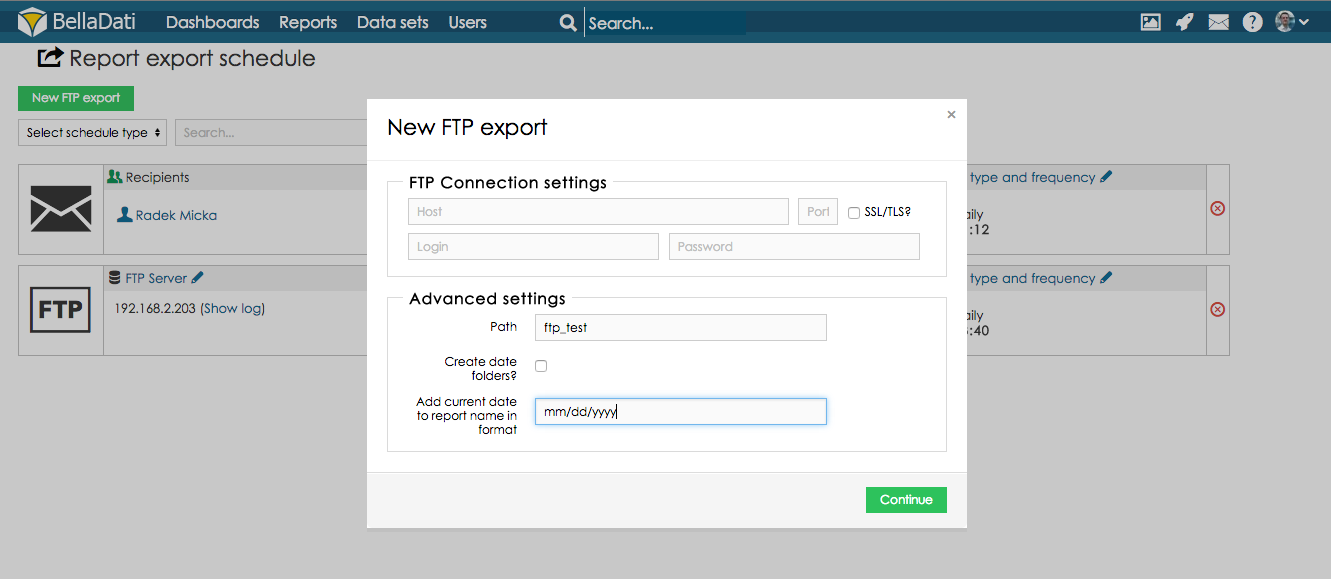
 

FTP出力スケジュール

 新しいFTPコネクションを作成するため、FTP出力ボタンをクリックしてください。


FTPコネクション設定

ホストFTPサーバーアドレス
ポート

FTPサーバーのポートを使用した(任意)

SSL/TLS?FTPSFTPESモードを可能にします。(任意)
ログインログインFTP
パスワードFTPのパスワード
パスパスはレポートが保存される場所です。
日付フォルダ作成?出力日用(もし選択されているなら)新フォルダーを作成
フォーマットのレポートネームに現在の日付を追加するレポートが保存される日付のパターンを作成


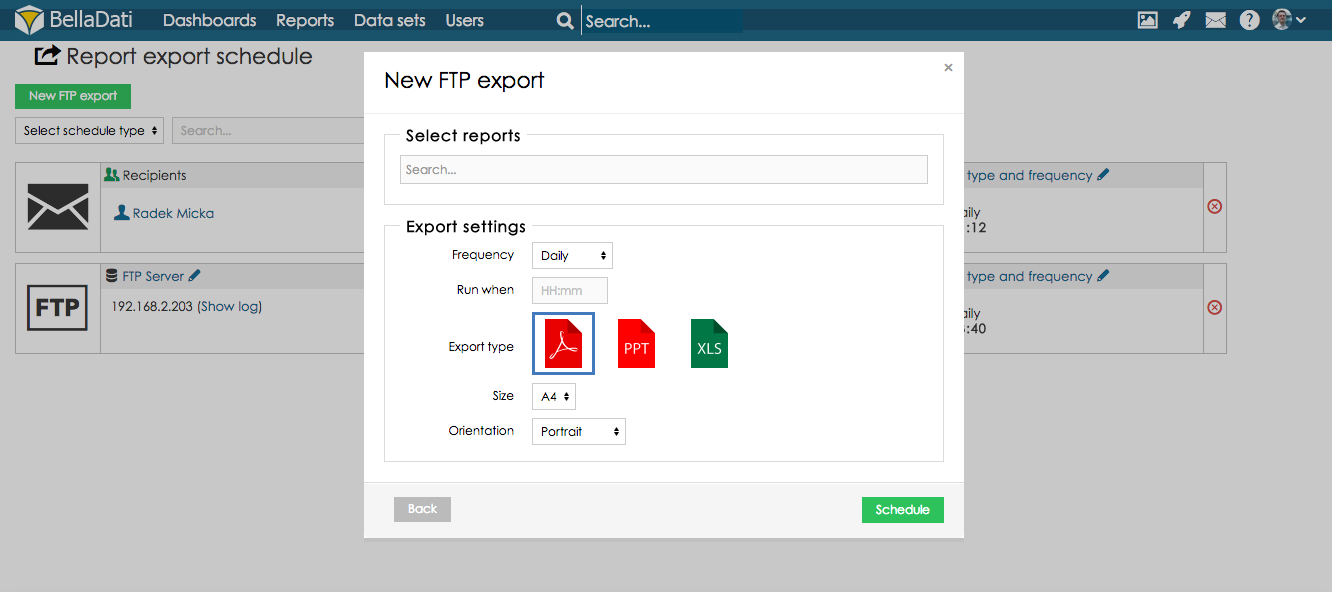
続くボタンをクリックし次の設定に進みます。

このダイアローグでは以下の事ができます:

  • 出力されるレポートが選択
  • レポートが保存される頻度が選択
  • 出力が実行される時間が選択。
  • 出力のタイプを選択
  • サイズとオリエンテーションを選択(PDF出力のみで可能)

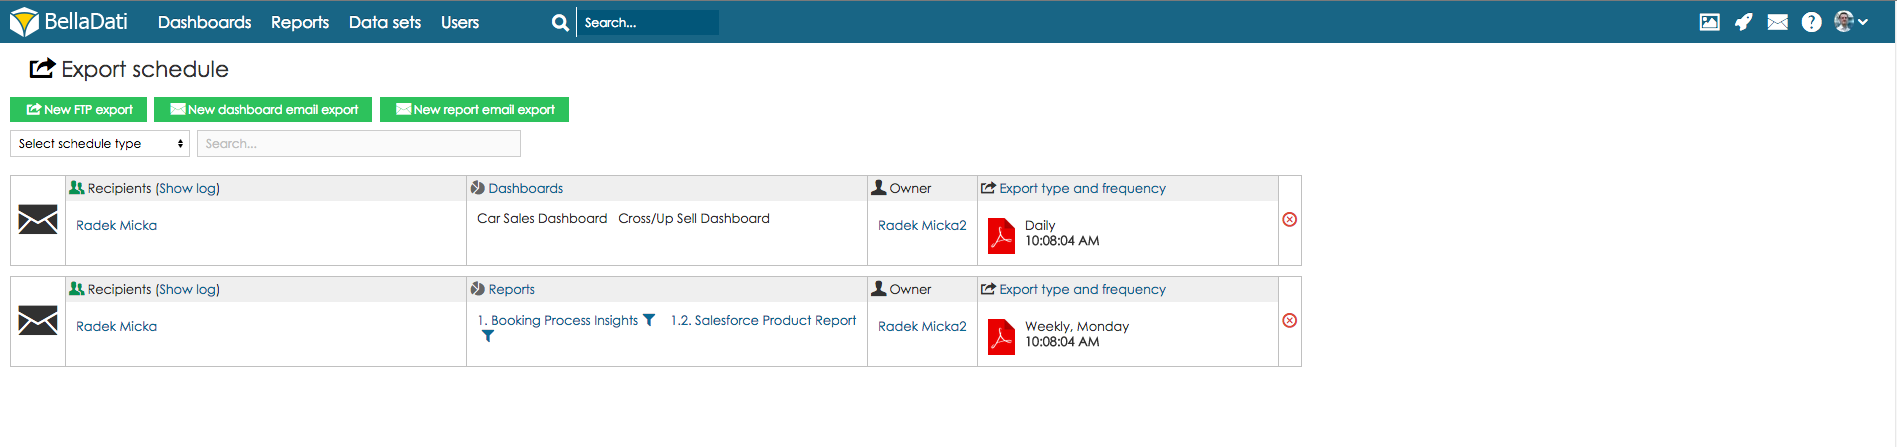
スケジュールボタンをクリックして、この出力設定を保存してください。

作成された出力はテーブルに表示され、そのテーブルでは出力設定を変更でき、出力用レポートを選択させることもできます。(FTPとメール出力は表示されます)

もし、FTPかメール出力または出力メールのみがスケジュールタイプ選択ドロップダウンで表示されます。あるいは検索フィールドによってスケジュールされている出力をブラウズしてください。

ダッシュボードをメールに送信


Info
 この機能は1つのメールで複数のダッシュボードを送信可能です。


新ダッシュボードメール出力ボタンをクリックしてメール送信設定でダイアローグウインドウを開けてください。このウインドウでは以下のことが設定できます:
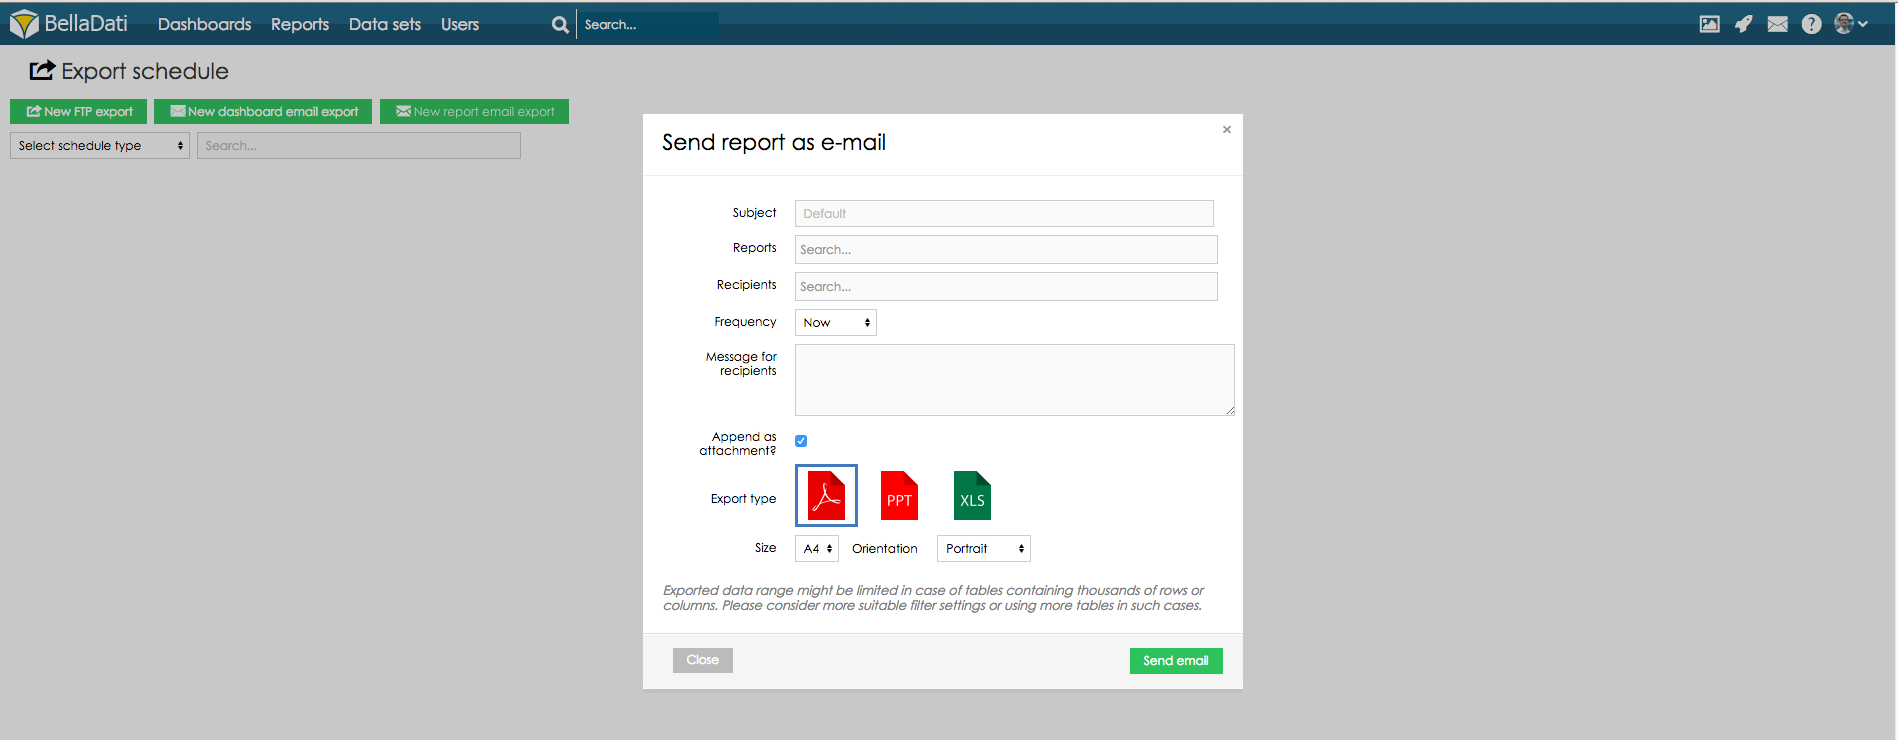
  • メールのタイトル
  • 送信先のダッシュボードの選択(もし、選択されたダッシュボードがない場合は、メールはダッシュボードの詳細なしに送信されます)
  • ダッシュボードが送信する受信先の選択
  • メールが送られる回数設定
  • 受信先へのメッセージの追加
  • 出力タイプの選択 - ダッシュボードが出力されるファイルのタイプ


レポートをメールに送信

Info
 この機能では1つのメールで複数のレポートを送付できます。


新レポートメール保存ボタンをクリックし、メール送付設定でダイアローグウインドウを開けてください。このウインドウでは以下のことが設定できます:

  • メールタイトル
  • 送信レポートの選択(もし、どのレポートも選択されていない場合は、メールはレポートの詳細なしに送信されます)
  • メールが送られる受信人受信グループの選択
  • メールが送られる回数の選択
  • 受信人へのメッセージの追加
  • 出力タイプの選択ーレポートが出力されるファイルのタイプ

出力スケジュールの編集

もし、スケジュールされた出力の設定を変更したい場合はスケジュールされている出力のリストに表示されている「鉛筆」アイコンをクリックしてください。

表示されているダイアローグウインドウでは以下のことができます:

  • 出力されるレポートの追加と削除
  • 出力されるレポートの順番の変更
  • メール本文に表示されるビューのビューと発注を選択(レポートの名前をクリックしてダイアログウィンドウが開きます。ここでは追加/削除するビューを選択するか、ビューの位置を変更できます。)
  • メールを受け取る受信人受信グループの追加、編集
  • メールが送られる回数の設定
  • 受信人へのメッセージの追加と編集
  • 出力タイプの設定
  • メール本文のビューのサイズの調整


Sv translation
languagede

Die Seite für den Reportexport dient zur Planung von Exporten zu FTP, zum Export von Dashboard-E-Mails oder zum Export von Report-E-Mails. Sie können auch alle diese Reports verwalten.

Note

Diese Seite ist nur für Domain-Administratoren verfügbar.

Die Seite für den Reportexport ist im oberen Menü von BellaDati zugänglich. Zeigen Sie mit der Maus auf die Option Report und klicken Sie auf den angezeigten Link Report export schedule.

Image Added


FTP-Export planen

Klicken Sie auf die Schaltfläche Neuer FTP-Export, um eine neue FTP-Verbindung zu erstellen.


FTP-Verbindungseinstellungen

HostFTP-Server-Adresse
PortBenutzter Port des FTP-Servers (optional)
SSL/TLS?Aktiviert den FTPS/FTPES-Modus (optional)
LoginFTP-Login
PasswortFTP-Passwort
PfadPfad, unter dem der Bericht gespeichert wird
Datumsordner erstellen?Creates new folder for export date (if selected)
Hinzufügen des aktuellen Datums zum Reportnamen im FormatErstellen Sie ein Datumsmuster, mit dem der Report gespeichert wird.


Image Added

Fahren Sie mit den nächsten Einstellungen fort, indem Sie auf die Schaltfläche Weiter klicken.

In diesem Dialogfeld können Sie:


  • Wählen Sie Reports aus, die exportiert werden sollen.
  • Wählen Sie die Häufigkeit, mit der der Report gespeichert wird.
  • Wählen Sie den Zeitpunkt, zu dem der Export ausgeführt wird.
  • Exportart auswählen
  • Größe und Ausrichtung auswählen (nur für den PDF-Export verfügbar)

Image Added

Klicken Sie auf die Schaltfläche Schedule, um die Einstellungen dieses Exports zu speichern.

Der erstellte Export wird in der Tabelle angezeigt, wo die Exporteinstellungen und ausgewählte Reports für den Export geändert werden können (sowohl FTP- als auch E-Mail-Exporte werden angezeigt).


Image Added

Wählen Sie, ob nur FTP- oder E-Mail-Exporte angezeigt werden sollen, indem Sie die Dropdown-Liste Zeitplantyp auswählen oder geplante Exporte nach Suchfeld durchsuchen.

Dashboard an E-Mail senden


Info
  This feature allows you to send multiple dashboards in one email.


Klicken Sie auf die Schaltfläche Neuer E-Mail-Export des Dashboards, um das Dialogfenster mit den Einstellungen der gesendeten E-Mails zu öffnen. In diesem Fenster können Sie einstellen:

  • Subject of the email
  • Select Dasboards which will be sent (if no dashboards are selected, email is sent without details of the dashboard)
  • Select Recipients to whom the dashboard will be sent
  • Set Frequency when email will be sent
  • Add Message for recipients
  • Choose Export type - type of file to which the dashboard will be exported
  • Send email to all recipients at once - all users will receive one email (they will see other users in the cc)
  • Compress attachment - exported file will be attached as .zip file
  • Require password - exported zip file will be protected with password (this option is displayed only if option compress attachment is enabled)

Image Added

Send report to email

Info
 This feature allows you to send multiple reports in one email.


Click button New report email export to open dialog window with settings of sent email. In this window, you are allowed to set:

  • Subject of the email
  • Select Reports which will be sent (if no reports are selected, email is sent without details of the report)
  • Select Recipients and Recipient groups to whom the report will be sent
  • Set Frequency when email will be sent
  • Add Message for recipients
  • Choose Export type - type of file to which the report will be exported
  • Send email to all recipients at once - all users will receive one email (they will see other users in the cc)
  • Compress attachment - exported file will be attached as .zip file
  • Require password - exported zip file will be protected with password (this option is displayed only if option compress attachment is enabled)

Image Added

Edit export schedule

If you would like to change settings of scheduled export hit a click on "pencil" icon displayed on the list of scheduled exports.

Image Added

Displayed dialogue window allows you to:

  • Add/remove Reports which will be exported
  • Change ordering of Reports which will be exported
  • Select Views and Ordering of the views displayed in email body (click on the name of the report to open dialogue window with list of the reports, which allows you to select views which should be added/removed, or change position of views)
  • Add/edit Recipients and Recipient groups who will receive email
  • Set Frequency by which selected email will be sent
  • Add/edit Message for recipients
  • Set Export type
  • Adjust size of the views in the email body