Page History
| Sv translation | |||||||||||||||||||||||||||||||||||
|---|---|---|---|---|---|---|---|---|---|---|---|---|---|---|---|---|---|---|---|---|---|---|---|---|---|---|---|---|---|---|---|---|---|---|---|
| |||||||||||||||||||||||||||||||||||
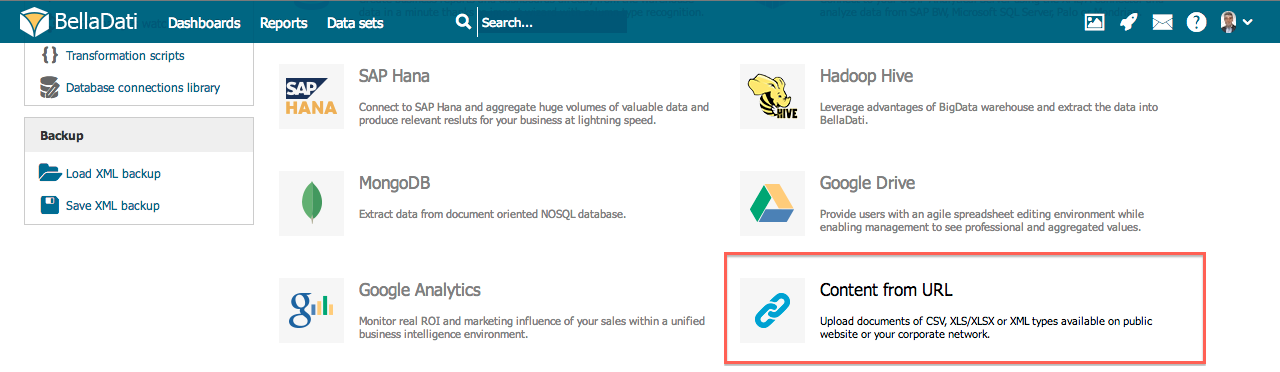
BellaDati can import data from URLs, web services and REST APIs. Connecting to URL has similarities with file import . In addition URL imports can be scheduled to execute automatically and repeatedly.
Connecting to URLFrom Data Source Connectors page select Connect from URL. |
| Note |
|---|
Login and password are optional parameters. |
Date and Time Variables
If you need to change the URL or HTTP post content dynamically, you can use predefined variables. BellaDati currently supports functions to get date, time or timestamp in user defined formats:
Name | Description | Examples |
|---|---|---|
| Evaluates the |
|
| Works like |
|
| Evaluates the |
|
| Works like | $time(now, HH:mm:ss) |
| Returns the current time stamp value |
|
| Returns the lowest value (sorted ascending) of the attribute specified by attribute ID stored in the current data set. Returns empty string if there are no data or the attribute code is not valid. |
$firstValue(L_DATE_ATTRIBUTE) //returns 2013-01-01 $firstValue(L_TIME_ATTRIBUTE) //returns 10:00:54 |
| Returns the highest value (sorted descending) of the attribute specified by attribute ID stored in the current data set. Returns empty string if there are no data or the attribute code is not valid. |
$lastValue(L_DATE_ATTRIBUTE) //returns 2013-12-31 $lastValue(L_TIME_ATTRIBUTE) //returns 23:59:59 |
DateString
- now - represents actual date
- actualyear - represents the first day of actual year (1.1.20XX). For example actualyear selected on 21.9.2010 represents date 1.1.2010
- actualquarter - represents the first day of actual quarter (1.1.20XX, 1.4.20XX, 1.7.20XX, 1.10.20XX). For example actualquarter selected on 21.9.2010 represents date 1.7.2010
- actualmonth - represents the first day of actual month (1.1.20XX, 1.2.20XX, ...). For example actaulmonth selected in 21.9.2010 represents date 1.9.2010
- actualweek - represents first day of actual week (Monday). For example actualweek selected on 21.9.2010 represents date 20.9.2010 (Monday of this week in calendar)
- relative and absolute enterig of date can be adjusted by operators using this syntax: date +|- n[d|w|m|q|y], where n is integer, d represents day, w represents week, m represents month q represents quartal and y represents year. We can for example define time in this way: actualyear + 2m -4d. Today is 21.9.2010, so this value represents 1.1.2010 + 2 months - 4 days, which means date 25.2.2010.
TimeString
- now - represents actual time
- actualhour - represents the actual hour at 0 minutes and 0 seconds.
- actualminute - represents the actual minute at 0 seconds
- actualsecond - represents the actual second
TUTORIAL VIDEO
| HTML |
|---|
<iframe width="560" height="315" src="https://www.youtube.com/embed/wMG1n4jEf2k" frameborder="0" allow="accelerometer; autoplay; encrypted-media; gyroscope; picture-in-picture" allowfullscreen></iframe> |
Connecting to SOAP web Services
BellaDati is able to connect resources available on network via the HTTP protocol. Except this simple usage, we can connect also more complex resources available as Web services. Web services are using the SOAP protocol, which is based on the plain HTTP protocol. The SOAP message comes in standard XML format, which is in BellaDati perfectly supported. Here is an example how to do it:
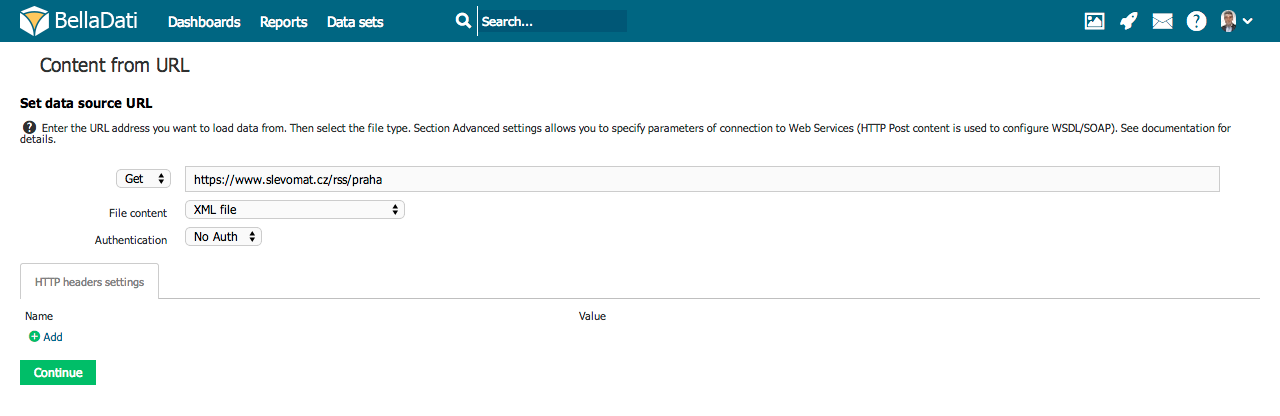
- Enter the endpoint URL of your web service and choose the XML file format.
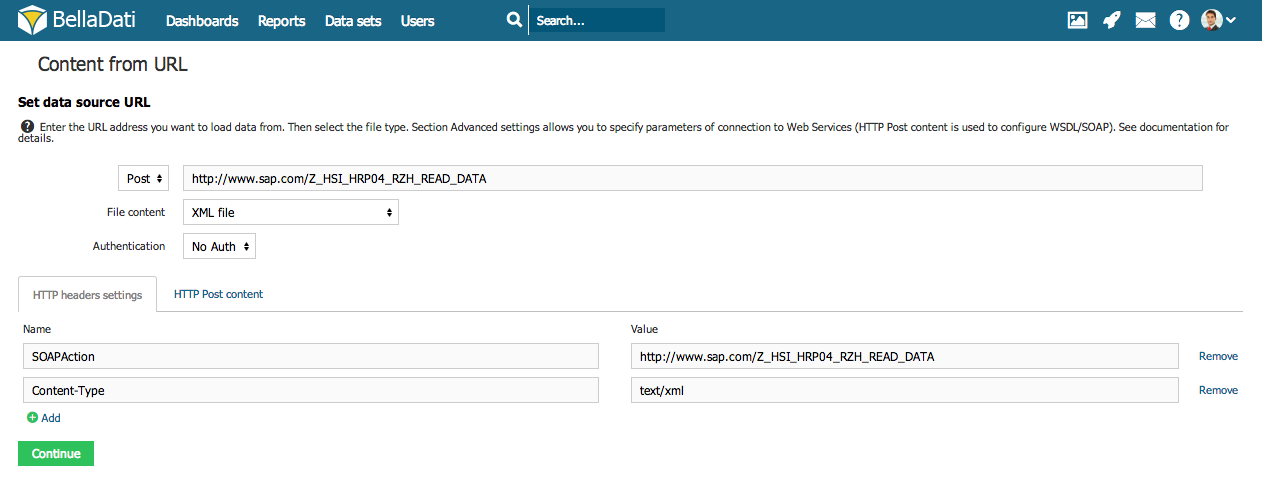
- Open the advanced settings, choose the POST method and set the following parameters:
- SOAPAction - value is contained in the WSDL file, which describes your web service. It is defined in the soapAction tag, e.g.: <soap:operation soapAction="http://www.sap.com/Z_HSI_HRP04_RZH_READ_DATA"/>
- Content-Type - set the value to text/xml
- Insert the POST content in the depicted structure:
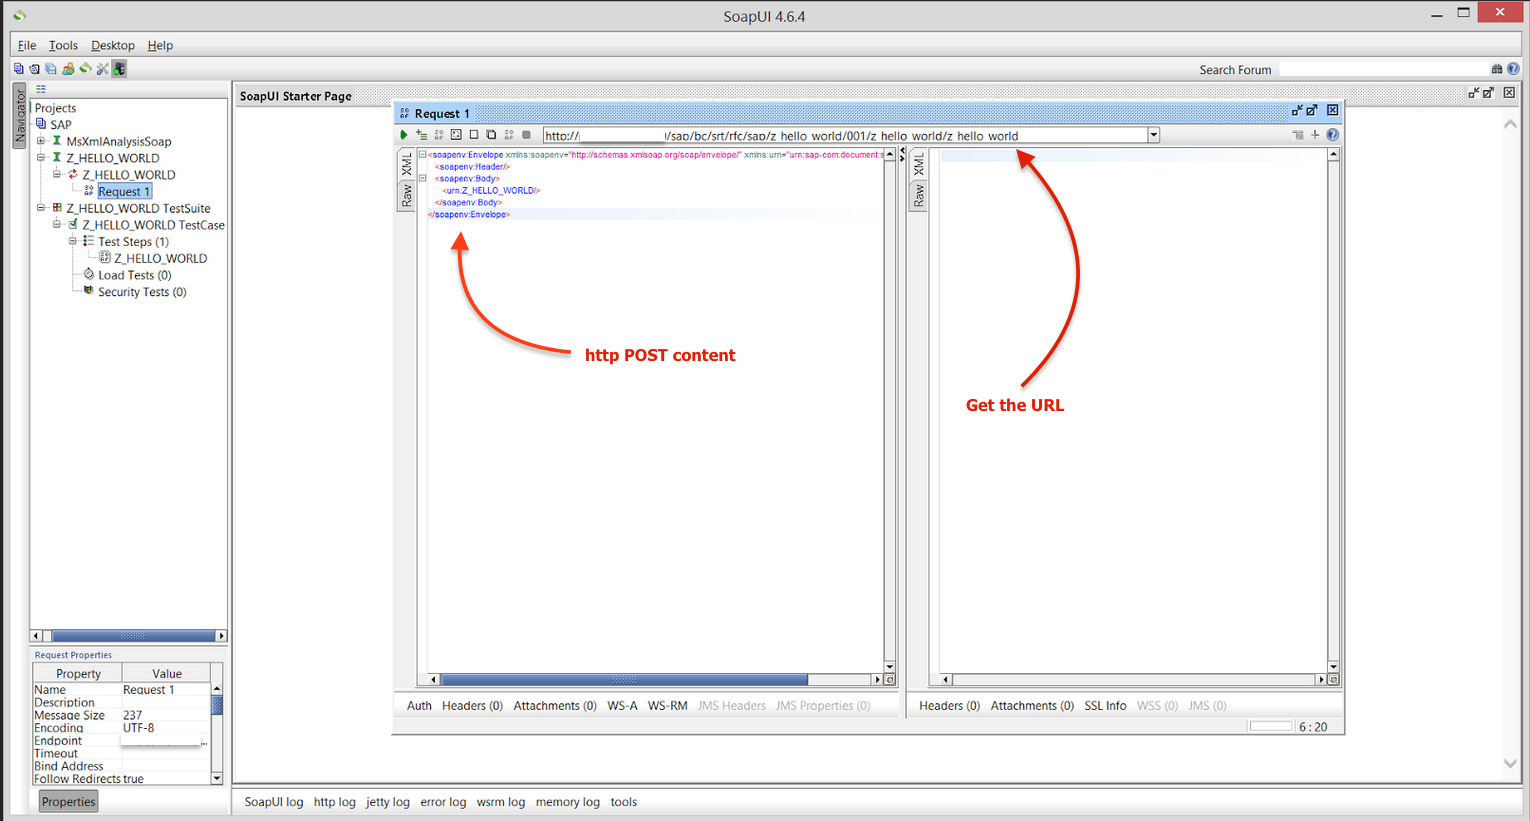
| Info |
|---|
In case you suffer any issues while connecting to SAP Web Services, we recommend to use external tools like SoapUI to which will generate right structure of XML structure based on WSDL. SoapUI will also help you to generate right http Post content.
|
Connecting to REST web services
You can connect to REST web services over HTTP using BellaDati. Just select the proper HTTP GET header type and file type (eg. CSV).
Authentication
The following authentication methods are supported:
- Basic and Digest HTTP Access Authentication ( RFC2617 standard )
- OAuth1a
- OAuth2
| Info |
|---|
REST API supports OAuth standard with a security token. |
For OAuth1a, following connection parameters are available:
- Consumer Key,
- Consumer Secret,
- Request Token URL,
- Token Authorization URL,
- Access Token URL.
For OAuth2, it is also possible to define Resource and State parameters, which are used for example when connecting to Office 365 services.
Connecting to Office 365 via HTTP Connector
This example will show how to connect to Office 365 via HTTP Connector and how to import list of contacts from the e-mail account.
- Select Connect over HTTP from list of data sources.
- Fill in the URL, in this example https://outlook.office.com/api/v1.0/me/contacts/?$orderby=displayname%20asc.
- Change File content to JSON.
- Select OAuth2 authentication.
- Add HTTP header with name Accept and value text/*, multipart/mixed, application/xml, application/json; odata.metadata=none.
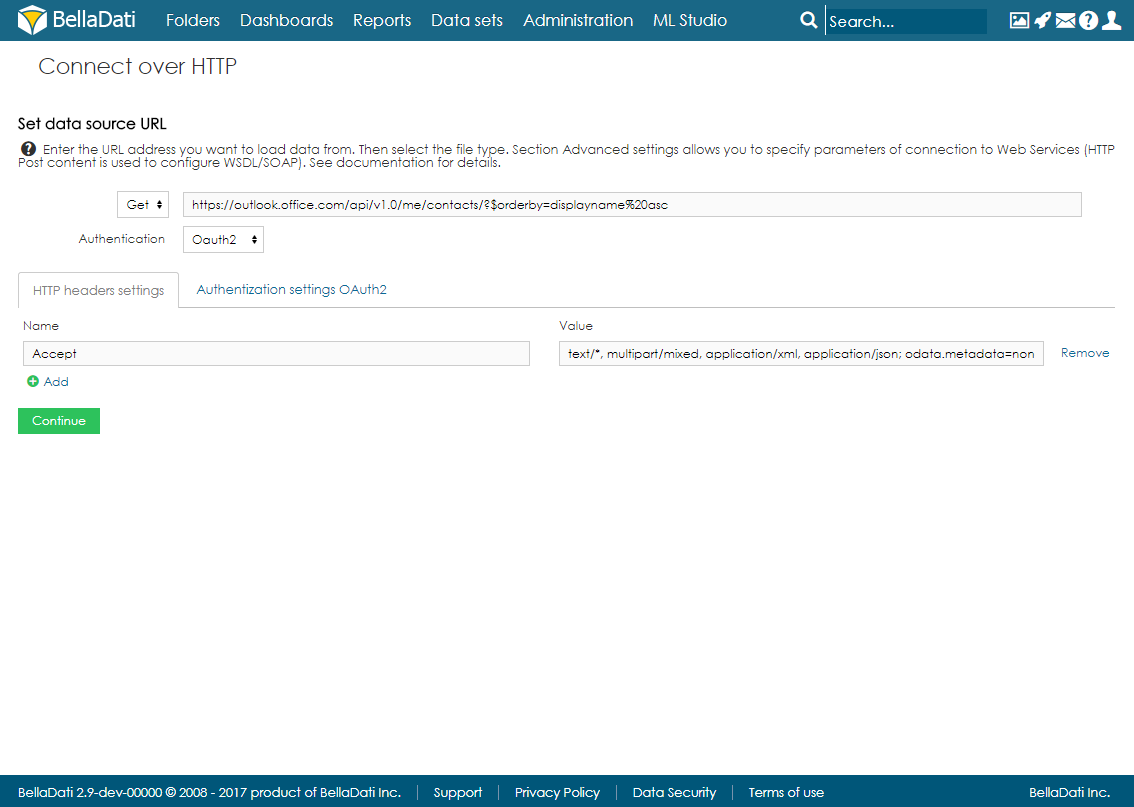
- In Authentication settings, fill in the OAuth Access Token which you generated in Office 365 and set the OAuth Token Type to Bearer (see Office 365 settings below).
- Click on Sign in using OAuth and fill in all the parameters. Set the scope accordingly to the token.
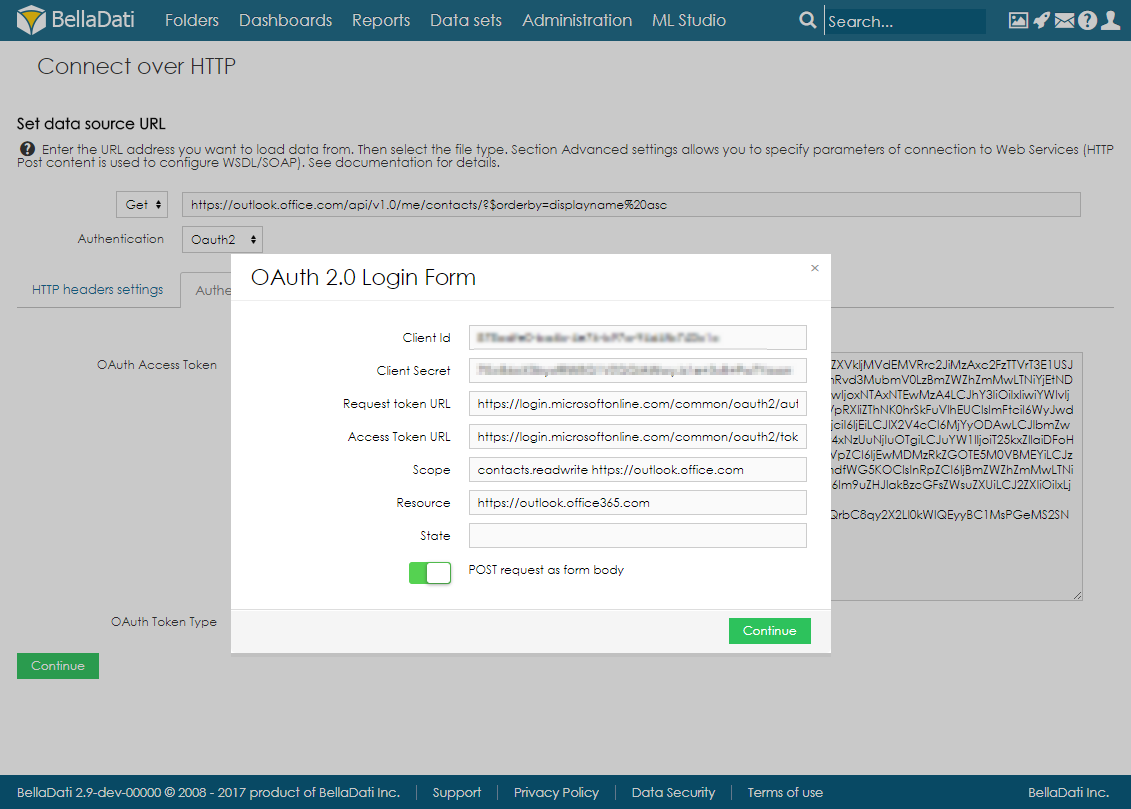
- Click on Continue and import the data.
Office 365 settings
- Go to https://portal.azure.com/
- In the left menu, click on Azure Active Directory and then on App registrations .
- Add new application registration, select Web app/API and fill in the URL of your BellaDati application.
- In Reply URLs, add new record: URLofYourBD/auth/callback/oauth2
- In Required permissions, add:
- Office 365 Exchange Online (Microsoft.Exchange) - Read contacts in all mailboxes
- Windows Azure Active Directory (Microsoft.Azure.ActiveDirectory) - Sign in and read user profile
- In Keys, add a new key and copy the credentials.
Next Steps
- Take me back to data sources
- Import settings
- Scheduling Import
List siblings
| Sv translation | |||||||||||||||||||||||||||
|---|---|---|---|---|---|---|---|---|---|---|---|---|---|---|---|---|---|---|---|---|---|---|---|---|---|---|---|
| |||||||||||||||||||||||||||
BellaDati je schopné importovať dáta z URL, webových služieb a RESP API. Pripojenie na URL je podobné importu súboru. Avšak v porovnaní s týmto importom, je možné pri URL nastaviť interval opakovania.
Pripojenie cez URLZo zoznamu zdrojov dát vyberte Obsah z URL.
Parametre pripojeniaPre pripojenie k URL zadajte nasledujúce parametre:
Nasledujúce nastavenia sú rovnaké ako pri importe súboru.
Premenné času a dátumuAk potrebujete aby sa obsah URL alebo HTTP menil dynamicky, použite prednastavené premenné. BellaDati podporuje funkciu získavania času, dátumu alebo timestamp v použivateľom definovaných formátoch:
|
| Info |
|---|
REST API podporuje štandarný OAuth s bezpečnostným mechanizmom (security token). |
Tutoriálové video
| HTML |
|---|
<iframe width="560" height="315" src="https://www.youtube.com/embed/wMG1n4jEf2k" frameborder="0" allow="accelerometer; autoplay; encrypted-media; gyroscope; picture-in-picture" allowfullscreen></iframe> |
Kam ďalej
- Späť na zdroje dát
- Nastavenia importu
- Plánovanie importu
List siblings
| Sv translation | |||||||||||||||||||||||||||||||||||
|---|---|---|---|---|---|---|---|---|---|---|---|---|---|---|---|---|---|---|---|---|---|---|---|---|---|---|---|---|---|---|---|---|---|---|---|
| |||||||||||||||||||||||||||||||||||
BellaDatiは、URL、Webサービス、REST APIからデータをインポートすることができます。 URLへの接続は、Importing from Fileと類似しています。さらに、URLのインポートは、自動的に繰り返し実行されるようスケジューリングできます。
URLに接続データソースに接続するページからHTTPで接続を選択してください。 |
| Note |
|---|
ログインとパスワードは、任意のパラメーターです。 |
日付と時刻の変数
URLやHTTPポストコンテンツを動的に変更する必要がある場合、事前定義された変数を使用できます。BellaDatiは現在、ユーザー定義の形式で日付、時刻、タイムスタンプを取得する関数をサポートしています:
名前 | 説明 | 例 |
|---|---|---|
|
|
|
|
|
|
|
|
|
|
| $time(now, HH:mm:ss) |
| 現在のタイムスタンプ値を返します。 |
|
| 現在のデータセットに格納されている属性IDで指定された属性の最小値(昇順)を返します。 |
$firstValue(L_DATE_ATTRIBUTE) //returns 2013-01-01 $firstValue(L_TIME_ATTRIBUTE) //returns 10:00:54 |
| 現在のデータセットに格納されている属性IDで指定された属性の最大値(降順)を返します。 |
$lastValue(L_DATE_ATTRIBUTE) //returns 2013-12-31 $lastValue(L_TIME_ATTRIBUTE) //returns 23:59:59 |
DateString
- now – 日付を表します。
- actualyear – 年の最初の日を表します (20XX.1.1)。 例えば、2010.9.21に選択されたactualyearは、日付2010.1.1を表します。
- actualquarter – 四半期の最初の日を表します(20XX.1.1、20XX.4.1、20XX.7.1、20XX.10.1)。例えば、2010.9.21に選択されたactualquarterは、日付2010.7.1を表します。
- actualmonth – 月の最初の日を表します(20XX.1.1、20XX.2.1, ...)。例えば、2010.9.21に選択されたactaulmonthは、日付2010.9.1を表します。
- actualweek – 週の最初の日を表します(月曜日)。 例えば、2010.9.21に選択されたactualweekは、日付2010.9.20(この週の月曜日)を表します。
- 絶対的な日付入力は、操作者がこの構文を使うことで調整できます: date +|- n[d|w|m|q|y]、 nが整数の時、d は日、 w は週、m は月、qは四半期、yは年を表します。例えばこのように定義できます: actualyear + 2m -4d。今日は21.9.2010であるため、このバリューは1.1.2010 + 2 months - 4 days、つまり日付は25.2.2010を表します。
- 日付の相対および絶対入力は、次の構文を使用して演算子で調整できます: date +|- n[d|w|m|q|y]、nは整数、dは日、wは週、mは月、qは四半期、yは年を表します。例えば、次のように時間を定義できます: actualyear + 2m -4d。今日は2010年9月21日であるとすると、この値は2010.1.1 + 2か月 - 4日、つまり日付2010.2.25を表します。
TimeString
- now – 時間を表します。
- actualhour – 時間を0分0秒で表します。
- actualminute – 分を0秒で表します。
- actualsecond – 秒を表します。
チュートリアルビデオ
| HTML |
|---|
<iframe width="560" height="315" src="https://www.youtube.com/embed/wMG1n4jEf2k" frameborder="0" allow="accelerometer; autoplay; encrypted-media; gyroscope; picture-in-picture" allowfullscreen></iframe> |
SOAP webサービスに接続
BellaDatiは、HTTPプロトコルを介してネットワーク上で利用可能なリソースに接続できます。この単純な使用法を除いて、Webサービスとして利用可能なより複雑なリソースも接続できます。 Webサービスは、プレーンHTTPプロトコルに基づくSOAPプロトコルを使用しています。 SOAPメッセージは標準のXML形式で提供され、BellaDatiで完全にサポートされています。これを行う方法の例を次に示します:
- webサービスのエンドポイントURLを入力し、XMLファイル形式を選択します。
- 詳細設定を開き、POSTメソッドを選択、以下のパラメーターを設定します:
- SOAPAction – 値は、Webサービスを説明するWSDLファイルに含まれています。soapActionタグで定義されています。例: <soap:operation soapAction="http://www.sap.com/Z_HSI_HRP04_RZH_READ_DATA"/>
- Content-Type – 値をtext/xmlに設定します。
- 表される構造にPOSTコンテンツを挿入します:
| Info |
|---|
SAP webサービスへの接続中に問題が発生した場合、SoapUIのなどの外部のツールを用いて、WSDLに基づいたXML構造の正しい構造を生成することをお勧めします。 SoapUIは、正しいhttpポストコンテンツを生成するのにも役立ちます。
|
REST webサービスに接続
BellaDatiを使用して、HTTP経由でREST Webサービスに接続できます。適切なHTTP GETヘッダータイプとファイルタイプ(例: CSV)を選択するだけです。
認証
サポートされる認証方法は次の通りです:
- 基本アクセス認証およびダイジェストHTTPアクセス認証 (RFC2617標準)。
- OAuth1a
- OAuth2
| Info |
|---|
REST APIは、セキュリティトークンを使用したOAuth標準をサポートしています。 |
OAuth1aの場合、次の接続パラメーターを使用できます:
- コンシューマキー
- コンシューマシークレット
- リクエストトークンURL
- トークン認証URL
- アクセストークンURL
OAuth2の場合、例えばOffice 365サービスに接続する時に使用されるResourceおよびStateパラメーターを定義することもできます。
HTTPコネクター経由でOffice 365に接続
この例では、HTTPコネクターを介してOffice 365に接続する方法と、電子メールアカウントから連絡先のリストをインポートする方法を示します。
- データソースのリストから[HTTP経由で接続]を選択します。
- URL(この例では https://outlook.office.com/api/v1.0/me/contacts/?$orderby=displayname%20asc.)に入力します。
- ファイルのコンテンツをJSONに変更します。
- OAuth2認証を選択します。
- Acceptという名前とtext/*, multipart/mixed, application/xml, application/json; odata.metadata=noneという値を持つHTTPヘッダーを追加します。
- [認証設定]で、Office 365で生成したOAuthアクセストークンを入力し、OAuthトークンタイプをBearerに設定します(以下のOffice 365設定を参照)。
- OAuthを使用してサインインをクリックし、すべてのパラメーターを入力します。トークンに応じてスコープを設定します。
- [続行]をクリックして、データをインポートします。
Office 365の設定
- https://portal.azure.com/ にアクセスします。
- 左側のメニューで、[Azure Active Directory]をクリックし、[アプリの登録]をクリックします。
- 新しいアプリケーション登録を追加し、Webアプリ/APIを選択して、BellaDatiアプリケーションのURLを入力します。
- 返信URLで、新しいレコードを追加します: URLofYourBD/auth/callback/oauth2
- [必要なアクセス許可]で、次を追加します:
- Office 365 Exchange Online(Microsoft.Exchange) - すべてのメールボックスの連絡先を読み取る
- Windows Azure Active Directory(Microsoft.Azure.ActiveDirectory) - サインインしてユーザープロファイルを読み取る
- [キー]で、新しいキーを追加し、資格情報をコピーします。
次に
- Data Sourcesに戻る
- Import Settings
- Scheduling Import
List siblings
| Sv translation | |||||||||||||||||||||||||||||||||||
|---|---|---|---|---|---|---|---|---|---|---|---|---|---|---|---|---|---|---|---|---|---|---|---|---|---|---|---|---|---|---|---|---|---|---|---|
| |||||||||||||||||||||||||||||||||||
BellaDati kann Daten von URLs, Webservices und REST-APIs importieren. Das Verbinden mit einer URL hat Ähnlichkeiten mit dem Dateiimport. Außerdem können URL-Importe automatisch und wiederholt ausgeführt werden.
Verbindung zur URL herstellenWählen Sie auf der Seite Datenquellen-Connectors die Option Verbindung über URL herstellen. |
| Note |
|---|
Login und Passwort sind optionale Parameter. |
Datums- und Zeitvariablen
Wenn Sie den URL- oder HTTP-Post-Inhalt dynamisch ändern müssen, können Sie vordefinierte Variablen verwenden. BellaDati unterstützt derzeit Funktionen zum Abrufen von Datum, Uhrzeit oder Zeitstempel in benutzerdefinierten Formaten:
Name | Beschreibung | Beispiele |
|---|---|---|
| Evaluates the |
|
| Works like |
|
| Evaluates the |
|
| Works like | $time(now, HH:mm:ss) |
| Returns the current time stamp value |
|
| Returns the lowest value (sorted ascending) of the attribute specified by attribute ID stored in the current data set. Returns empty string if there are no data or the attribute code is not valid. |
$firstValue(L_DATE_ATTRIBUTE) //returns 2013-01-01 $firstValue(L_TIME_ATTRIBUTE) //returns 10:00:54 |
| Returns the highest value (sorted descending) of the attribute specified by attribute ID stored in the current data set. Returns empty string if there are no data or the attribute code is not valid. |
$lastValue(L_DATE_ATTRIBUTE) //returns 2013-12-31 $lastValue(L_TIME_ATTRIBUTE) //returns 23:59:59 |
DateString
- now - steht für aktuelles Datum
- actualyear - entspricht dem ersten Tag des tatsächlichen Jahres (1.1.20XX). Beispielsweise repräsentiert das am 21.9.2010 ausgewählte aktuelle Jahr das Datum 1.1.2010
- actualquarter - stellt den ersten Tag des tatsächlichen Quartals dar (1.1.20XX, 1.4.20XX, 1.7.20XX, 1.10.20XX). Beispielsweise entspricht das am 21.9.2010 ausgewählte aktuelle Quartal dem Datum 1.7.2010
- actualmonth -stellt den ersten Tag des aktuellen Monats dar (1.1.20XX, 1.2.20XX, ...). Zum Beispiel entspricht actaulmonth, ausgewählt am 21.9.2010, dem Datum 1.9.2010
- actualweek - steht für den ersten Tag der tatsächlichen Woche (Montag). Beispielsweise repräsentiert die am 21.9.2010 ausgewählte tatsächliche Woche das Datum 20.9.2010 (Montag dieser Woche im Kalender).
Die relative und absolute Eingabe des Datums kann von Operatoren mit der folgenden Syntax angepasst werden: Datum + | - n [d | w | m | q | y], wobei n eine Ganzzahl ist, d den Tag darstellt, w die Woche darstellt, m den Monat q darstellt Quartal und y steht für Jahr. Wir können zum Beispiel die Zeit auf diese Weise definieren: aktuelles Jahr + 2m -4d. Heute ist der 21.9.2010, daher entspricht dieser Wert dem 1.1.2010 + 2 Monaten - 4 Tagen, das ist das Datum 25.2.2010.
TimeString
- now -steht für die tatsächliche Zeit
- actualhour - steht für die tatsächliche Stunde bei 0 Minuten und 0 Sekunden.
- actualminute - steht für die tatsächliche Minute bei 0 Sekunden
- actualsecond - repräsentiert die tatsächliche Sekunde
TUTORIAL VIDEO
| HTML |
|---|
<iframe width="560" height="315" src="https://www.youtube.com/embed/wMG1n4jEf2k" frameborder="0" allow="accelerometer; autoplay; encrypted-media; gyroscope; picture-in-picture" allowfullscreen></iframe> |
Verbindung zu SOAP-Webdiensten
BellaDati kann über das HTTP-Protokoll verfügbare Ressourcen im Netzwerk verbinden. Abgesehen von dieser einfachen Verwendung können wir auch komplexere Ressourcen verbinden, die als Web-Services verfügbar sind. Webdienste verwenden das SOAP-Protokoll, das auf dem einfachen HTTP-Protokoll basiert. Die SOAP-Nachricht wird im Standard-XML-Format geliefert, das in BellaDati perfekt unterstützt wird. Hier ist ein Beispiel, wie es geht:
- Geben Sie die Endpunkt-URL Ihres Web-Service ein und wählen Sie das XML Dateiformat.
- Öffnen Sie die erweiterten Einstellungen, wählen Sie die POST-Methode aus und legen Sie die folgenden Parameter fest:
- Der SOAPAction-Wert ist in der WSDL-Datei enthalten, die Ihren Webdienst beschreibt. Es ist im soapAction-Tag definiert, z.B.: <soap:operation soapAction="http://www.sap.com/Z_HSI_HRP04_RZH_READ_DATA"/>
- Content-Type - Setzen Sie den Wert auf text / xml
- Fügen Sie den POST-Inhalt in die dargestellte Struktur ein:
| Info |
|---|
Wenn bei der Verbindung zu SAP Web Services Probleme auftreten, empfehlen wir die Verwendung externer Tools wie SoapUI, mit denen eine auf WSDL basierende rechte Struktur der XML-Struktur generiert wird. SoapUI hilft Ihnen auch, den richtigen http Post-Inhalt zu generieren.
|
Verbindung zu REST-Webdiensten
Sie können über BellaDati eine Verbindung zu REST-Webdiensten über HTTP herstellen. Wählen Sie einfach den richtigen HTTP-GET-Headertyp und -Dateityp aus (z. B. CSV).
Authentifizierung
Die folgenden Authentifizierungsmethoden werden unterstützt:
- Basic and Digest HTTP Access Authentication (RFC2617 standard)
- OAuth1a
- OAuth2
| Info |
|---|
Die REST-API unterstützt den OAuth-Standard mit einem Sicherheitstoken. |
Für OAuth1a stehen folgende Verbindungsparameter zur Verfügung:
- Consumer Key,
- Consumer Secret,
- Token-URL anfordern,
- Token-Autorisierungs-URL,
- Zugriffstoken-URL
Für OAuth2 können auch Ressourcen- und Zustandsparameter definiert werden, die beispielsweise beim Herstellen einer Verbindung mit Office 365-Diensten verwendet werden.
Verbindung zu Office 365 über HTTP Connector
In diesem Beispiel wird gezeigt, wie Sie über HTTP Connector eine Verbindung zu Office 365 herstellen und eine Liste der Kontakte aus dem E-Mail-Konto importieren.
- Wählen Sie Connect over HTTP aus der Liste der Datenquellen aus.
- Geben Sie die URL ein, in diesem Beispiel https://outlook.office.com/api/v1.0/me/contacts/?$orderby=displayname%20asc.
- Ändern Sie den Inhalt der Datei in JSON.
- Wählen Sie OAuth2-Authentifizierung aus.
- Fügen Sie einen HTTP-Header mit dem Namen Accept und Wert text / *, multipart / mixed, application / xml, application / json hinzu. odata.metadata = keine.
- Geben Sie unter Authentifizierungseinstellungen das OAuth-Zugriffstoken ein, das Sie in Office 365 generiert haben, und legen Sie den OAuth-Token-Typ auf Träger fest (siehe Office 365-Einstellungen unten).
- Klicken Sie auf mit OAuth anmelden und geben Sie alle Parameter ein. Stellen Sie den Gültigkeitsbereich entsprechend dem Token ein.
- Klicken Sie auf Weiter und importieren Sie die Daten.
Office 365 Einstellungen
- Gehen Sie zu https://portal.azure.com/
- Klicken Sie im linken Menü auf Azure Active Directory und dann auf App-Registrierungen.
- Fügen Sie eine neue Anwendungsregistrierung hinzu, wählen Sie Web-App / API aus und geben Sie die URL Ihrer BellaDati-Anwendung ein.
- Fügen Sie unter Antwort-URLs einen neuen Dataset hinzu: URLofYourBD / auth / callback / oauth2
- Fügen Sie unter Erforderliche Berechtigungen folgendes hinzu:
- Office 365 Exchange Online (Microsoft.Exchange) - Kontakte in allen Mailboxen lesen
- Windows Azure Active Directory (Microsoft.Azure.ActiveDirectory) - Melden Sie sich an und lesen Sie das Benutzerprofil
- Fügen Sie unter Schlüssel einen neuen Schlüssel hinzu und kopieren Sie die Anmeldeinformationen.
Nächste Schritte
- Bring mich zu den Datenquellen zurück
- Importeinstellungen
- Planen des Imports
List siblings
Overview
Content Tools