Page History
| Sv translation | ||||||||||||||||||||||||||||||||||||||||||||||||||||||||
|---|---|---|---|---|---|---|---|---|---|---|---|---|---|---|---|---|---|---|---|---|---|---|---|---|---|---|---|---|---|---|---|---|---|---|---|---|---|---|---|---|---|---|---|---|---|---|---|---|---|---|---|---|---|---|---|---|
| ||||||||||||||||||||||||||||||||||||||||||||||||||||||||
Before You BeginPlease read the following important notes before you begin installing BellaDati on Tomcat:
1. Setup data warehousePlease follow the instructions on the Setting up the PostgreSQL Database page. 2. Download and extract BellaDati WAR ArchiveDownload the BellaDati WAR distribution as a ZIP archive from the BellaDati download page and extract its content using a tool such as 7-Zip for Windows or Linux's GNU tar tools. Only one of the files in the ZIP archive is used for this setup -
3. Configure BellaDati WARSince version 2.7.14 there is no special configuration change needed, however, there are several advanced settings (e.g. enforcing the SSL), which are configurable in application.properties only.
4. Configure Tomcat4.1 Configure Tomcat ContextA BellaDati context needs to be set up in Tomcat. To do this:
If you are installing in Windows, make sure that the paths you specify for the location of the WAR file and database are full paths with drive letters (e.g.
4.2 Set JAVA Environment
4.2.1 For Linux/SolarisBefore you start Tomcat, make sure you have configured the JAVA_HOME variable, which points to the installed Java SDK. You can do it in this way:
Make sure this variable is automatically set after system starts (append it to the You can also specify it in the file
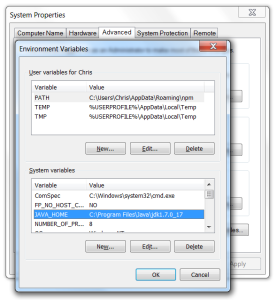
4.2.2 For WindowsWindows users can specify the environment parameters in the Environment Variables window.
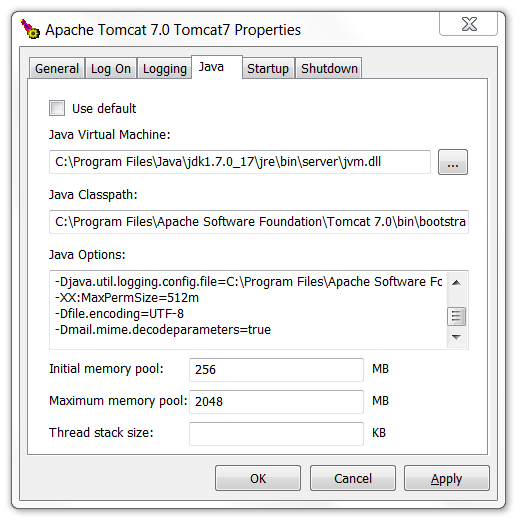
4.3 Set Tomcat Home Directory PermissionsBy default BellaDati is creating several directories within the Tomcat home folder. To allow this, Tomcat needs to run as a user with read and write access to this directory. 4.4 Configure Memory Settings in TomcatTomcat memory settings need to be modified to avoid the following issue:
To prevent this issue, follow the instructions below.
For Linux/SolarisEdit
Alternatively, you can edit the
For Windows
If Tomcat is not installed as a service:
If Tomcat is installed and running as a service:
For other environments and more information on memory settings, see the System Requirements. 4.5 Modify Tomcat's |
| Code Block |
|---|
<Connector port="8080" protocol="HTTP/1.1" connectionTimeout="20000" redirectPort="8443"/> |
You should modify this element by specifying the URIEncoding="UTF-8" attribute:
| Code Block |
|---|
<Connector port="8080" protocol="HTTP/1.1" connectionTimeout="20000" redirectPort="8443" URIEncoding="UTF-8"/> |
| Info |
|---|
Please Note:
|
4.6 Modify Tomcat's context.xml
In order for Tomcat to be able to cache web resources of BellaDati a default value for the cache size must be modified. Modify the $TOMCAT_HOME/conf/context.xml file in your Tomcat installation directory by adding following line:
| Code Block |
|---|
<Resources cacheMaxSize="51200" /> |
4.7 Set PID file for Tomcat
To be able to use Tomcat's bin/shutdown.sh or bin/shutdown.bat file to properly shutdown the Tomcat, a path to a file which will contain PID of started Tomcat needs to be set in CATALINA_PID environment variable.
For Linux/Solaris
Edit $TOMCAT_HOME/bin/setenv.sh file (or create this file if it does not exist) and add the following:
| Code Block |
|---|
export CATALINA_PID=<absolute-path-to-pid-file> |
For Windows
Edit $TOMCAT_HOME/bin/setenv.bat file (or create this file if it does not exist) and add the following:
| Code Block |
|---|
set CATALINA_PID=<absolute-path-to-pid-file> |
4.8 Configure location for logs
The default location for logs generated by BellaDati (see Configure logging for more details) is relative to the exploded belladati.war which is not suitable for long term storage.
To change the logs directory, add a new JVM option -Dlogs.location=<location>, where <location> is the desired absolute path to the parent directory in which logs will be stored, to your Tomcat (see section 4.4 for more details on how to do it).
5. Start or Restart Tomcat
BellaDati is now ready to run in Tomcat.
Run as Service
Start the Tomcat service used for Belladati. Restart it if it's already running.
Run Manually
If Tomcat is not running as a service, start (or restart) the Tomcat server with Tomcat's bin/startup.sh or bin/startup.bat scripts.
Shutdown Manually
If Tomcat is not running as a service, you can stop the Tomcat server with Tomcat's bin/shutdown.sh or bin/shutdown.bat scripts if you set a CATALINA_PID environment variable with the path to a file containing PID of the running Tomcat.
6. Run the Setup Wizard
Point your browser to http://localhost:8080/belladati. This starts the Setup Wizard, which will take you through BellaDati's setup procedure.
| Sv translation | ||||||||||||||||||||||||||||||||||||||||||
|---|---|---|---|---|---|---|---|---|---|---|---|---|---|---|---|---|---|---|---|---|---|---|---|---|---|---|---|---|---|---|---|---|---|---|---|---|---|---|---|---|---|---|
| ||||||||||||||||||||||||||||||||||||||||||
始める前に Tomcat上BellaDatiのインストールを開始する前に、次の重要な注意事項をお読みください
1. データウェアハウス設定PostgreSQLデータベースの設定ページの指示に従ってください。 2. WARダウンロードしてBellaDati WARアーカイブ抽出BellaDatiダウンロードページからZIPアーカイブとしてBellaDati WARディストリビューションをダウンロードして、Windows7-ZipまたはLinux のGNU tarなどツールを使用してその内容を解凍します。ZIPアーカイブ内の一つファイルしかbelladati.warにこのセットアップが使用されません。
3. BellaDati WAR設定2.7.14バージョンから特別な構成に変更がないですがapplication.propertiesで設定されているいくつかの拡張設定が(例えば、SSLを強制する)あります。
4. Tomcat構成4.1 Tomcatの設定コンテキストBellaDatiコンテキストは、Tomcatでセットアップする必要があります。以下となります。
ここではサンプルファイルです。 Windowsでインストールする場合は、WARファイルとデータベースの場所に指定するパスがドライブ文字がある完全パスであることを確認してください(例えば 4.2 JAVA環境の設定
4.2.1 Linux/Solaris用Tomcatを開始する前に、あなたがインストールしたJava SDKを指すJAVA_HOME変数を設定していることを確認してください。以下の通りに進みます。
この変数は自動的にシステムが起動(.profileに追加)後に設定されていることを確認してください。
4.2.2 Windows用Windowsユーザーは環境変数ウィンドウに環境パラメータを指定できます。
4.3 Tomcat のホームディレクトリのアクセス権を設定するデフォルトでは、BellaDatiはTomcatホームフォルダ内に複数のディレクトリを作成しています。 これに従って、このディレクトリへの読み書きアクセス権を持つユーザとしてTomcatを実行する必要があります。 4.4 Tomcatでメモリ設定を構成Tomcatメモリ設定は、以下の問題を回避するように修正される必要があります。 この問題を回避するには、以下の手順に従ってください。
Linux/Solaris用
また、
Windows用
Tomcatはサービスとしてインストールされていない場合:
Tomcatがサービスとしてインストールされている場合:
他の環境とメモリの設定の詳細については、システム要求を参照してください。 4.5 Tomcatの |
| Code Block |
|---|
<Connector port="8080" protocol="HTTP/1.1" connectionTimeout="20000" redirectPort="8443"/> |
URIEncoding = "UTF-8"属性を指定することで、この要素を変更する必要があります。
| Code Block |
|---|
<Connector port="8080" protocol="HTTP/1.1" connectionTimeout="20000" redirectPort="8443" URIEncoding="UTF-8"/> |
| Info |
|---|
注意:
|
5. Tomcat開始または再起動
今BellaDatiはTomcatで実行できました。
サービスとして実行
Belladatiに使用するTomcatサービスを開始します。すでに実行している場合にそれを再起動します。
手動で実行
Tomcatがサービスとして実行されていない場合は、Tomcatのbin/startup.sh or bin/startup.batのスクリプトでTomcatサーバーを起動します(または再起動する)。
6. ウィザードセットアップを実行
お使いのブラウザでhttp://localhost:8080/belladatiに移します。これはBellaDati設定手順を介して行くことができるセットアップウィザードを起動します。
-Xmxに2048 MB値(最大メモリプール)は評価目的のみのために推奨されますのでご注意ください。本番デプロイするための推奨設定を見つけるために推奨JVMオプションの記事を参照してください
BellaDatiはTomcatのデフォルトで提供するものより多くのメモリを必要になります。これらのメモリの設定が増加されていない場合BellaDatiを実行しているときに、これがOutOfMemoryをエラーになる場合があります。
Overview
Content Tools