Page History
| Sv translation | |||||||||||||||||||||||||||||||||||||||||||||||||||||||||||||||||||||||||||||||||||||||||
|---|---|---|---|---|---|---|---|---|---|---|---|---|---|---|---|---|---|---|---|---|---|---|---|---|---|---|---|---|---|---|---|---|---|---|---|---|---|---|---|---|---|---|---|---|---|---|---|---|---|---|---|---|---|---|---|---|---|---|---|---|---|---|---|---|---|---|---|---|---|---|---|---|---|---|---|---|---|---|---|---|---|---|---|---|---|---|---|---|---|
| |||||||||||||||||||||||||||||||||||||||||||||||||||||||||||||||||||||||||||||||||||||||||
The BellaDati Java SDK is an easy-to-use implementation to access the REST API using Java. All data is made available in Java objects, eliminating the need to manually parse and interpret JSON responses from the server. Setting up the SDK
The SDK consists of several parts:
To use the SDK, download the API jar and the implementation matching your environment. When upgrading, make sure the versions of both jars match. The SDK source is available on GitHub. DependenciesDependencies for the SDK depend on the implementation you are planning to use. You can manually set up the dependencies or configure Maven to do it for you. Regular Java VMUsing MavenAdd the following dependency and dependency management entries:
Manual SetupDownload and add the following libraries to your classpath:
AndroidUsing MavenIn your
Manual SetupDownload and add the following libraries to your project:
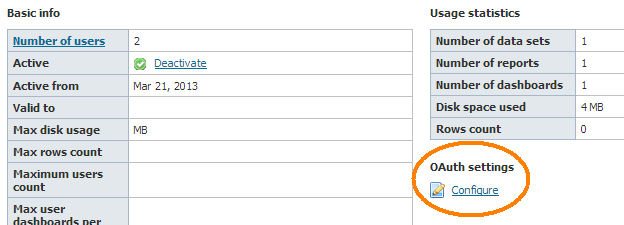
Server SetupIn order to access data from BellaDati, you need to enable API access in your domain. To do so, open your domain settings and click Configure under OAuth Settings.
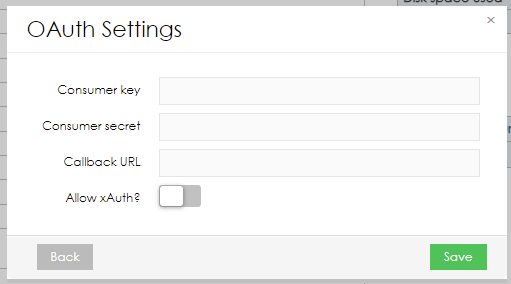
In this dialog, enter a consumer key and consumer secret. These will be used during authentication in the SDK.
You can optionally set a callback URL that will be opened when a user successfully authorizes an OAuth request - more on that in the example below. Finally, if your application environment doesn't allow using a web browser for authentication, you can enable xAuth to authenticate with username and password from within your client application. Usage ExampleIn this example, we will use the SDK to authenticate using OAuth or xAuth and retrieve some data visible to our example user. AuthenticationBefore we can read data through the SDK, we have to authenticate as a valid user. In this example, let's assume that we have set up a domain with a consumer key sdkKey and a consumer secret sdkSecret. The first step is to connect to our server:
Alternatively, we could use:
OAuthThe recommended form of authentication is OAuth. Using this protocol, the SDK requests a token from the server that the user then has to authorize using their web browser. The advantage of this mechanism is that the user sends their credentials directly to the server, reducing the risk of them getting intercepted on the computer running the SDK. In the first step, we let the SDK get a request token from the server:
Now, we need to ask our user to authorize this token:
This is where the callback URL mentioned above comes in: If you are writing a web application, you can use the callback to redirect the user back to your application after authorizing access. Once the user has successfully authorized our application, we can request access from the server:
xAuthFor some applications, it is not possible or feasible to use a web browser for authentication. In these situations, you can use xAuth to have the user enter their credentials directly into your application and use them as follows:
Retrieving DataAfter successful authentication, we now have an instance of the BellaDatiService interface. This interface offers several methods to get data from the server. In our example, let's first get a list of reports along with thumbnail images to display to the user.
This call consists of multiple steps: getReportInfo() gives us a PaginatedList (specifically, a PaginatedIdList) of reports, which is initially empty. Calling load() contacts the server and fetches the first page of reports. A PaginatedList is Iterable (so you can use it in loops) and offers methods like size(), get(), contains() and others to find out about its contents, as well as several methods to work with the pagination itself. Finally, if your use case requires a regular List, you can easily convert it by calling toList(). The ReportInfo objects inside the list contain general information about our reports, such as their names, descriptions and owners. To load the thumbnails, we have to make a separate request to the server for each report we want to load. Since these requests may take a some time depending on server latency, we want to load our thumbnails in parallel. For example:
You may notice that loadThumbnail() returns Object, which is cast to BufferedImage in the example above. This is to support different implementations - on Android (which doesn't have BufferedImage), you'll get an Android Bitmap instead. In some situations, perhaps in a web application, you might just want to load a thumbnail for a given report ID, without having to load the report itself first. To do this, you can instead use:
Now we have a list of reports including thumbnail images that we can show to our user, asking them to select which one they would like to see. Let's say our user has selected the 3rd report in the list. We can get its contents:
This Report object contains more details about the report, most importantly a list of its Views. Each chart, table, KPI etc. inside a report is represented by such a View. We can iterate over the views and display them:
As you can see, views can have different types, which are rendered differently. Most views contain JSON content, which is returned as a JsonNode from the Jackson library. Tables however contain Table objects, which have 3 additional load methods to load the table's contents. You can refer to the TableView for details on how to load tables. In this example, we are loading all views one by one in a single thread, which may be slow. It can easily be done in parallel by using a mechanism similar to what we did for thumbnail images above, but we decided to omit it here for clarity. General AdviceTry not to make many calls to the server in sequence to avoid causing long loading times for your users. When loading multiple items, consider loading them in parallel. It's easy to recognize which methods should better be run in parallel: Any methods named loadSomething() are making a call to the server. The BellaDatiService interface offers several shortcut methods that can give you direct access to an object when you know its ID. For example, you can load a report without first getting the report list, or a view without first loading its report. You can save a user's active session for later use by serializing your BellaDatiService instance and storing it in your application. When the user wants to continue working with your application, you can restore the instance and the user doesn't need to authenticate again until the access token used by the SDK expires. |

| Sv translation | |||||||||||||||||||||||||||||||||||||||||||||||||||||||||||||||||||||||||||
|---|---|---|---|---|---|---|---|---|---|---|---|---|---|---|---|---|---|---|---|---|---|---|---|---|---|---|---|---|---|---|---|---|---|---|---|---|---|---|---|---|---|---|---|---|---|---|---|---|---|---|---|---|---|---|---|---|---|---|---|---|---|---|---|---|---|---|---|---|---|---|---|---|---|---|---|
| |||||||||||||||||||||||||||||||||||||||||||||||||||||||||||||||||||||||||||
Java SDK BellaDatiはJavaを使用してREST APIにアクセスするための使いやすい実装です。すべてのデータはJavaオブジェクトで使用可能になり、手動で解析する必要性を排除して、サーバーからのJSON応答を解釈します。 SDK設定SDKはいくつかの部分で構成されています。
SDKを使用するには、API jarをダウンロードして、使用環境にマッチしてください。アップグレードする場合には両方のjarファイルのバージョンが一致していることを確認します 依存関係SDKの依存関係は、使用ために計画している実装に依存します。あなたは依存関係を手動で設定またはMavenを設定できます。 通常のJava VMMaven使用次の依存関係と依存関係管理エントリを追加します。
手動設定ダウンロードして、あなたのクラスパスに次のライブラリを追加します。
AndroidMaven使用あなたのbuild.gradleファイルでは、以下のリポジトリと依存関係のエントリを追加します
手動設定ダウンロードして、プロジェクトに次のライブラリを追加する。
サーバー設定BellaDatiからのデータにアクセスするには、ドメイン内のAPIアクセスを有効にする必要があります。そうするために、ドメインの設定を開いて、「Oauth設定」下の「構成」をクリックします。
このダイアログでは、コンシューマキーとコンシューマシークレットを入力します。これらは、SDKの認証時に使用されます。
ユーザーがOAuthリクエストを正常に承認したときに開かれるコールバックURLを任意設定できます。詳細は以下の例をご参考してください。最後、アプリケーション環境は認証のためのWebブラウザを使用することを許可しない場合、クライアントアプリケーション内からユーザ名とパスワードで認証するためXAUTHを有効にすることができます。 使用例この例では、SDKを使用してOAuthまたはxAuthを使用して認証し、サンプルユーザーに表示されるデータを取得します。 認証SDKを介してデータを読み取ることができる前に、有効なユーザとして認証する必要があります。この例では、コンシューマキーsdkKeyとコンシューマシークレットsdkSecretを使用してドメインを設定したと仮定します。最初のステップは、サーバーに接続することです。
あるいは、使用できます:
OAuth認証の推奨フォームはOAuthです。このプロトコルを使用すると、SDKは、ユーザーがWebブラウザを使用して承認する必要のあるサーバーからトークンを要求します。このメカニズムの利点は、ユーザがSDKを実行しているコンピュータ上で制限させるリスクを低減し、サーバーに直接に資格情報を送信することです。 最初のステップでは、SDKにサーバからのリクエストトークンを取得させます。
今、私たちはこのトークンを許可するユーザーに依頼する必要があります。
ここは上記のようにコールバックURLが入るところです: Webアプリケーションを記述する場合は、コールバックを使用して、アクセスを承認した後にユーザーをアプリケーションにリダイレクトすることができます。 ユーザがアプリケーションを正常に認可された後、サーバーからのアクセスを要求できます。
xAuthいくつかのアプリケーションでは、認証のためにウェブブラウザを使用することが可能または不可能です。このような状況では、xAuthを使用すると、ユーザーがアプリケーションに直接資格情報を入力し、次のように使用できるようになります。
データの取得認証が成功した後、今BellaDatiServiceインタフェースのインスタンスを持っています。このインターフェイスは、サーバーからデータを取得するためにいくつかの方法を提供しています。この例では、最初にサムネイル画像とともにレポートのリストを取得してユーザーに表示しましょう。
この呼び出しは、複数のステップで構成されています。getReportInfo()は最初が空でレポートのPaginatedList(特に、PaginatedIdList)を提供します。サーバーに問い合わせload()を呼び出し、レポートの最初のページをフェッチします。PaginatedListはIterableであり、その内容について調べるためにsize()、 get(),、contains()などのメソッドとともにページネーション自体を操作するいくつかの方法を提供しています。最後、ご利用の場合は通常のListを必要とすれば、簡単にtoList()呼び出すことによってそれを変換できます。 リストの内にReportInfoオブジェクトは、名前、説明、所有者などレポートに関する一般的な情報が含まれています。サムネイルをロードするために、我々はロードしたい各レポートのサーバーへ個別の要求を行う必要がります。これらの要求は、サーバーの待ち時間に応じていくつかの時間がかかる場合がありますので、当社のサムネイルを並行してロードしたいです。例えば:
loadThumbnailは、上記の例でBufferedImageにキャストされているObjectを返却します。異なる実装をサポートし、代わりにAndroidでのBitmapAndroidを取得します(BufferedImageを持っていない) いくつかの状況では、おそらくWebアプリケーションで最初のレポート自体をロードすることなく、与えられたレポートにIDのサムネイルをロードできます。これを行うには、代わりに使用できます。
次に、ユーザーに表示できるサムネイル画像を含むレポートのリストを表示し、どの画像を表示するかを選択するよう求めます。 ユーザーがリストの3番目のレポートを選択したとします。 私たちはその内容を得ることができます:
このReportオブジェクトは、、レポートについての詳細、特にそのViewsのリストが含まれています。レポート内の各チャート、テーブル、KPIなどは、このようなViewによって表されます。ビューを繰り返して表示することができます。
ご覧のように、ビューは異なるレンダリングされた異なるタイプを持つことができる。ほとんどのビューは、ジャクソンライブラリからJsonNodeとして返却されるJSONコンテンツが含まれます。しかし、テーブルオブジェクトを含むテーブルがテーブルの内容を追加ロードするための3つの方法がある。テーブルをロードする方法の詳細については、TableViewをご参照してください。 この例では、時間がかかることがあり、単一のスレッドによってすべてのビューをロードしています。簡単に上記のサムネイル画像にしたものと同様のメカニズムを使用することで並行して行われますが、明確にするためにここでそれを省略することに決定できます。 一般的助言ユーザーの読み込み時間が長くなることを避けるために、サーバーを何度も呼び出さないようにしてください。複数の項目をロードする場合、それらを並行してロードすることを検討してください。これは、より良い並列で実行されるべき方法を認識するのは簡単です:loadSomething()という名前の任意の方法は、サーバーへの呼び出しを行っています。 BellaDatiServiceインターフェイスを使用すると、そのIDを知っているときに、オブジェクトに直接アクセスできるいくつかのショートカットメソッドが用意されています。たとえば、レポートリストを最初に取得したり、最初にレポートをロードせずにレポートをロードすることができます。 BellaDatiServiceインスタンスをシリアル化してアプリケーションに保存することで、後で使用できるようにユーザーのアクティブなセッションを保存できます。ユーザがアプリケーションで作業を継続したい場合は、インスタンスを復元することができ、SDKで使用されるアクセストークンが期限切れになるまでユーザーは再度認証する必要はありません。 SDKはいくつかの部分で構成されています。 |
Overview
Content Tools