Page History
| Sv translation | |||||||||||||||
|---|---|---|---|---|---|---|---|---|---|---|---|---|---|---|---|
| |||||||||||||||
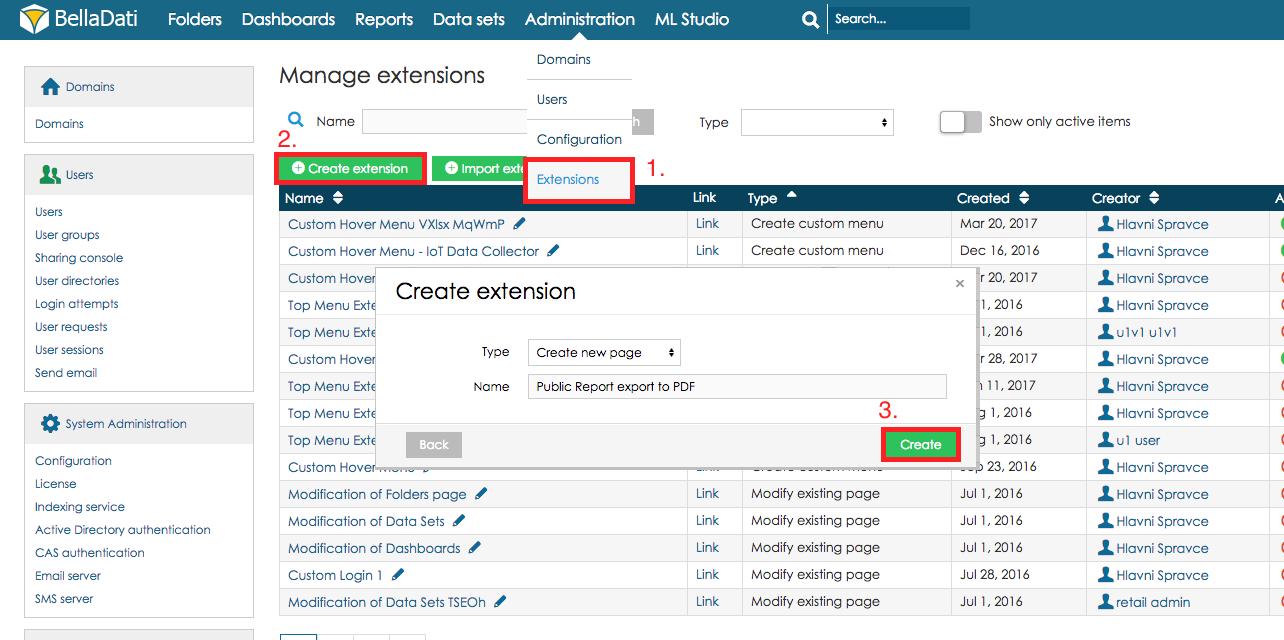
You can create your own API Endpoints using BellaDati Extensions feature. This tutorial describes how to create an endpoint which exports public Report to PDF. You can download complete Extension with an endpoint here and import it to BellaDati Extensions. Refer to Importing Extensions section in Extensions documentation. Preconditions
TutorialStep 1. Create an Extension
Step 2. Create an API Endpoint in ExtensionAfter creating the Extension you should be redirected to Extension detail.
Step 3. Write code which will export Report to PDF and send it to clientAfter creating the Endpoint you should be redirected to Endpoint detail with code editor where you can write/paste your code. In the Endpoint class are 2 methods, doGet() and doPost(). Each will be executed based on the endpoint call method (GET/POST). We will call this endpoint as GET so we will write the code in the doGet() method. Refer to the code below:
Step 4. Endpoint usageExtension has to be activated before the endpoint can be used. We also have to activate Public access so public users will be able to use the endpoint.
Endpoint is now ready to use so we can try it. Clicking on Link above the code editor will open URL with our endpoint. We just have to append parameter "reportId" with ID of Report which should be exported (refer to implementation above). Your URL should look like this:
Example usage in HTML:
|


| Sv translation | |||||||||||||||
|---|---|---|---|---|---|---|---|---|---|---|---|---|---|---|---|
| |||||||||||||||
Extensionsを使用して、独自のAPIエンドポイントを作成できます。このチュートリアルでは、パブリックレポートをPDFにエクスポートするエンドポイントを作成する方法について説明します。 ここからエンドポイントを含む完全な拡張機能をダウンロードして、BellaDati拡張機能にインポートできます。拡張機能の「拡張機能のインポート」セクションを参照してください。 前提条件
チュートリアルStep 1. Create an Extension
Step 2. Create an API Endpoint in ExtensionAfter creating the Extension you should be redirected to Extension detail.
Step 3. Write code which will export Report to PDF and send it to clientAfter creating the Endpoint you should be redirected to Endpoint detail with code editor where you can write/paste your code. In the Endpoint class are 2 methods, doGet() and doPost(). Each will be executed based on the endpoint call method (GET/POST). We will call this endpoint as GET so we will write the code in the doGet() method. Refer to the code below:
Step 4. エンドポイントの使用Extension has to be activated before the endpoint can be used. We also have to activate Public access so public users will be able to use the endpoint.
Endpoint is now ready to use so we can try it. Clicking on Link above the code editor will open URL with our endpoint. We just have to append parameter "reportId" with ID of Report which should be exported (refer to implementation above). Your URL should look like this:
Example usage in HTML:
|
Overview
Content Tools