Versions Compared

Key

  • This line was added.
  • This line was removed.
  • Formatting was changed.
Comment: Migration of unmigrated content due to installation of a new plugin
Sv translation
languageen

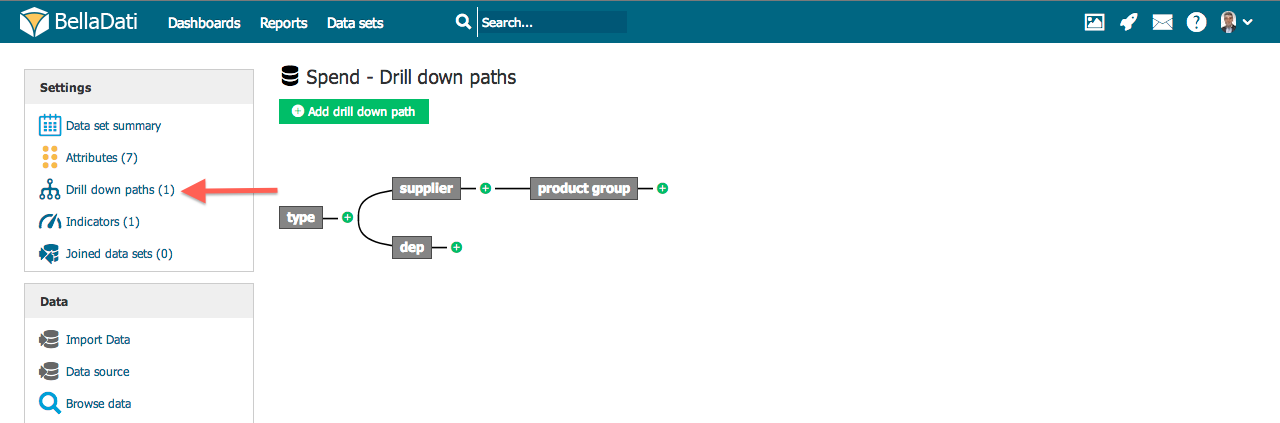
Predefined drill-down path specifies the meaningful sequence might by useful for further drill-down operation in report (see attached video tutorial below). Each data set can contain more drill-down paths. The simplest drill-down path is linear, however BellaDati supports more complex structures like trees.

Info

Predefined drill-down paths are available int the report when performing ad-hoc drill-down (by clicking on + in the table), or in the drill-down settings.


  1. Go to desired data set via data set menu.
  2. Select "Attributes" in the left submenu.
Info

Predefined drill-down paths significantly simplifies creating reports by analysts and performing drill-down operation in reports and on dashboards. Therefore we recommend defining these paths on the data set level.

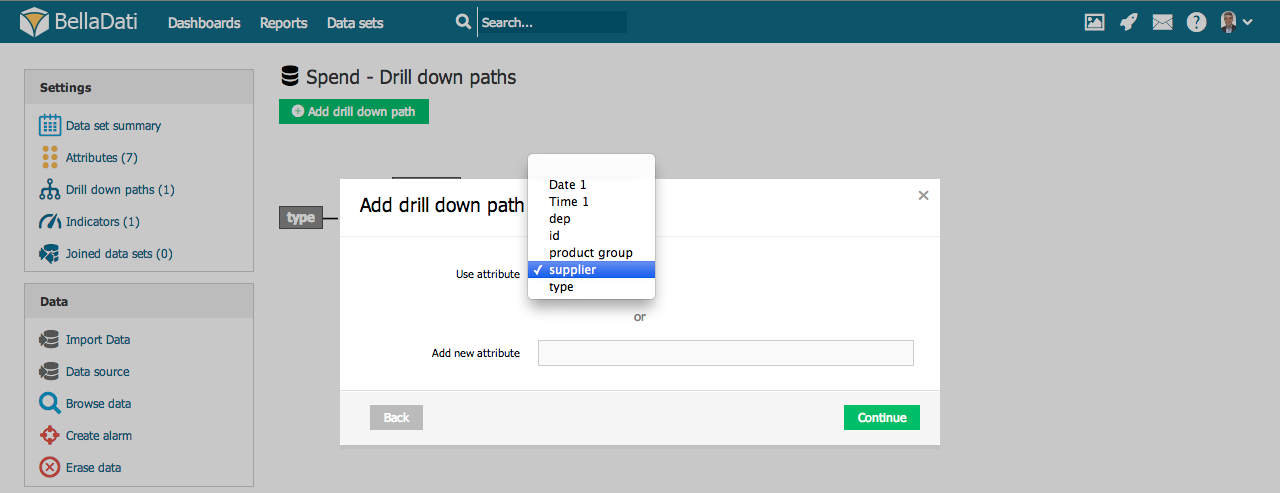
Adding new drill-down path

  1. Click "Add drill down path" at the top of the page. A popup will appear.
  2. Select first attribute in "Use attribute" drop-down box and click on "Save" button.
  3. Click the green plus icon on the right of existing attribute in drill-down path to add another attribute and repeat steps above to create whole drill-down path.
Note

By clicking on green plus icon in the middle of existing drill-down path, you can branch out current drill-down path to more sub-paths.


Tip

You can create an new attribute during drill-down path definition by filling in the field "Add new attribute" in the popup. See managing attributes for details.

Editing drill-down path

  • Removing attribute: Hoover over the desired attribute, click on the top left cross symbol and confirm this action in popup.

Tutorial video

HTML
<iframe width="560" height="315" src="https://www.youtube.com/embed/u9mtM4FIIA8" frameborder="0" allow="accelerometer; autoplay; encrypted-media; gyroscope; picture-in-picture" allowfullscreen></iframe>


Next Steps

Sv translation
languagesk

Preddefinované vetvenie určuje logickú postupnosť operácií vetvenia v reporte (viď. pridané tutoriálové video). Každá skupina dát môže obsahovať viacero takýchto vetvení. Najjednoduchšie preddefinované vetvenie je lineárne, avšak BellaDati podporuje aj komplexnejšie štruktúry ako napríklad stromy.

Info

Preddefinované vetvenia sú dostupné v reporte pri vykonávaní ad hoc vetvenia (kliknutím na + v tabuľke), alebo v nastavení vetvenia.


  1. Prejdite na požadovanú skupinu dát.
  2. Vyberte zložku "Atribúty" z ľavého menu.
Info

Preddefinované vetvenie do značnej miery uľahčuje tvorenie reportov analytikmi, rovnako ako aj operácie vetvenia v reportoch a dashboardoch. Preto odporúčame definovať preddefinované vetvenia na úrovni skupín dát.

Pridávanie nového preddefinovaného vetvenia

  1. Kliknite na "Pridať preddefinované vetvenie"  na spodnej časti stránky. Zobrazí sa nové okno.
  2. Vyberte prvý atribút z poľa "Použiť atribút" a kliknite na tlačítko "Uložiť".
  3. Kliknite na zelené tlačítko plus na pravej strane existujúceho atribútu v preddefinovanom vetvení a pridajte ďalší atribút. Takto pokračujte a vytvorte celé požadované vetvenie.
Note

Kliknutím na zelené plus v strede existujúceho prepojenia môžete vytvoriť "odbočku" a tak vytvoriť viacero úrovní.


Tip

Počas tvorby preddefinovaného vetvenia môžete pomocou vyplnenie poľa "Pridať nový atribút" v popup okne vytvoriť nový atribút. Pre viac informácií prejdite na správa atribútov.

Úprava preddefinovaného vetvenia

  • Odobratie atribútu: Prejdite nad názvom požadovaného atribútu, kliknite na krížik v pravom hornom rohu a následne túto akciu potvrďte.

Tutoriálové video

Widget Connector
width853
urlhttps://www.youtube.com/watch?v=u9mtM4FIIA8&index=13&list=PL48CzuF9XMMcOBpaXoTyH1a19QF2eU94G
height480

Kam ďalej

Sv translation
languageja

事前定義されたドリルダウンパスは、レポートのさらなるドリルダウン操作に役立つ意味のある順序を指定します (以下の添付のチュートリアルビデオをご覧下さい)。各データセットには、さらにドリルダウンパスを含めることができます。最もシンプルなドリルダウンパスは線形ですが、BellaDatiはツリー構造のようなより複雑な構造をサポートしています。

Info

事前定義されたドリルダウンパスは、アドホックドリルダウンを実行する際 (表で+をクリック)、またはドリルダウン設定で、レポートで利用可能です。


  1. データセットのメニューから目的のデータセットに進んでください。
  2. 左側のサブメニューから、[属性]を選んでください。
Info
事前定義されたドリルダウンパスにより、アナリストによるレポートの作成と、レポートおよびダッシュボードでのドリルダウン操作の実行が大幅に簡素化されます。したがって、これらのパスをデータセットレベルで定義することをお勧めします。 

新規ドリルダウンパスの追加

  1. ページ上部の[ドリルダウンを追加]をクリックしてください。ポップアップが表示されます。
  2. [属性を使用する]ドロップダウンボックスで最初の属性を選択し、[次へ]ボタンをクリックします。
  3. ドリルダウンパス内の属性の右側にある緑色のプラスアイコンをクリックして別の属性を追加し、上記の手順を繰り返すことでドリルダウンパス全体を作成します。
Note

既存のドリルダウンパス中央にある緑色のプラスアイコンをクリックすると、現在のドリルダウンパスをさらにサブパスに分岐することができます。


Tip
ドリルダウンパスの定義中に、ポップアップ内の[新しい属性を追加する]フィールドに入力して、新しい属性を作成できます。詳細については、Managing Attributesをご覧ください。

ドリルダウンパスの編集

  • 属性の削除: 目的の属性にカーソルを合わせ、左上の×マークをクリックして、ポップアップでこの操作を確認します。

チュートリアルビデオ

HTML
<iframe width="560" height="315" src="https://www.youtube.com/embed/u9mtM4FIIA8" frameborder="0" allow="accelerometer; autoplay; encrypted-media; gyroscope; picture-in-picture" allowfullscreen></iframe>


次に

Sv translation
languagede

DatasetDer vordefinierte Drilldown-Pfad gibt die sinnvolle Reihenfolge an, die möglicherweise für weitere Drilldown-Vorgänge in Reports nützlich sind (siehe beiliegendes Video-Lernprogramm unten). Jeder Dataset kann weitere Drilldown-Pfade enthalten. Der einfachste Drilldown-Pfad ist linear, BellaDati unterstützt jedoch komplexere Strukturen wie Bäume.

Info

Vordefinierte Drilldown-Pfade sind im Report verfügbar, wenn Sie einen Ad-hoc-Drilldown durchführen (durch Klicken auf + in der Tabelle) oder in den Drilldown-Einstellungen.


  1. Zum gewünschten Dataset über das Datasetmenü gehen.
  2. Wählen Sie im linken Untermenü "Attribute".
Info

Vordefinierte drilldown-Pfade vereinfachen die Erstellung von Reports  durch Analysten und die Durchführung von Drilldown-Vorgängen in Reports und Dashboards erheblich. Daher empfehlen wir, diese Pfade auf Datasetebene zu definieren.

Neuen Drilldown-Pfad hinzufügen

  1. Klicken Sie unten auf der Seite auf "Drilldown-Pfad hinzufügen". Es erscheint ein Popup.
  2. Wählen Sie das erste Attribut in der Dropdown-Liste "Attribut verwenden" aus und klicken Sie auf die Schaltfläche "Speichern".
  3. Klicken Sie auf das grüne Plus-Symbol rechts neben dem vorhandenen Attribut im Drilldown-Pfad, um ein weiteres Attribut hinzuzufügen, und wiederholen Sie die obigen Schritte, um den gesamten Drilldown-Pfad zu erstellen.
Note

Durch Klicken auf das grüne Plus-Symbol in der Mitte des vorhandenen Detaillierungspfads können Sie den aktuellen Detaillierungspfad in weitere Unterpfade verzweigen.


Tip

Sie können ein neues Attribut während der Definition des Drilldown-Pfads erstellen, indem Sie im Popup das Feld "Neues Attribut hinzufügen" ausfüllen. Weitere Informationen finden Sie unter Attribute verwalten.

Drilldown-Pfad bearbeiten

  • Attribut entfernen: Bewegen Sie den Mauszeiger über das gewünschte Attribut, klicken Sie auf das rechte obere Kreuzsymbol und bestätigen Sie die Aktion im Popup.

Tutorial video

Widget Connector
width853
urlhttps://www.youtube.com/watch?v=u9mtM4FIIA8&index=13&list=PL48CzuF9XMMcOBpaXoTyH1a19QF2eU94G
height480

Nächste Schritte