Versions Compared

Key

  • This line was added.
  • This line was removed.
  • Formatting was changed.
Sv translation
languageen

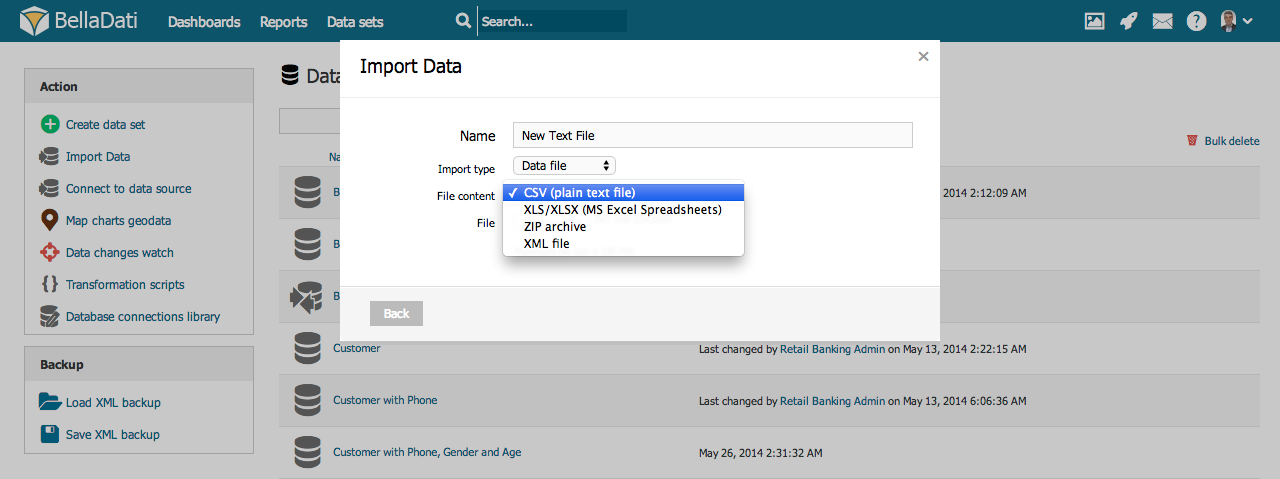
The following file formats are supported for manual import in BellaDati:

  • CSV (plain text files)
  • Microsoft Excel (XLS, XLSX) - Office 2003 - 2016 (previous versions not guaranteed)
  • XML files
  • ZIP files (containing one or more supported file formats above)
  • JSON files

To import file:

  • Go to the Data Set page
  • Select Import data
  • Choose Data file in Inport type
  • Select appropriate Data file format
Info

After selecting the data file, you need to wait until the file is uploaded.


Note

Please note, that default maximum file size to import is 20MB. BellaDati Unlimited or BellaDati On-Premise may have different file size limits. You can compress the file size when importing it in a ZIP archive (see below).

Importing from CSV

When you are importing from CSV, please continue directly to Import settings page.
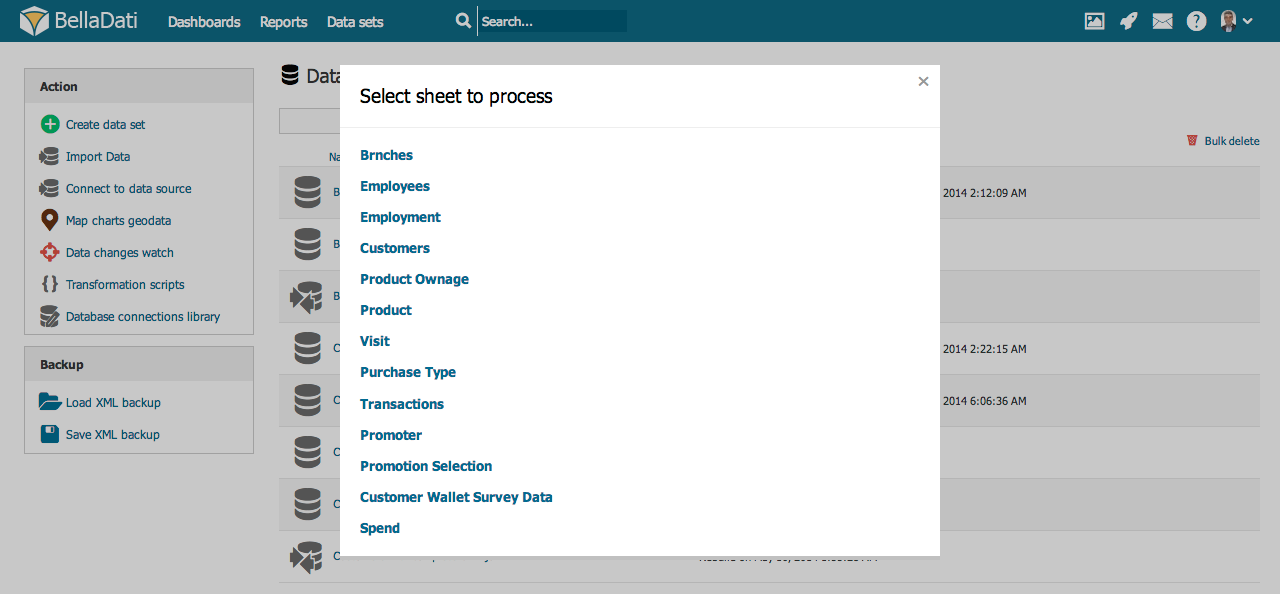
Info

The maximum number of columns in a CSV file is 1000.

Importing from Microsoft Excel

After uploading XLS/XLSX file you will be prompted to select the desired spreadsheet list.
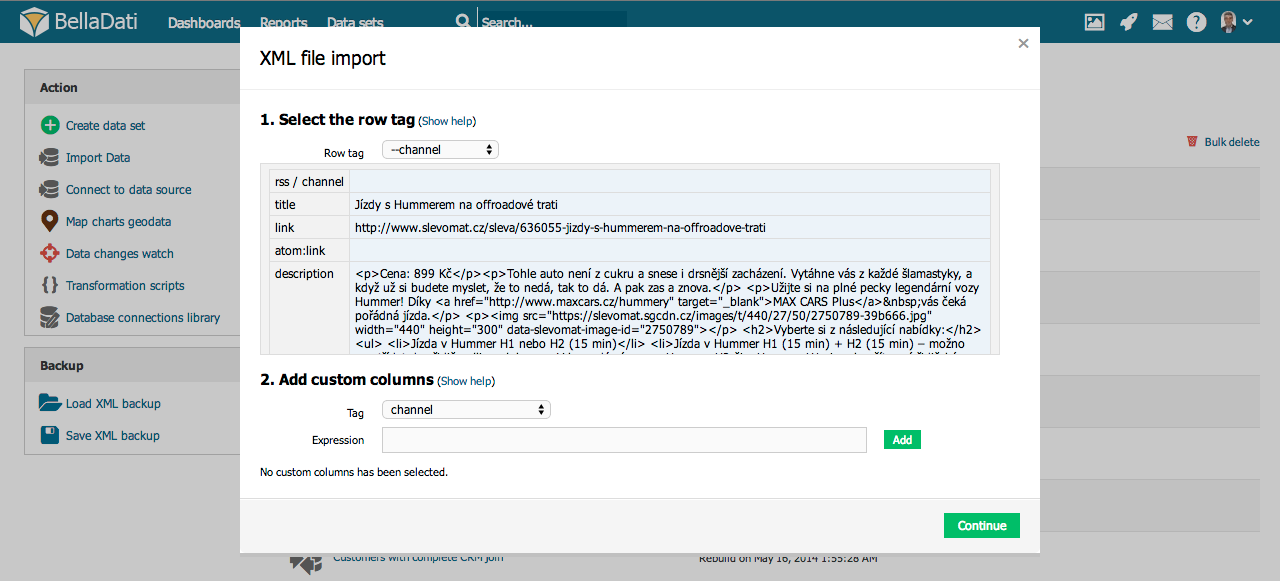

Info

List selection will not appear when your Excel spreadsheet contains only single list.


Info

The recommended number of columns in the XLS/XLSX file is 256.


Importing from XML

In the XML importing guide, you will be prompted to select the row tag, which represents repeatable data sentence. The following example illustrates it on XML file containing employees:

Code Block
<employees>
	<employee>
		<name>Jan</name>
		<surname>Novak</surname>
	</employee>
	<employee>
		<name>Petr</name>
		<surname>Novak</surname>
	</employee>
        ...
</employees>

In this case, the row tag is <employee>.


  1. Row tag: Select repeating tag in XML structure. Check extracted content in the preview on the left.
  2. Optionally, you can add custom columns repeatedly: Select items and/or attributes when XML structure is not straightforward.
Tip

You can use the xPath syntax for the custom columns definition. For more info proceed to tutorial with example, how custom columns can be set.


Importing from ZIP

Importing data compressed as ZIP archive represents an effective way how to reduce imported file size and also upload times significantly. It can contain the following file formats:

  • Plain text (CSV)
  • Microsoft Excel (XLS, XLSX)
  • XML

Please follow corresponding chapters above to continue importing Microsoft Excel or XML file formats.
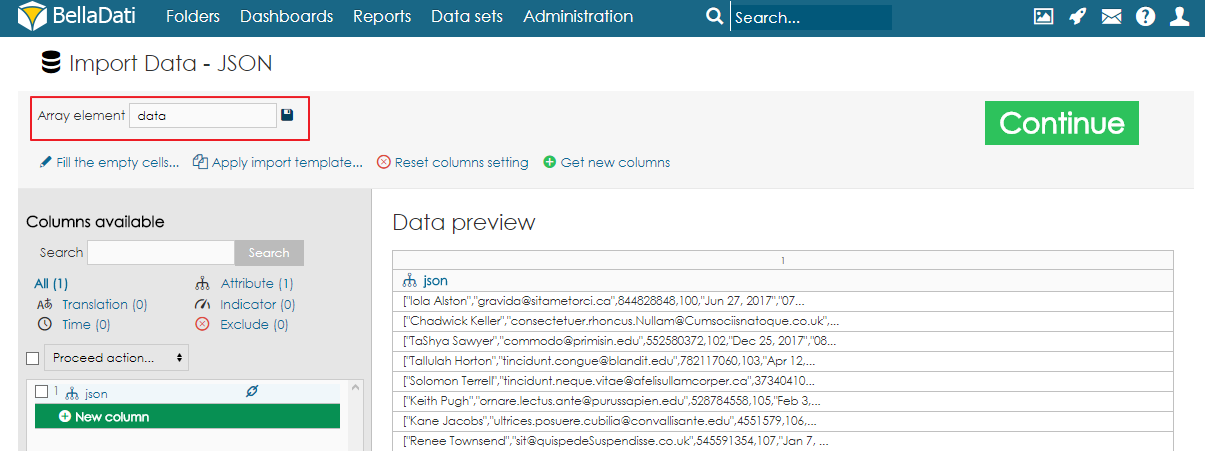
Info

New data set will not be created until the import process will have been successfully completed.

Importing From JSON

Note

Importing from JSON is available since BellaDati 2.9

BellaDati also allows users to import data from JSON file. By using special transformation functions, it is possible to parse JSON arrays and objects.

In some cases, it might be necessary to change Array element to correctly parse the data into rows. This can be done in the import settings.

After choosing the Array element correctly, it is possible to use the function parseJSON() to load the JSON value into a variable and then access the values by using functions getString(), getInteger(), getDouble(), etc. to load the values. To access a nested object, users have to use function getJSONObject(). To access an array, function getJSONArray() is available.

Info

If the Array element is nested into another object, use "," character to separate the Array path.


Examples

Let's have a JSON file with following structure:

Code Block
languagexml
{
	"sales": [{
			"category": "Food",
			"summary": {
				"totalPrice": 136,
				"totalItems": 8,
				"cashierName": "John Doe",
				"items": [{
						"name": "Bread",
						"amount": 5,
						"price": 55
					},
					{
						"name": "Butter",
						"amount": 3,
						"price": 81
					}
				]
			}
		},
		{
			"category": "Drinks",
			"summary": {
				"totalPrice": 40,
				"totalItems": 5,
				"cashierName": "Jane Doe",
				"items": [{
						"name": "Water",
						"amount": 2,
						"price": 10
					},
					{
						"name": "Juice",
						"amount": 3,
						"price": 30
					}
				]
			}
		}
	]
}

To be able to get the values, users need to specify sales as Array element. 

To get the category, add a new column as an attribute and use following code:

Code Block
languagejs
JSONElement e = parseJSON(value(1))
return e.getString('category')

To get the total items, add a new column  as an indicator and use following code:

Code Block
languagejs
JSONElement e = parseJSON(value(1))
JSONElement f= e.getJSONObject('summary') as JSONObject; 
return f.getInteger('totalItems') 

To calculate the total price from all the item prices, use this formula:

Code Block
languagejs
JSONElement e = parseJSON(value(1))
JSONElement f= e.getJSONObject('summary') as JSONObject; 
total = 0;
f.getJSONArray('items').each()
	{
	JSONObject o = it as JSONObject; 
    g = o.getInteger('price') as Integer
      total = total + g
    }
	
return total


Let's have this JSON:

Code Block
languagexml
{"sensorId":"sensor01","values":["sensor01","2018/9/28 18:17","26.55","42"],"mqttTopic":"belladati","mqttMessageId":-1}


To access value from the JSONArray, use this formula:

Code Block
languagejs
JSONElement e = parseJSON(value(1))
JSONArray a = e.getJSONArray('values') as JSONArray
a.getString(2)


Let's have this JSON:

Code Block
languagexml
{
    "data":
    {
        "total":123,
        "data":
            [{
						"name": "Water",
						"amount": 2,
						"price": 10
					},
					{
						"name": "Juice",
						"amount": 3,
						"price": 30
					}
				]
        
    }
}

In this case, we need to set "data,data" as the Array element.

In order to get the value from the element name, we can use the following transformation script:

Code Block
languagejs
JSONElement e = parseJSON(value(1))
return e.getString('name')

Next Steps

Sv translation
languagesk

BellaDati, pri manuálnom importe, podporuje nasledujúce formáty súborov:

  • CSV (textový súbor)
  • Microsoft Excel (XLS, XLSX) - Office 2003, 2007 a 2010 (funkčnosť predošlých verzii nie je garantovaná)
  • Súbory XML 
  • Súbory ZIP (musí obsahovať jeden alebo viac súborov vo vyššie spomenutých formátoch)

Ako importovať súbor:

  • Pomocou odkazu v hlavnom menu prejdite na stránku Skupin dát
  • Vyberte Importovať dáta
  • Vyberte Dáta zo súboru  v kolonke Typ importu
  • Vyberte vhodný formát súboru 
Info

Po výbere dátového súboru musíte počkať kým sa súbor nenahrá.


Note

Maximálna veľkosť importu je 20MB. Je možné nastaviť BellaDati Unlimited alebo On-Premise na ľubovoľnú veľkosť. Veľkosť súboru sa dá znížiť pomocou importu v súbore ZIP (návod nižšie).

Import z CSV

Ak importujete zo súboru CSV, pokračujte priamo na stránku Nastavenie importu

Import z Microsoft Excel 

Po nahraní XLS/XLSX súboru je potrebné vybrať, z ktorého listu chcete dáta importovať.

Info

Tento výber sa nezobrazí ak Váš súbor obsahuje len jeden list


Import z XML

Pri importe z XML od Vás bude aplikácia žiadať výber elementu určujúceho začiatok nového záznamu (tag). Nasledujúci obrázok obsahuje ukážku takéhoto elementu v XML súbore obsahujúcom zamestnancov:

Code Block
<employees>
	<employee>
		<name>Jan</name>
		<surname>Novak</surname>
	</employee>
	<employee>
		<name>Petr</name>
		<surname>Novak</surname>
	</employee>
        ...
</employees>

V tomto prípade je elementom  <employee>.


  1. Element opakovania záznamu: Vyberte opakovanie v štruktúre XML. Vybrané dáta môžete skontrolovať v ukážke na ľavej strane.
  2. Prípadne môžete pridať vlastné stĺpce. 
Tip

Na určenie vlastných stĺcpov môžete použiť syntax xPath.


Import zo ZIP

Import dát z archívu ZIP umožnuje jednoduchoe znížit veľkosť importovaného súboru ako aj čas importu. Môže obsahovať nasledujúce formáty:

  • CSV
  • Microsoft Excel (XLS, XLSX)
  • XML

Na následný importov zo súborov XLS/XLSX a XML postupujte podľa návodu vyššie. 

Info

Nová skupina dát nebude vytvorená až kým neprebehne celý import.

Kam ďalej

Sv translation
languageja

以下のファイル形式は、BellaDatiの手動インポートでサポートされています:

  • CSV (プレーンテキストファイル)
  • Microsoft Excel (XLS, XLSX) - Office 2003 - 2016 (以前のバージョンは保証されていません)
  • XMLファイル
  • ZIPファイル (上記のサポートされている1つ以上のファイル形式を含む)
  • JSONファイル

ファイルをインポートするには:

  • データセットページへ行く
  • データをインポートを選択
  • インポートタイプデータファイルを選択
  • 適切なデータファイル形式を選択
Info

データファイルを選択した後、ファイルがアップロードされるまでお待ちください。


Note

インポートするデフォルトの最大ファイルサイズ20MBです。BellaDati UnlimitedまたはBellaDatiオンプレミスでは、ファイルサイズの制限が異なっている場合があります。ZIPアーカイブにインポートする際に、ファイルサイズを圧縮できます (以下参照)。

CSVからインポート

CSVからインポートする場合は、Import Settingsページへ直接進んでください。

Microsoft Excelからインポート

XLS/XLSXファイルをアップロード後、目的のスプレッドシートリストを選択するよう求められます。

Info

Excelスプレッドシートに1つしかリストを含まない場合、リスト選択は表示されません。


XMLからインポート

XMLインポートガイドでは、繰り返し可能なデータ文を示す行タグを選択するよう求められます。以下の例は、従業員を含むXMLファイルで行タグを示しています:

Code Block
<employees>
	<employee>
		<name>Jan</name>
		<surname>Novak</surname>
	</employee>
	<employee>
		<name>Petr</name>
		<surname>Novak</surname>
	</employee>
        ...
</employees>

この場合、行タグは<employee>です。


  1. 行タグ: XML構造でリピートタグを選択します。左側のプレビューで、抽出されたコンテンツを確認します。

  2. オプションとして、カスタム列を繰り返し追加できます: XML構造が複雑な場合は、アイテムや属性を選択します。
Tip

カスタム列の定義にxPath構文を使用できます。詳細については、カスタム列の設定方法の例を示したチュートリアルに進んでください。

ZIPからインポート

ZIPアーカイブとして圧縮されたデータをインポートすることは、インポートされたファイルサイズとアップロード時間を劇的に減らす効率的な方法を表します。以下のファイル形式を含めることができます:

  • プレーンテキスト (CSV)
  • Microsoft Excel (XLS, XLSX)
  • XML

Microsoft ExcelまたはXMLファイル形式のインポートを続けるには、上記の対応する章をご参照ください。

Info

インポートプロセスが正常に終了するまで、新しいデータセットは作成されません。

JSONからインポート

Note
JSONからのインポートは、BellaDati 2.9以降で利用可能です。

BellaDatiでは、ユーザーがJSONファイルからデータをインポートすることもできます。特別な変換関数を使用することにより、JSON配列とオブジェクトを解析できます。

場合によっては、データを行に正しく解析するために配列要素を変更する必要があります。これは、インポート設定で行うことができます。

配列要素を正しく選択した後、parseJSON()関数を使用してJSON値を変数にロードし、getString(), getInteger(), getDouble()といった関数を使用して値をロードし、値にアクセスすることができます。ネストされたオブジェクトにアクセスするには、getJSONObject()関数を使用する必要があります。配列にアクセスするには、関数getJSONArray()関数を使用できます。 

Info
配列要素が別のオブジェクトにネストされている場合は、"," 文字を使用して配列パスを区切ります。


次の構造を持つJSONファイルを作成しましょう:
Code Block
languagexml
{
	"sales": [{
			"category": "Food",
			"summary": {
				"totalPrice": 136,
				"totalItems": 8,
				"cashierName": "John Doe",
				"items": [{
						"name": "Bread",
						"amount": 5,
						"price": 55
					},
					{
						"name": "Butter",
						"amount": 3,
						"price": 81
					}
				]
			}
		},
		{
			"category": "Drinks",
			"summary": {
				"totalPrice": 40,
				"totalItems": 5,
				"cashierName": "Jane Doe",
				"items": [{
						"name": "Water",
						"amount": 2,
						"price": 10
					},
					{
						"name": "Juice",
						"amount": 3,
						"price": 30
					}
				]
			}
		}
	]
}

値を取得できるようにするには、配列要素としてsalesを指定する必要があります。

カテゴリーを取得するには、属性として新しい列を追加し、次のコードを使用します:

Code Block
languagejs
JSONElement e = parseJSON(value(1))
return e.getString('category')


合計アイテムを取得するには、インジケータとして新しい列を追加し、次のコードを使用します:
Code Block
languagejs
JSONElement e = parseJSON(value(1))
JSONElement f= e.getJSONObject('summary') as JSONObject; 
return f.getInteger('totalItems') 


すべてのアイテムの価格から合計価格を計算するには、次の式を使用します:
Code Block
languagejs
JSONElement e = parseJSON(value(1))
JSONElement f= e.getJSONObject('summary') as JSONObject; 
total = 0;
f.getJSONArray('items').each()
	{
	JSONObject o = it as JSONObject; 
    g = o.getInteger('price') as Integer
      total = total + g
    }
	
return total


このJSONを使用してみましょう
Code Block
languagexml
{"sensorId":"sensor01","values":["sensor01","2018/9/28 18:17","26.55","42"],"mqttTopic":"belladati","mqttMessageId":-1}


JSONArrayから値にアクセスするには、次の式を使用します:
Code Block
languagejs
JSONElement e = parseJSON(value(1))
JSONArray a = e.getJSONArray('values') as JSONArray
a.getString(2)


このJSONを使用してみましょう:
Code Block
languagexml
{
    "data":
    {
        "total":123,
        "data":
            [{
						"name": "Water",
						"amount": 2,
						"price": 10
					},
					{
						"name": "Juice",
						"amount": 3,
						"price": 30
					}
				]
        
    }
}

この場合、"data,data"を配列要素として設定する必要があります。

要素名から値を取得するには、次の変換スクリプトを使用できます:

Code Block
languagejs
JSONElement e = parseJSON(value(1))
return e.getString('name')

次に

Sv translation
languagede

Die folgenden Dateiformate werden für den manuellen Import in BellaDati unterstützt:

  • CSV (Nur-Text-Dateien)
  • Microsoft Excel (XLS, XLSX) - Office 2003 - 2016 (frühere Versionen sind nicht garantiert)
  • XML-Dateien
  • ZIP-Dateien (mit einem oder mehreren unterstützten Dateiformaten, siehe oben)
  • JSON-Dateien

So importieren Sie eine Datei:

  • Gehen Sie zur Seite Dataset
  • Wählen Sie Daten importieren
  • Wählen Sie Datendatei im Typ Import
  • Wählen Sie das geeignete Dateiformat

Info

Nachdem Sie die Datendatei ausgewählt haben, müssen Sie warten, bis die Datei hochgeladen wurde. 


Note

Bitte beachten Sie, dass die maximal zu importierende Standarddateigröße 20 MB beträgt. BellaDati Unlimited oder BellaDati On-Premise können unterschiedliche Dateigrößenbeschränkungen haben. Sie können die Dateigröße beim Import in ein ZIP-Archiv komprimieren (siehe unten).

Import von Daten aus CSV Dateien

Wenn Sie Daten aus CSV Dateien importieren, fahren Sie direkt mit der Seite Einstellungen importieren fort.

Import aus Microsoft Excel

Nach dem Hochladen der XLS / XLSX-Datei werden Sie aufgefordert, die gewünschte Tabelle auszuwählen.

Info


Wenn Ihre Excel-Tabelle nur eine einzige Liste enthält, wird die Auswahl der Liste nicht angezeigt.


Import aus XML

Im XML-Importleitfaden werden Sie aufgefordert, das Zeilen-Tag auszuwählen, das einen wiederholbaren Dataset darstellt. Das folgende Beispiel zeigt es in einer XML-Datei mit Mitarbeitern:

Code Block
<employees>
	<employee>
		<name>Jan</name>
		<surname>Novak</surname>
	</employee>
	<employee>
		<name>Petr</name>
		<surname>Novak</surname>
	</employee>
        ...
</employees>

In diesem Fall lautet das Zeilen-Tag <employee>.


  1. Row-Tag: Wählen Sie ein sich wiederholendes Tag in der XML-Struktur aus. Überprüfen Sie den extrahierten Inhalt in der Vorschau auf der linken Seite.
  2. Sie können optional auch benutzerdefinierte Spalten hinzufügen: Wählen Sie Elemente und/oder Attribute aus, wenn die XML-Struktur nicht einfach ist.
Tip

Sie können die xPath-Syntax für die benutzerdefinierte Spaltendefinition verwenden. Weitere Informationen finden Sie im Tutorial mit Beispiel, wie benutzerdefinierte Spalten gesetzt werden können.

Import von ZIP datein

Das Importieren von Daten, die als ZIP-Archiv komprimiert wurden, stellt eine effektive Methode dar, um die importierte Dateigröße zu reduzieren und auch die Zeiten erheblich zu erhöhen. Es kann folgende Dateiformate enthalten:

  • Plain text (CSV)
  • Microsoft Excel (XLS, XLSX)
  • XML

Bitte folgen Sie den entsprechenden Kapiteln, um das Importieren von Microsoft Excel- oder XML-Dateiformaten fortzusetzen.

Info

Ein neuer Dataset wird erst erstellt, wenn der Importvorgang erfolgreich abgeschlossen wurde.

Import von JSON Datein

Note

Der Import von JSON ist seit BellaDati 2.9 verfügbar

Mit BellaDati können Benutzer auch Daten aus der JSON-Datei importieren. Mithilfe spezieller Transformationsfunktionen können JSON-Arrays und -Objekte analysiert werden.

In einigen Fällen kann es erforderlich sein, das Array-Element zu ändern, um die Daten korrekt in Zeilen zu analysieren. Dies kann in den Importeinstellungen vorgenommen werden.

Nachdem Sie das Array-Element korrekt ausgewählt haben, können Sie mit der Funktion parseJSON () den JSON-Wert in eine Variable laden und dann mit den Funktionen getString (), getInteger (), getDouble () usw. auf die Werte zugreifen, um die Werte zu laden Werte. Um auf ein verschachteltes Objekt zugreifen zu können, müssen Benutzer die Funktion getJSONObject () verwenden. Um auf ein Array zuzugreifen, ist die Funktion getJSONArray () verfügbar.

Beispiele

Lassen Sie uns eine JSON-Datei mit folgender Struktur ansehen:

Code Block
languagexml
{
	"sales": [{
			"category": "Food",
			"summary": {
				"totalPrice": 136,
				"totalItems": 8,
				"cashierName": "John Doe",
				"items": [{
						"name": "Bread",
						"amount": 5,
						"price": 55
					},
					{
						"name": "Butter",
						"amount": 3,
						"price": 81
					}
				]
			}
		},
		{
			"category": "Drinks",
			"summary": {
				"totalPrice": 40,
				"totalItems": 5,
				"cashierName": "Jane Doe",
				"items": [{
						"name": "Water",
						"amount": 2,
						"price": 10
					},
					{
						"name": "Juice",
						"amount": 3,
						"price": 30
					}
				]
			}
		}
	]
}

Um die Werte abrufen zu können, müssen Benutzer sales als Array-Element angeben.

Um die Kategorie zu erhalten, fügen Sie eine neue Spalte als Attribut hinzu und verwenden folgenden Code:

Code Block
languagejs
JSONElement e = parseJSON(value(1))
return e.getString('category')

Um die gesamten Elemente zu erhalten, fügen Sie eine neue Spalte als Indikator hinzu und verwenden folgenden Code:

Code Block
languagejs
JSONElement e = parseJSON(value(1))
JSONElement f= e.getJSONObject('summary') as JSONObject; 
return f.getInteger('totalItems') 

Verwenden Sie diese Formel, um den Gesamtpreis für alle Artikelpreise zu berechnen:

Code Block
languagejs
JSONElement e = parseJSON(value(1))
JSONElement f= e.getJSONObject('summary') as JSONObject; 
total = 0;
f.getJSONArray('items').each()
	{
	JSONObject o = it as JSONObject; 
    g = o.getInteger('price') as Integer
      total = total + g
    }
	
return total

Nun zu folgendem JSON: 

Code Block
languagexml
{"sensorId":"sensor01","values":["sensor01","2018/9/28 18:17","26.55","42"],"mqttTopic":"belladati","mqttMessageId":-1}

Verwenden Sie diese Formel, um auf den Wert von JSONArray zuzugreifen: 

Code Block
languagejs
JSONElement e = parseJSON(value(1))
JSONArray a = e.getJSONArray('values') as JSONArray
a.getString(2)

Nächste Schritte