Page History
| Sv translation | ||||||||||||||||||||||||||||||
|---|---|---|---|---|---|---|---|---|---|---|---|---|---|---|---|---|---|---|---|---|---|---|---|---|---|---|---|---|---|---|
| ||||||||||||||||||||||||||||||
The BellaDati Connector SDK is an API written in Java. The main goal is to provide ability for customers to implement their own data connector and integrate it with BellaDati. There are 3 prerequisites to make it work:
Setting up the Connector SDKThe Connector SDK consists of two parts:
To use the SDK, download the API jar. The SDK source is available on GitHub.
Setting up the IDEYou will need Java IDE to implement your own connector, for example Eclipse. No special configuration is required for setting up IDE for BellaDati Connector SDK. Setting up the projectYour custom connector has to be located in package with prefix "com.belladati.sdk.connector" (due to simpler class path scanning) followed by your package name. Usage of company web address as a suffix of Java package structure is good idea. Example:
Your Java project needs at least one dependency - latest Connector SDK API containing the SDK's interface declarations. You can manually set up the dependencies or configure your build tool (Maven, Gradle, etc.) to do it for you. Using MavenIn your
Using GradleIn your
Overview of classes in SDKThis section contains high overview of classes and interfaces that are bundled in SDK. Please see online Javadoc or source code on GitHub for more details. DataProviderApiProvides import data (including preview data and data definition) based on given configuration. This is the main entry point to your connector. You have to extend this abstract class in your custom connector and implement also public static method getName (see below for more details). RowApiOne source row represented as array of RowsApi
PropertyValueApiClass representing value of property used in ProgressBarApiProgress bar displayed on user interface during import. You can use this reference in your custom connector to update progress status of import action. ConnectorUtilsUtilities for connector SDK. You can use helper methods in this class to simplify your implementation. ImplementationYour custom connector must implement the following abstract types: RowApi, RowsApi and DataProviderApi. There is also one additional static method "getMetadata" that has to be implemented in DataProviderApi with following definition:
Using metadataIn Connector SDK 1.0+ and BellaDati 2.9.7+ advanced connector behavior can be provided inside metadata. Metadata are defined as org.json.JSONObject instance and are returned by static getMetadata() method defined in your custom connector DataProviderApi implementation class. Metadata allows you to define:
Example:
For detailed metadata description, continue to Connector metadata.
BuildingYour custom connector has to be packaged as JAR (Java Archive) with all necessary dependencies. Please discuss usage, versions and scopes of all dependencies with BellaDati team. When you're ready, call your preferred tool to build this project: Using Maven
Using Gradle
Directory " TestingYour custom connector project has to contain tests to verify behavior. You are responsible for your code. Tests should contain also negative scenarios.
DeploymentSearch for the lib directory located in your <belladati_installation_folder>/belladati/WEB-INF/lib. Installation folder can differ according the installation path of your application server and according type of application server that you use. To deploy your custom connector to BellaDati please copy built JAR (including dependencies) file into the belladati/WEB-INF/lib folder and do not forget to restart your Application server.
UsageCustom connectors available on classpath are listed at the end of data sources list:
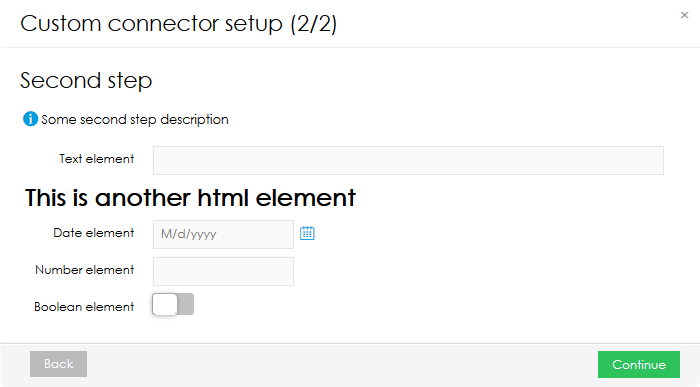
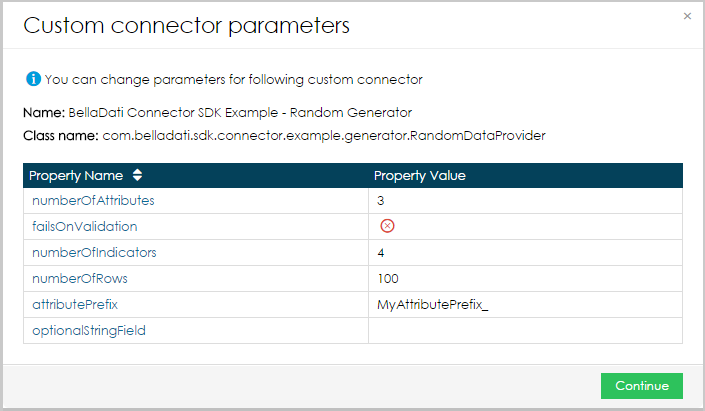
After you select one of connectors you can customize parameters for selected connector.
After you enter valid parameters and click "Continue" button you can continue with import workflow on common Import Settings page.
|


| Sv translation | ||||||||||||||||||||||||||||||
|---|---|---|---|---|---|---|---|---|---|---|---|---|---|---|---|---|---|---|---|---|---|---|---|---|---|---|---|---|---|---|
| ||||||||||||||||||||||||||||||
BellaDati Connector SDKはJavaで書かれたAPIです。主な目標は、顧客が自分のデータコネクタを実装し、BellaDatiとそれを統合するための機能を提供することです。それを動作させるための3の前提条件があります。
コネクタSDKの設定Connector SDKが2つの部分で構成されます
SDKを使用するには、API jarファイルをダウンロードしてください。SDKのソースはGitHubの上で利用可能です。
IDE設定独自のコネクタを実装するには、Java IDEが必要です(Eclipseなど)。BellaDati Connector SDKのIDEを設定するための特別な設定は必要ありません。 プロジェクトの設定カスタムコネクタは、パッケージ名が続き「com.belladati.sdk.connector」プレフィックス(単純なクラスパスのスキャンによる)とパッケージにする必要がある。Javaパッケージ構造の接尾辞として会社のWebアドレスを使用するのは良い考えです。例:
Javaプロジェクトに少なくとも1つの依存関係が必要です - SDKのインタフェース宣言を含む最新のConnector SDK API。依存関係を手動で設定したり、ビルドツール(Maven、Gradleなど)を設定してあなたのために行うことができます。 Maven使用pom.xmlファイルに次の依存関係を追加します。
Gradle使用build.gradleファイルに次の依存関係を追加します。
SDK内にクラスの概要このセクションでは、JDKにバンドルされているクラスおよびインタフェースの高い概要が含まれています。詳細については、JavadocオンラインとGitHubでのソースコードをご参照してください。 DataProviderApi特定の構成に基づいてインポートデータを提供します(プレビューデータとデータ定義を含む)。これはあなたのコネクタへのメインエントリポイントです。あなたのカスタムコネクタに、この抽象クラスを拡張し、また公共の静的メソッドのgetNameを実装する必要があります。(詳細は以下を参照) RowApi一つのソース行は、文字列値の配列として表現しました。あなたのカスタムコネクタで、このインタフェースを実装する必要があります。 RowsApi
PropertyValueApi
ProgressBarApiプログレスバーはインポート時に、ユーザインターフェース上に表示されます。インポートアクションの進捗状況を更新するために、カスタムコネクターにこのリファレンスを使用できます。 ConnectorUtilsコネクタSDK用ユーティリティ。あなたの実装を簡素化するために、このクラスのヘルパーメソッドを使用できます。 実装カスタムコネクタはRowApi、RowsApiとDataProviderApiなど3抽象型の具象サブクラスを含んでいる必要があります。もう1つの静的メソッド "getName"があります。これは、DataProviderApiの具体的なサブクラスで実装する必要があります。
ビルディングカスタムコネクタは、すべての必要な依存関係を持つJAR(JavaArchive)としてパッケージ化する必要があります。使用方法、バージョンとすべての依存関係のスコープをBellaDatiチームに議論してください。準備ができたら、このプロジェクトをビルドするために優先ツールを呼び出します。 Maven使用
Gradle使用
「ターゲット」ディレクトリは、プロジェクトのjarファイルや他のビルド成果物が含まれています。 検査カスタムコネクタプロジェクトには、動作を確認するためのテストが含まれている必要があります。 あなたはあなたのコードを担当しています。 テストには否定的なシナリオも含める必要があります。
展開あなたの<belladati_installation_folder>/ belladati/ WEB-INF/ libにあるlibディレクトリを検索します。インストール先フォルダは、アプリケーションサーバのインストールパスを応じて、使用するアプリケーションサーバーの種類に従って異なる場合があります。 BellaDatiにカスタムコネクタを展開するにはbelladati/ WEB-INF/ libフォルダにファイル構築されたJARファイル(依存関係を含む)をコピーして、アプリケーションサーバーを再起動することを忘れないでください。
使用法データ・ソースへの接続の「カスタム・コネクター」オプションをクリックすると、あなたのカスタムコネクタを使用できます。あなたのクラスパスで使用可能なすべてのカスタムコネクタとダイアログウィンドウが表示されます。
コネクタのいずれかを選択し、「続行」ボタンをクリックした後、選択したコネクタのパラメータをカスタマイズすることができます。
有効なパラメータを入力し、「続行」ボタンをクリックした後、あなたは一般的なインポート設定ページで、インポートのワークフローを続行できます。
|

Overview
Content Tools