| Info |
|---|
このページでは、64-bit Linux または 64/32-bit WindowsにIoTコレクターをインストールする方法をステップごとに示します。 |
始める前に
BellaDati IoTデータコレクターのインストールを開始する前に、以下の重要な注意事項をお読みください:
Linuxでインストーラーを実行するには:
- インストーラーに実行権限があることを確認してください。次のコマンドを使用して、実行権限を追加できます:
- 次のコマンドを実行します(コンソールモードでインストーラーを実行する場合は、argument-cを使用できます):
Windowsでインストーラーを実行するには:
- インストーラー実行可能ファイルを管理者として実行します
このウィンドウは、最小システム要件に対してマシンをチェックします。構成が基準を満たしていない場合は、より高性能なマシンにアップグレードして、IoTコレクターのパフォーマンスの低下を回避します。
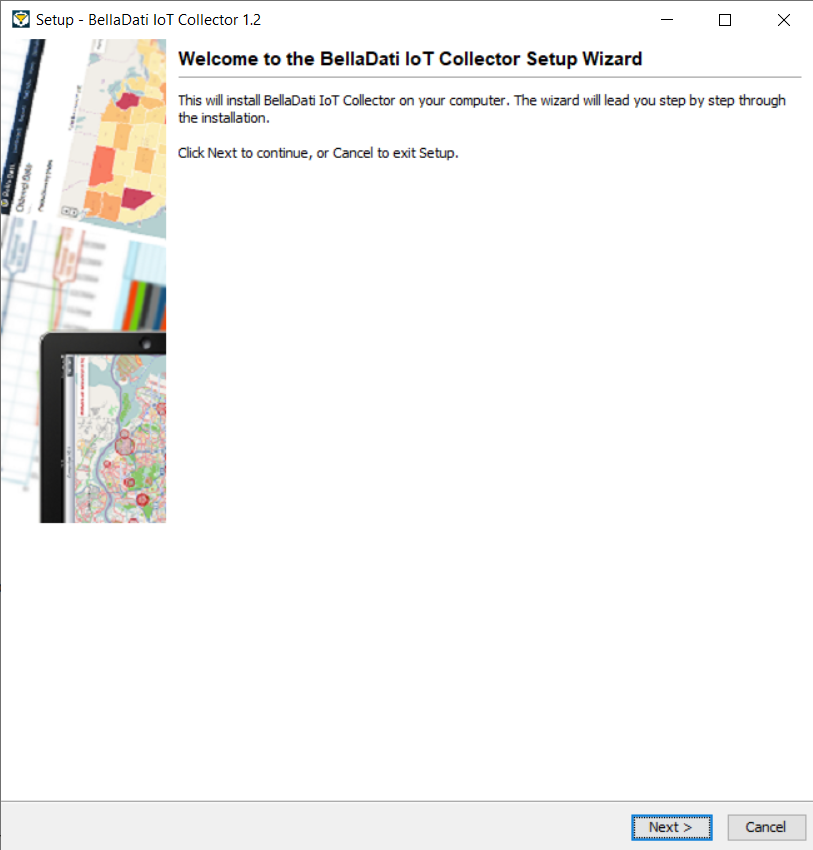
[次へ]をクリックして、インストールを続行します。
2. ライセンス条項
ライセンス契約を読んで同意します。

[次へ]をクリックして、インストールを続行します。
3. 宛先のディレクトリを選択
デフォルトでは、IoTコレクターは事前定義されたインストールディレクトリにインストールされます。これらの設定を変更する場合は、[参照]をクリックして別のフォルダーに移動します。インストーラーは空きディスク容量をチェックして、十分な空き容量があることを確認します。

[次へ]をクリックして、インストールを続行します。
4. インストールの種類を選択
デプロイメントモードを選択してすべてのアプリケーションパラメーターを指定する場合は、[高度なインストール]をオンにします。デフォルト設定で基本インストールを実行する場合は、選択しないでください。
インストール後、各マシンの起動後に、インストールされたモジュールを自動起動する場合は、[サービスを自動的に開始する]をオンにします。自分でモジュールを起動するには、空白のままにします。
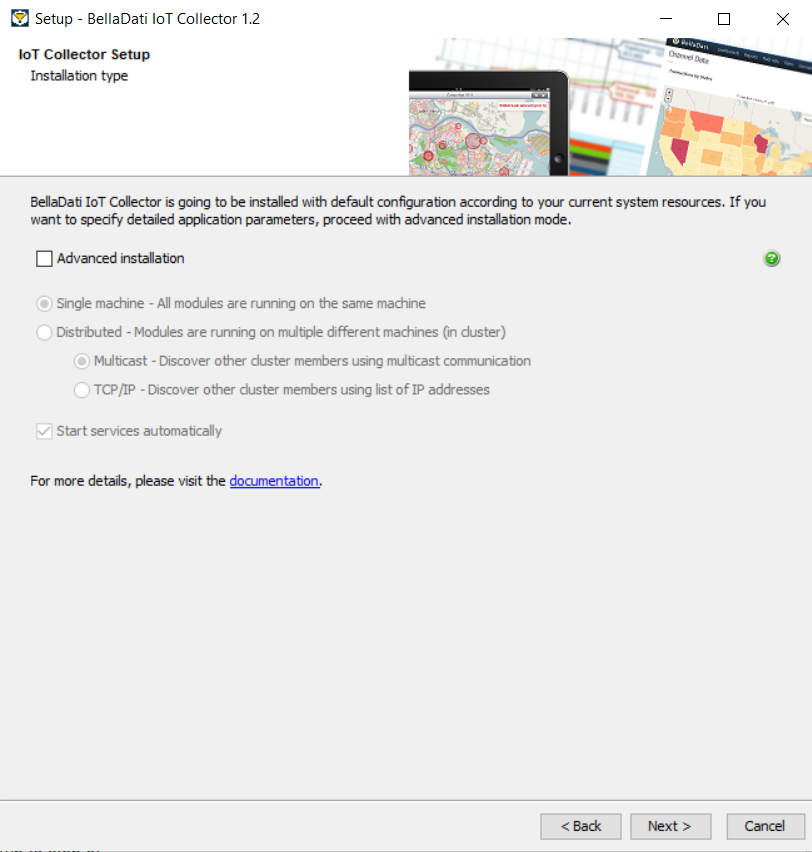
[次へ]をクリックして、インストールを続行します。
5. 分散モードの構成
| Note |
|---|
Proceed with the following steps only if you checked Advanced Installation and Distributed mode. Otherwise jump to step 6.詳細インストールと分散モードをオンにした場合のみ、次の手順に進みます。それ以外の場合は、手順6に進みます。 |
5.1. 分散モード - マルチキャスト
Approve or edit the following default cluster settings次のデフォルトのクラスター設定を承認または編集します:
- Multicast group - Multicast group IP addressマルチキャストグループIPアドレス
- Multicast port - Socket port that the member listens to and sends discovery messages through
- Multicast TTL - TTL (Time To Live) value for multicast packets sent out
- Multicast timeout - Period (in seconds) during which a member waits for a multicast response from another member
- Trusted interfaces - Comma separated list of IP addresses of all trusted members
| Tip |
|---|
Please see Hazelcast documentation for more details. Ask your network administrator if you are unsure about the configuration. |
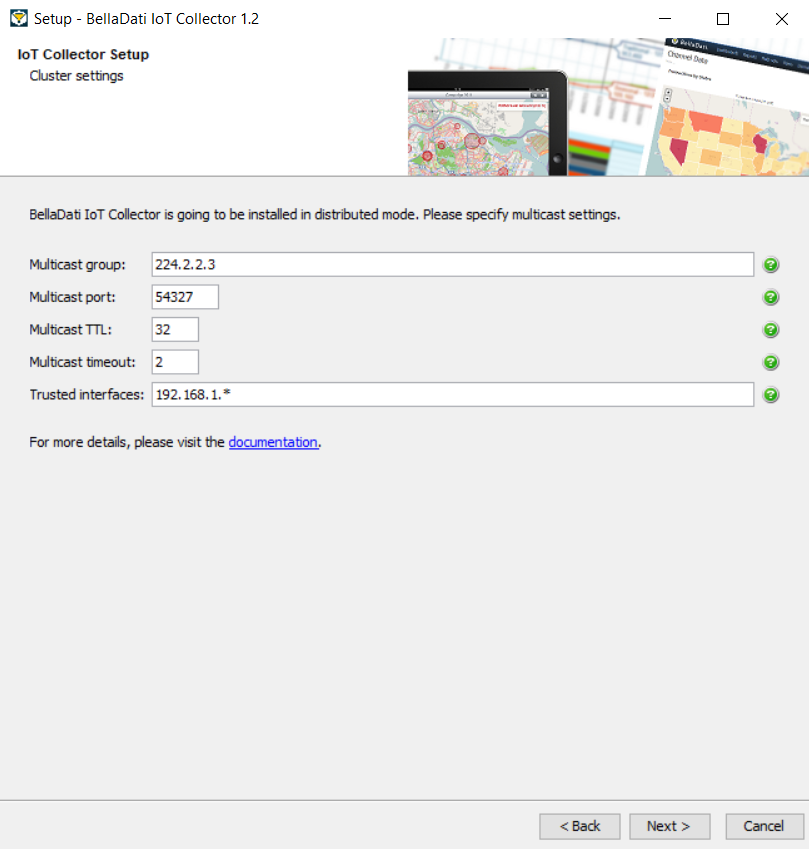
[次へ]をクリックして、インストールを続行し、手順6に進みます。
5.2. 分散モード - TCP/IP
Approve or edit the following default cluster settings:
- Members - Comma separated list of IP addresses of other cluster members
| Tip |
|---|
Please see Hazelcast documentation for more details. Ask your system administrator if you are unsure about the configuration. |
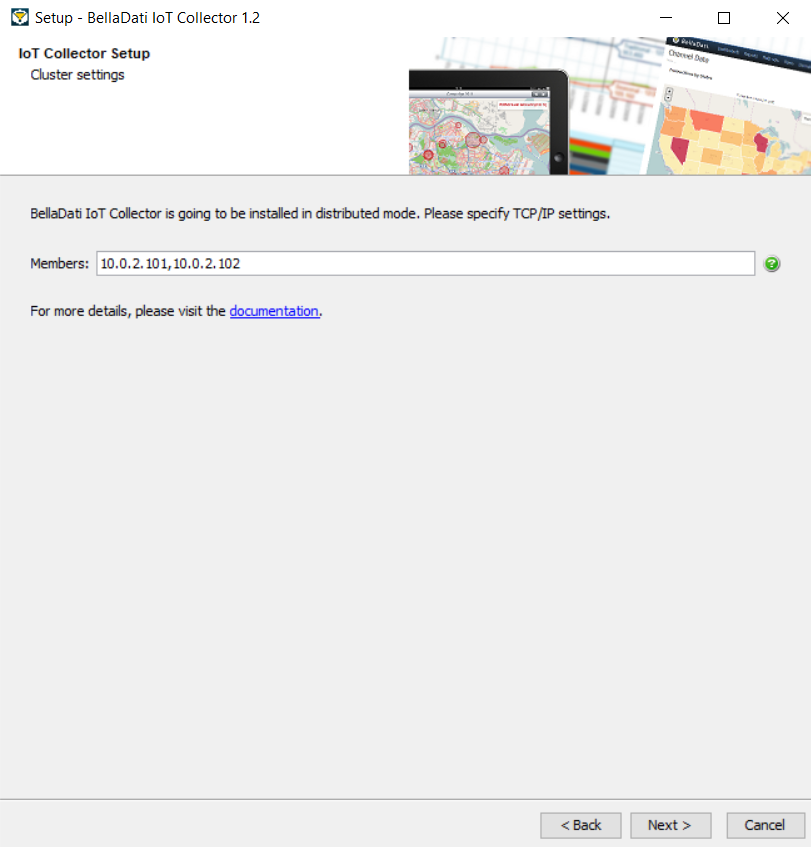
[次へ]をクリックして、インストールを続行し、手順6に進みます。
6. モジュールの選択
Please specify count of modules that you want to install on this machine:
- Audit - Provides auditing services and status of modules and sensors
- Receiver - Collects data from multiple devices
- Sender - Retrieves data periodically from linked receiver and execute automated actions if necessary
You will need to specify configuration parameters for each module in next steps.
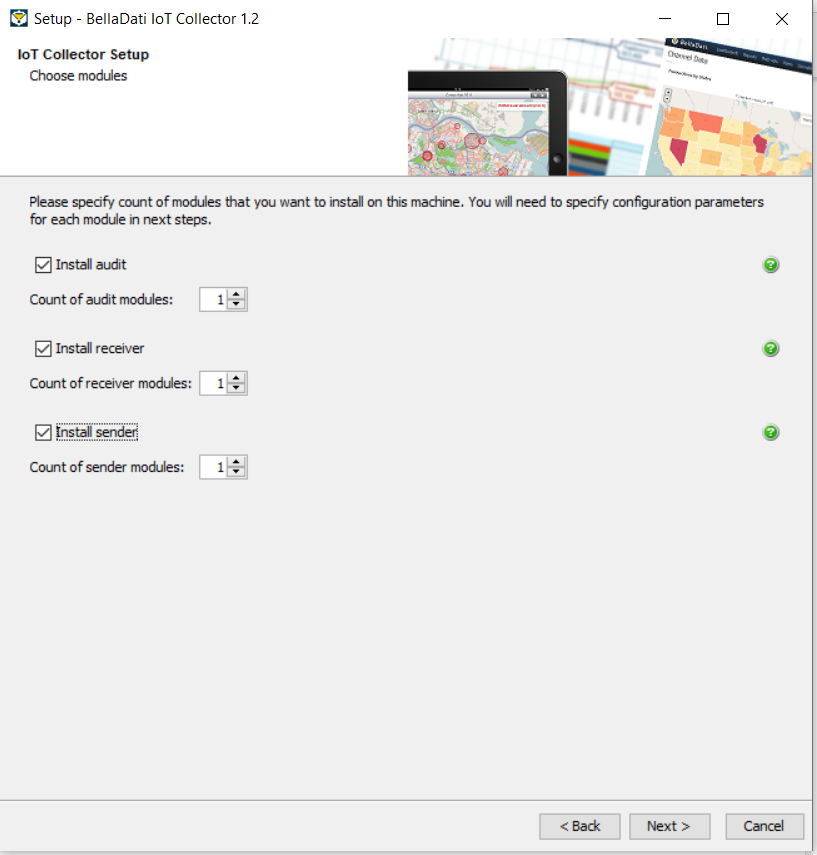
[次へ]をクリックして、インストールを続行します。
7. Audit構成
| Note |
|---|
Proceed with the following steps only if you checked Install Audit. Otherwise jump to step 8. |
7.1. インスタンス構成
Approve or edit the following default settings:
- Instance name - Name that will identify this IoT Collector instance uniquely. Good practice is to enter company name followed by environment identification.
- Drop database at startup - Flag indicating if database should be dropped during module startup
- Authentication enabled
- Administrator password - Password for main administrator (default: BellaDati01)
- Drop old users at startup - Flag indicating if users should be dropped during module startup
- Merge users at startup - Flag indicating if users should be merged/updated during module startup
| Note |
|---|
Please make sure that you enter the same values for all installations in Distributed Mode! |
| Tip |
|---|
Leave the default values if you are unsure about the configuration. |
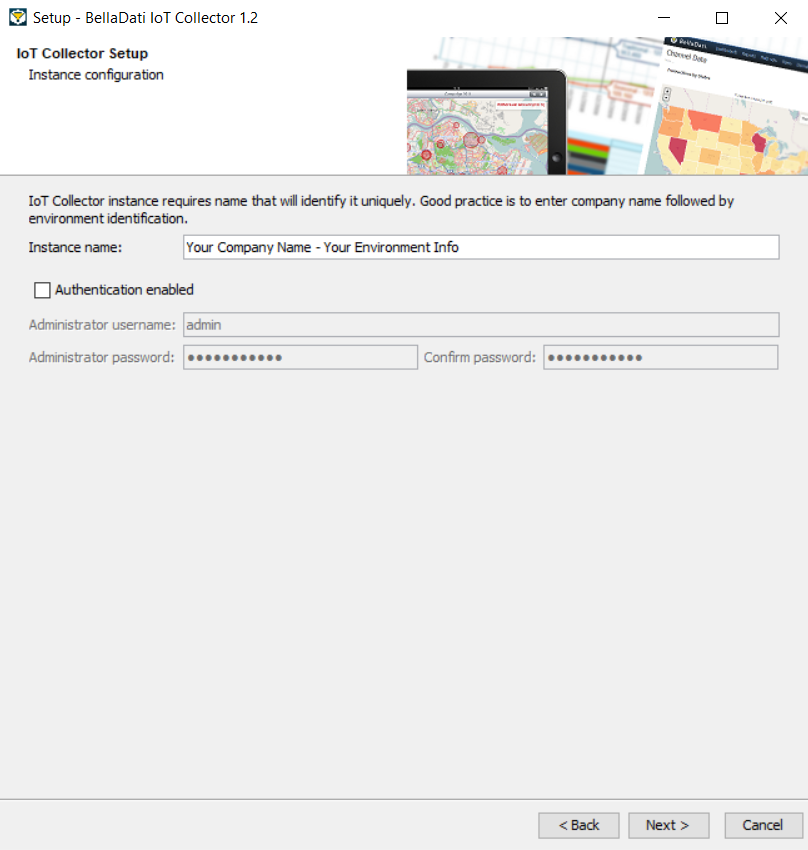
[次へ]をクリックして、インストールを続行します。
7.2. Audit - 基本パラメーター
Approve or edit the following default settings:
- Name - Name that will identify this audit module uniquely
- Port - HTTP port on which audit endpoints will be running
- Body limit - Maximum allowed HTTP request body size (in bytes, default: 2 MB)
- Drop database at startup - Flag indicating if database should be dropped during module startup
- JSON limit enabled - Flag indicating if JSON data object should be limited (default: false/unlimited)
- Maximal VARCHAR length - Length of VARCHAR column storing JSON data object
| Note |
|---|
Please make sure that you enter the same values (except Name and Port) for all installations in Distributed Mode! |
| Tip |
|---|
Leave the default values if you are unsure about the configuration. |
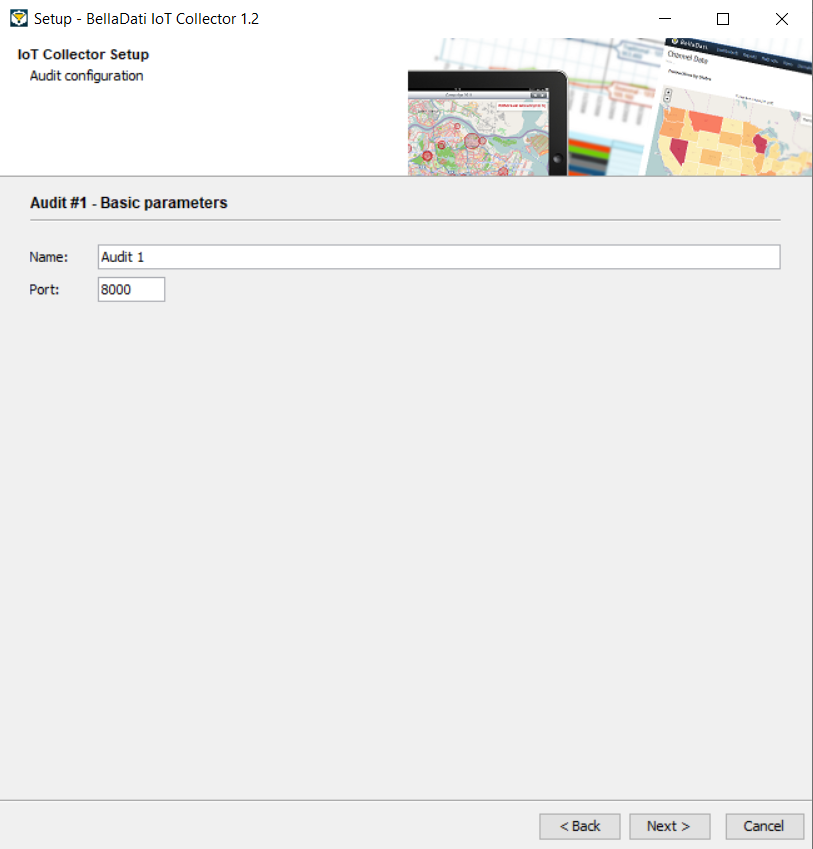
[次へ]をクリックして、インストールを続行します。
7.3. Audit - セキュリティパラメーター
Approve or edit the following default security settings:
- Authentication enabled
- Viewer username - Unique viewer username
- Viewer password - Password for viewer (default: BellaDati01)
- Drop old users at startup - Flag indicating if users should be dropped during module startup
- Merge users at startup - Flag indicating if users should be merged/updated during module startup
- SSL/TLS enabled
- Keystore path - Absolute or relative path to Java keystore file (JKS)
- Keystore password - Password of Java keystore (default: wibble)
| Note |
|---|
Please make sure that you enter the same values for all installations in Distributed Mode! |
| Tip |
|---|
Leave the default values if you are unsure about the configuration. |

[次へ]をクリックして、インストールを続行します。
8. Receiver構成
| Note |
|---|
Proceed with the following steps only if you checked Install Receiver. Otherwise jump to step 9. |
By default, receiver is configured as HTTP_POST_CONSUME. You can change it after the installation using the IoT Console or manually.
8.1. Receiver - 基本パラメーター
Approve or edit the following default settings:
- Name - Name that will identify this receiver module uniquely
- Port - HTTP port on which receiver endpoints will be running
- Sensor ID - JSON key identifying entry that stores sensor identification
- Input mode
- Single - Sensor sends JSON data containing only one single record
- Bulk - Sensor sends JSON data containing multiple records
- Body limit - Maximum allowed HTTP request body size (in bytes, default: 2 MB)
- Drop database at startup - Flag indicating if database should be dropped during module startup
- JSON limit enabled - Flag indicating if JSON data object should be limited (default: false/unlimited)
- Maximal VARCHAR length - Length of VARCHAR column storing JSON data object
| Tip |
|---|
Leave the default values if you are unsure about the configuration. |
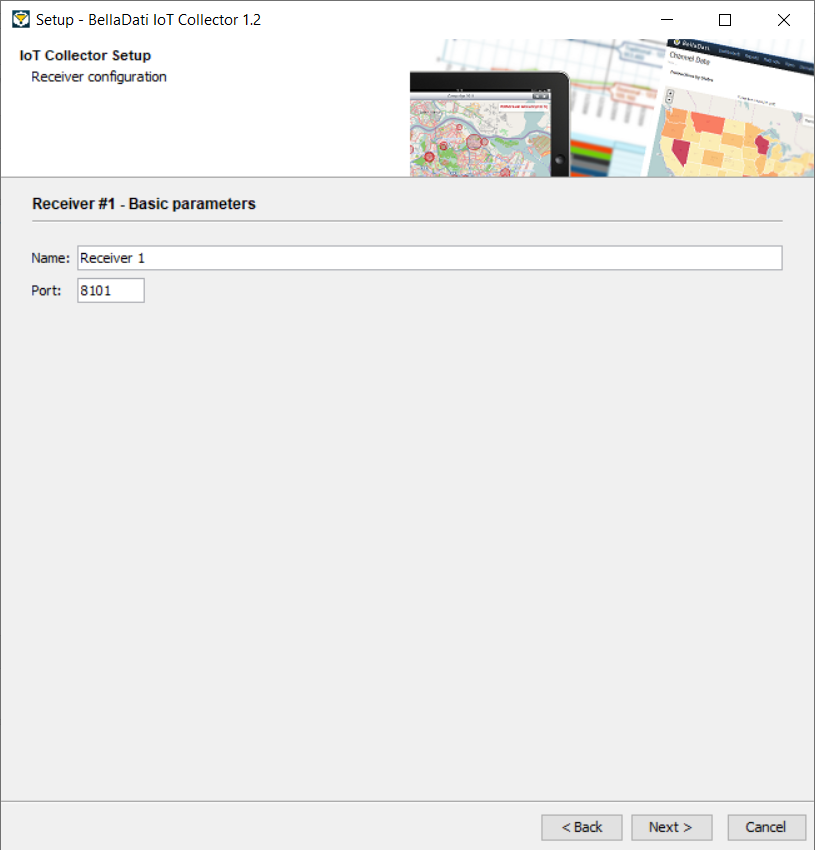
[次へ]をクリックして、インストールを続行します。
8.2. Receiver - セキュリティパラメーター
Approve or edit the following default security settings:
- Authentication enabled
- Sensor username - Unique sensor username
- Sensor password - Password for sensor (default: BellaDati01)
- Viewer username - Unique viewer username
- Viewer password - Password for viewer (default: BellaDati01)
- Editor username - Unique editor username
- Editor password - Password for editor (default: BellaDati01)
- Drop old users at startup - Flag indicating if users should be dropped during module startup
- Merge users at startup - Flag indicating if users should be merged/updated during module startup
- SSL/TLS enabled
- Keystore path - Absolute or relative path to Java keystore file (JKS)
- Keystore password - Password of Java keystore (default: wibble)
| Tip |
|---|
Leave the default values if you are unsure about the configuration. |
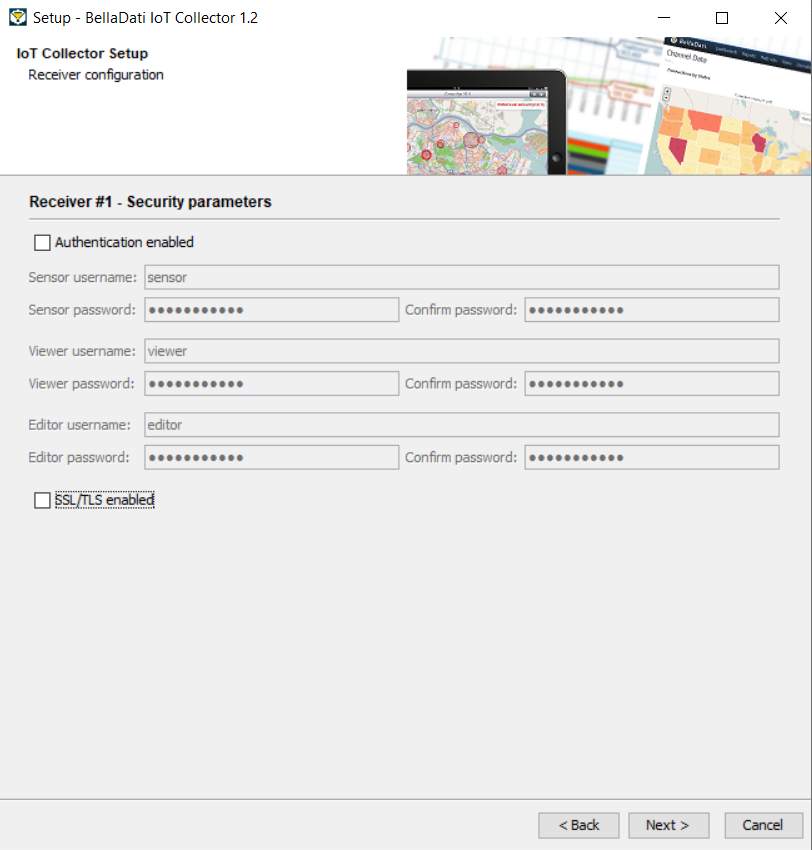
[次へ]をクリックして、インストールを続行します。
9. Sender構成
| Note |
|---|
Proceed with the following steps only if you checked Install Sender. Otherwise jump to step 10. |
9.1. Sender - 基本パラメーター
Approve or edit the following default settings:
- Name - Name that will identify this sender module uniquely
- Port - HTTP port on which sender endpoints will be running
- Period - Delay after which the timer will fire new send event (in seconds, default: 60)
- Limit - Page size that is used as a filter to obtain data from receiver (default: 1000)
- Delete processed data from receiver database
- Receiver
- Local - Receiver is located on the same machine as this sender
- Remote - Receiver is located on the remote machine
| Tip |
|---|
Leave the default values if you are unsure about the configuration. |
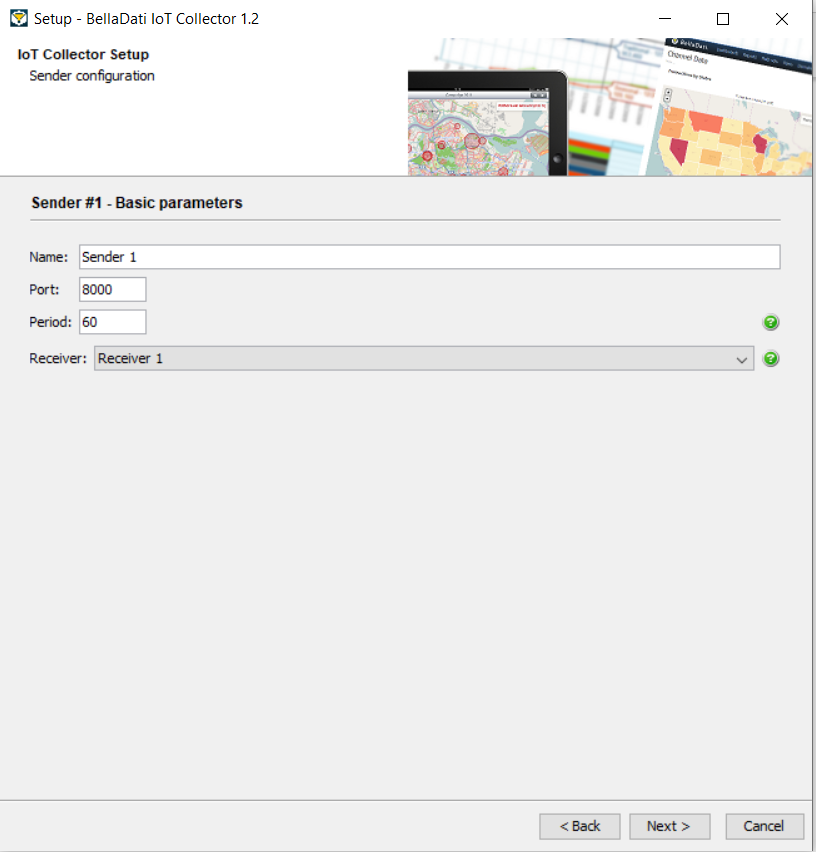
[次へ]をクリックして、インストールを続行します。
9.2. Sender - セキュリティパラメーター
Approve or edit the following default security settings:
- Authentication enabled
- Viewer username - Unique viewer username
- Viewer password - Password for viewer (default: BellaDati01)
- Drop old users at startup - Flag indicating if users should be dropped during module startup
- Merge users at startup - Flag indicating if users should be merged/updated during module startup
- SSL/TLS enabled
- Keystore path - Absolute or relative path to Java keystore file (JKS)
- Keystore password - Password of Java keystore (default: wibble)
| Tip |
|---|
Leave the default values if you are unsure about the configuration. |
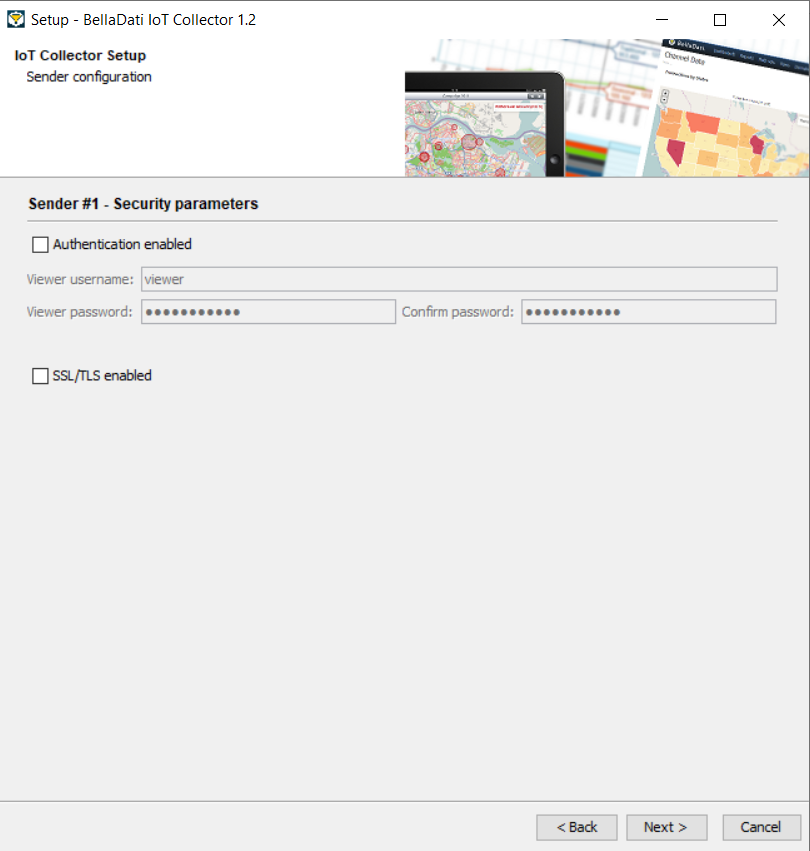
[次へ]をクリックして、インストールを続行します。
Approve or edit the name of the start menu folder.
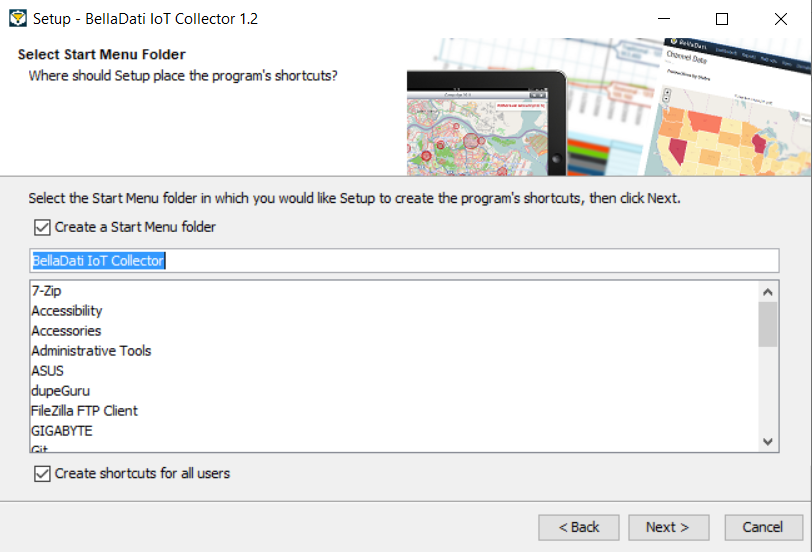
[次へ]をクリックして、インストールを続行します。
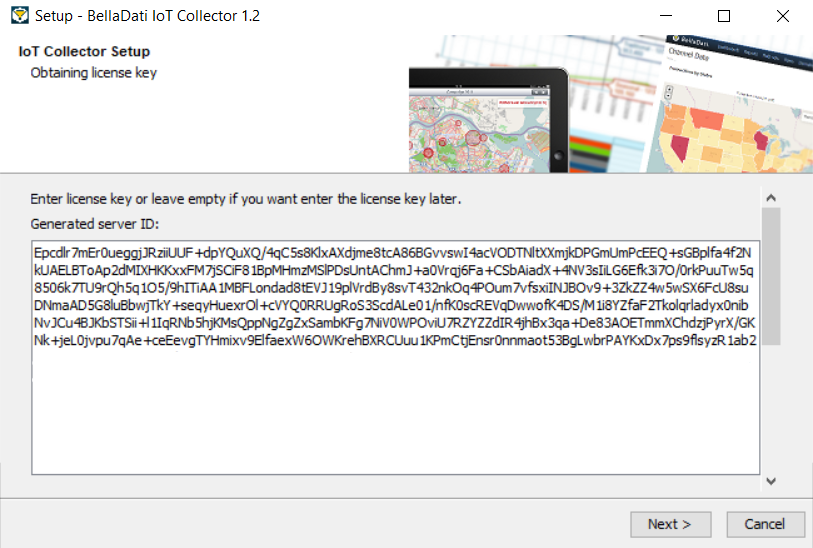
11. ライセンスキー
| Note |
|---|
Proceed with the following steps only if you checked Install Audit. Otherwise jump to step 12. |
Send obtained server ID to BellaDati support team and request license key. Enter obtained license key to the following form. Alternatively, leave it empty and enter the license key later via the IoT Console.
Click Next and wait while IoT Collector is installed on your computer.
12. 分散モードでの起動
| Note |
|---|
Proceed with the following steps only if you checked Advanced Installation and Distributed mode with Autostart option. Otherwise jump to step 13. |
In order to start Collector modules correctly, cluster has to be formed at first. You need to start all audit modules running on other machines at first. Receiver and sender modules will be started after the confirmation that all audit modules are up and running.
Click Next to proceed with the startup. It could take some time to start all modules.
13. インストールの完了
The installation is complete.
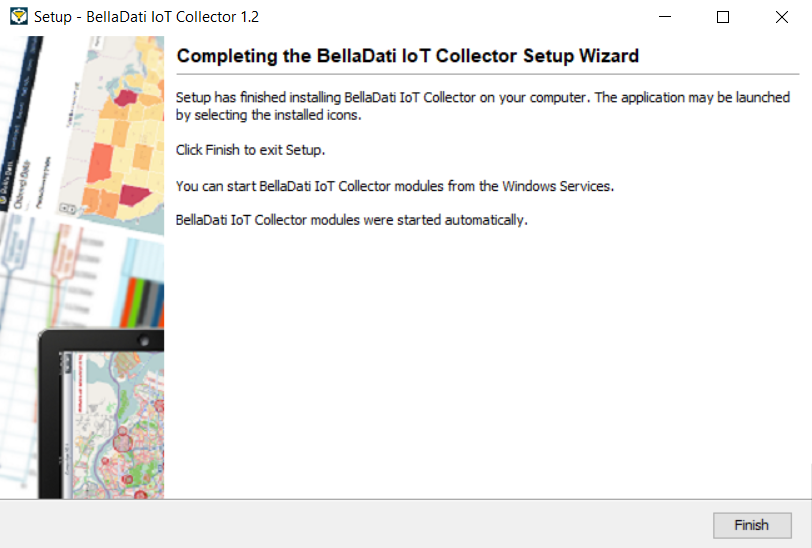
Close the window.
14. トラブルシューティング
- If you have any problems during installation, please try to complete installation (retry or ignore errors) and then send us following log file:
- Modules do not autostart after restart of Linux machine. You need to register/edit created services for autostart based on your distribution, version, service system (e.g. SysV, Systemd, Upstart) and init system (e.g. update-rc.d, ntsysv, chkconfig, insserv). Please keep following order during modules startup:
- Start all audit modules
- Start all receiver modules
- Start all sender modules
- To access IoT Collector modules after the installation is complete, point your web browser to http://localhost:<port>/ or https://localhost:<port>/ (based on entered settings in step 7, 8, and 9).
- If you have any problems with IoT Collector functionality, please send us all log files located on following location: