| Info |
|---|
This page will show you step by step how to install IoT Collector on 64-bit Linux or 64/32-bit Windows. |
Before You Begin
Please read the following important notes before you begin installing BellaDati IoT Data Collector:
- Check that your target machine meets (at least) the minimal system requirements (appropriate HW and SW, including Java).
- Your BellaDati instance is up and running, and it is accessible from your target machine.
To run installer on Linux:
- Please make sure the installer has execute privileges. You can use following command to add execute rights:
- Execute following command (you can use argument-c if you want to run installer in console mode):
To run installer on Windows:
- Run installer executable as Administrator
This window will check your machine against the minimal system requirements. Upgrade to a higher-performance machine in case your configuration does not meet the criteria, to avoid experiencing a decreased performance of IoT Collector.

Click Next to proceed with the installation.
2. License Terms
Read and Accept the license agreement.

Click Next to proceed with the installation.
3. Select Destination Directory
By default, IoT Collector is installed into a predefined installation directory. Click browse to navigate to different folder if you want to modify these settings. Installer will check your free disk capacity to ensure enough space is available.

Click Next to proceed with the installation.
4. Select Installation Type
Check Advanced Installation if you want to choose deployment mode and specify all application parameters. Leave it not selected to perform basic installation with default settings.
Check Start services automatically if you want to autostart installed modules after installation and also after each machine startup. Leave it blank to start modules on your own.
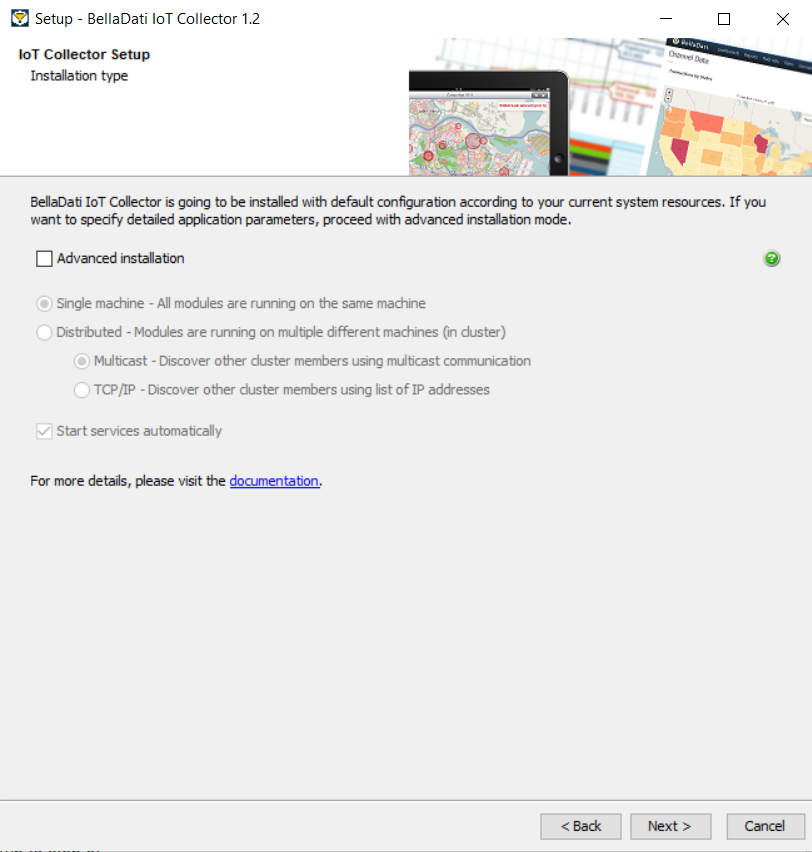
Click Next to proceed with the installation.
5. Configuration for Distributed Mode
| Note |
|---|
Proceed with the following steps only if you checked Advanced Installation and Distributed mode. Otherwise jump to step 6. |
5.1. Distributed Mode - Multicast
Approve or edit the following default cluster settings:
- Multicast group - Multicast group IP address
- Multicast port - Socket port that the member listens to and sends discovery messages through
- Multicast TTL - TTL (Time To Live) value for multicast packets sent out
- Multicast timeout - Period (in seconds) during which a member waits for a multicast response from another member
- Trusted interfaces - Comma separated list of IP addresses of all trusted members
| Tip |
|---|
Please see Hazelcast documentation for more details. Ask your network administrator if you are unsure about the configuration. |
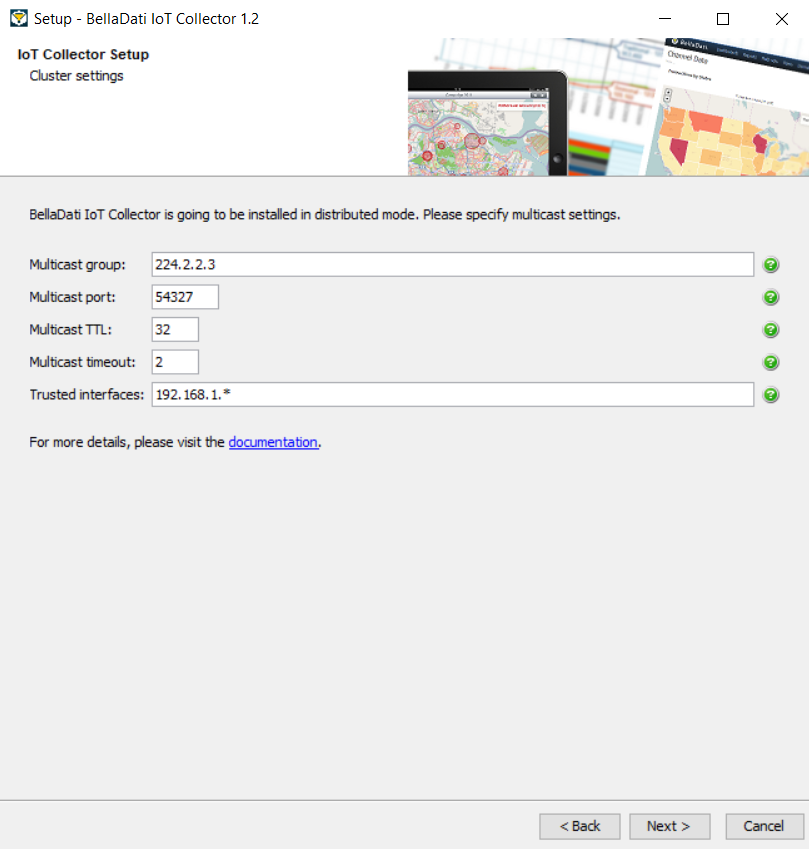
Click Next to proceed with the installation and go to step 6.
5.2. Distributed Mode - TCP/IP
Approve or edit the following default cluster settings:
- Host - IP Address of current PC
| Tip |
|---|
Please see Hazelcast documentation for more details. Ask your system administrator if you are unsure about the configuration. |

Click Next to proceed with the installation

- Members - Comma separated list of IP addresses of other cluster members
Click Next to proceed with the installation and go to step 6.
6. Choose Modules
Please specify count of modules that you want to install on this machine:
- Audit - Provides auditing services and status of modules and sensors
- Receiver - Collects data from multiple devices
- Sender - Retrieves data periodically from linked receiver and execute automated actions if necessary
- BellaDati module - Retrieves data from multiple senders and sends them to Belladati Dataset in bulks.
You will need to specify configuration parameters for each module in next steps.
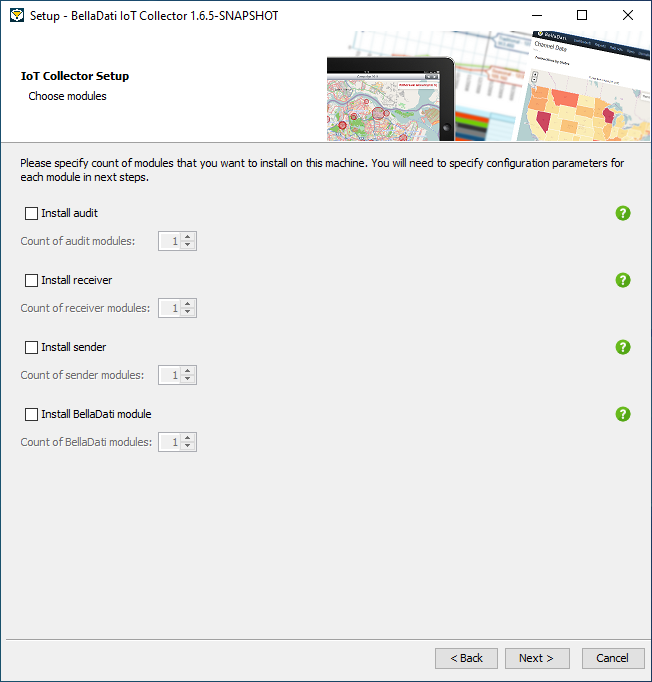
Click Next to proceed with the installation.
7. Audit Configuration
| Note |
|---|
Proceed with the following steps only if you checked Install Audit. Otherwise jump to step 8. |
7.1. Instance Configuration
Approve or edit the following default settings:
- Instance name - Name that will identify this IoT Collector instance uniquely. Good practice is to enter company name followed by environment identification.
- Drop database at startup - Flag indicating if database should be dropped during module startup
- Authentication enabled
- Administrator password - Password for main administrator (default: BellaDati01)
- Drop old users at startup - Flag indicating if users should be dropped during module startup
- Merge users at startup - Flag indicating if users should be merged/updated during module startup
| Note |
|---|
Please make sure that you enter the same values for all installations in Distributed Mode! |
| Tip |
|---|
Leave the default values if you are unsure about the configuration. |
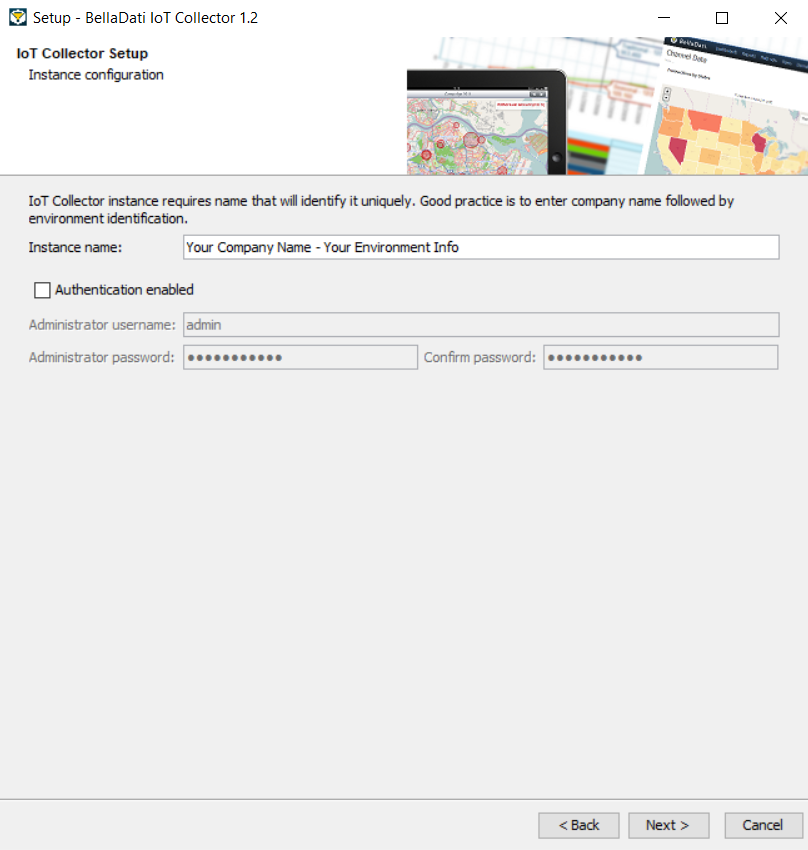
Click Next to proceed with the installation.
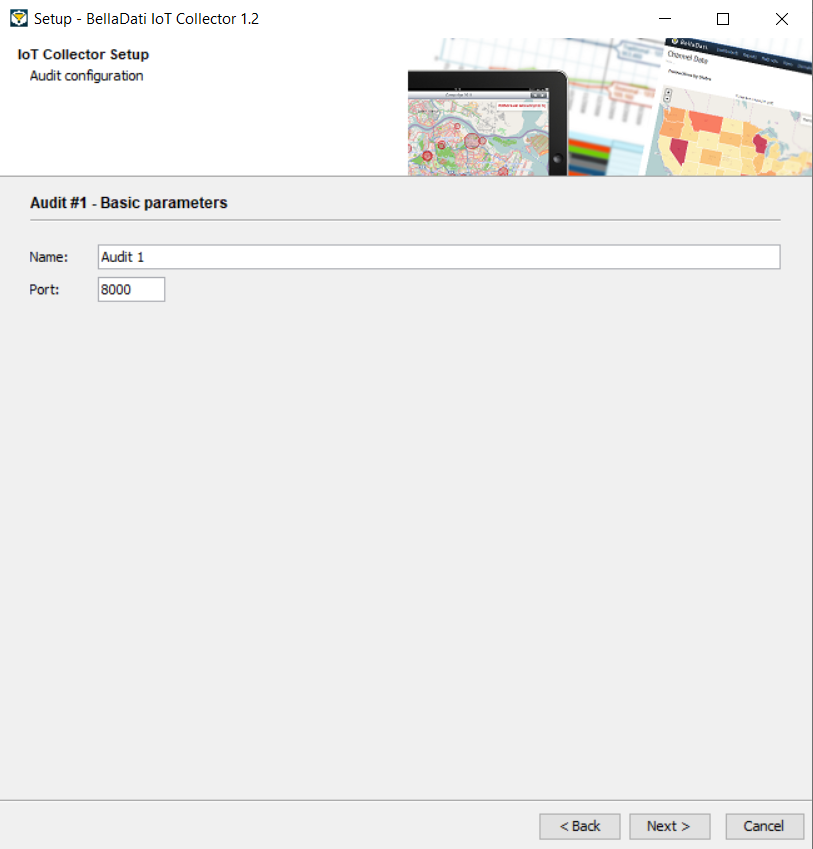
7.2. Audit - Basic Parameters
Approve or edit the following default settings:
- Name - Name that will identify this audit module uniquely
- Port - HTTP port on which audit endpoints will be running
- Body limit - Maximum allowed HTTP request body size (in bytes, default: 2 MB)
- Drop database at startup - Flag indicating if database should be dropped during module startup
- JSON limit enabled - Flag indicating if JSON data object should be limited (default: false/unlimited)
- Maximal VARCHAR length - Length of VARCHAR column storing JSON data object
| Note |
|---|
Please make sure that you enter the same values (except Name and Port) for all installations in Distributed Mode! |
| Tip |
|---|
Leave the default values if you are unsure about the configuration. |
Click Next to proceed with the installation.
7.3. Audit - Security Parameters
Approve or edit the following default security settings:
- Authentication enabled
- Viewer username - Unique viewer username
- Viewer password - Password for viewer (default: BellaDati01)
- Drop old users at startup - Flag indicating if users should be dropped during module startup
- Merge users at startup - Flag indicating if users should be merged/updated during module startup
- SSL/TLS enabled
- Keystore path - Absolute or relative path to Java keystore file (JKS)
- Keystore password - Password of Java keystore (default: wibble)
| Note |
|---|
Please make sure that you enter the same values for all installations in Distributed Mode! |
| Tip |
|---|
Leave the default values if you are unsure about the configuration. |

Click Next to proceed with the installation.
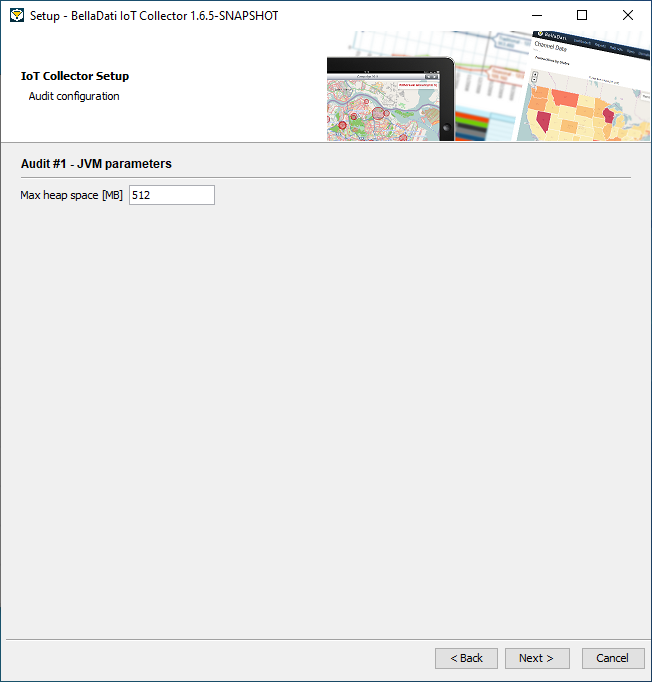
7.4. Audit - Heap size
Approve or edit the following default security settings:
- Max heap space - Set maximum avaible heap size memory
Click Next to proceed with the installation.
8. Receiver Configuration
| Note |
|---|
Proceed with the following steps only if you checked Install Receiver. Otherwise jump to step 9. |
By default, receiver is configured as HTTP_POST_CONSUME. You can change it after the installation using the IoT Console or manually.
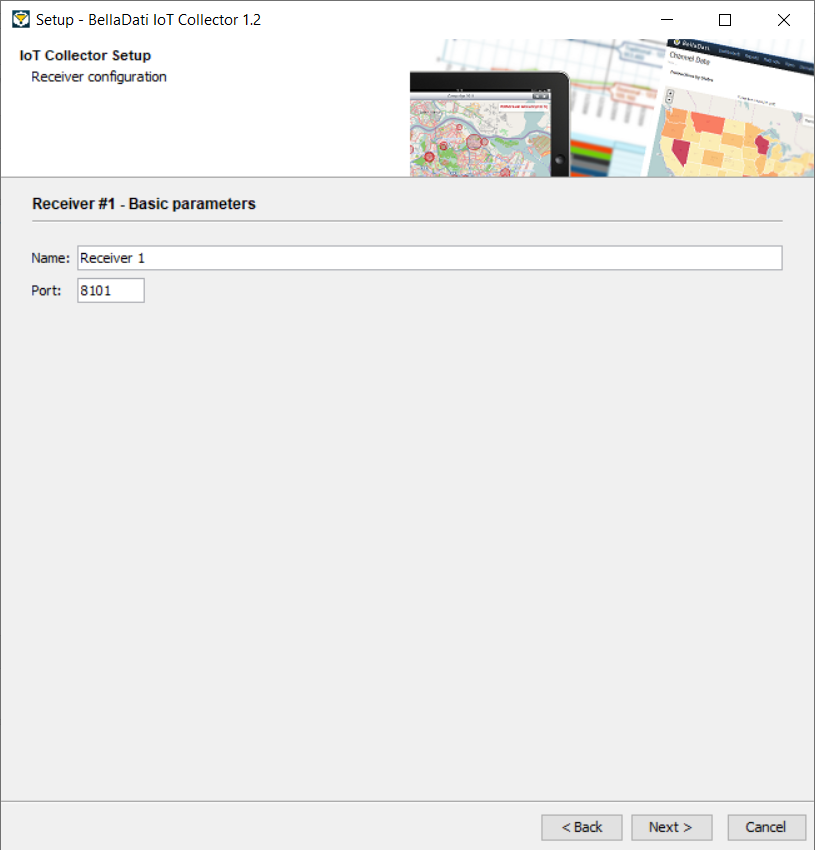
8.1. Receiver - Basic Parameters
Approve or edit the following default settings:
- Name - Name that will identify this receiver module uniquely
- Port - HTTP port on which receiver endpoints will be running
- Sensor ID - JSON key identifying entry that stores sensor identification
- Input mode
- Single - Sensor sends JSON data containing only one single record
- Bulk - Sensor sends JSON data containing multiple records
- Body limit - Maximum allowed HTTP request body size (in bytes, default: 2 MB)
- Drop database at startup - Flag indicating if database should be dropped during module startup
- JSON limit enabled - Flag indicating if JSON data object should be limited (default: false/unlimited)
- Maximal VARCHAR length - Length of VARCHAR column storing JSON data object
| Tip |
|---|
Leave the default values if you are unsure about the configuration. |
Click Next to proceed with the installation.
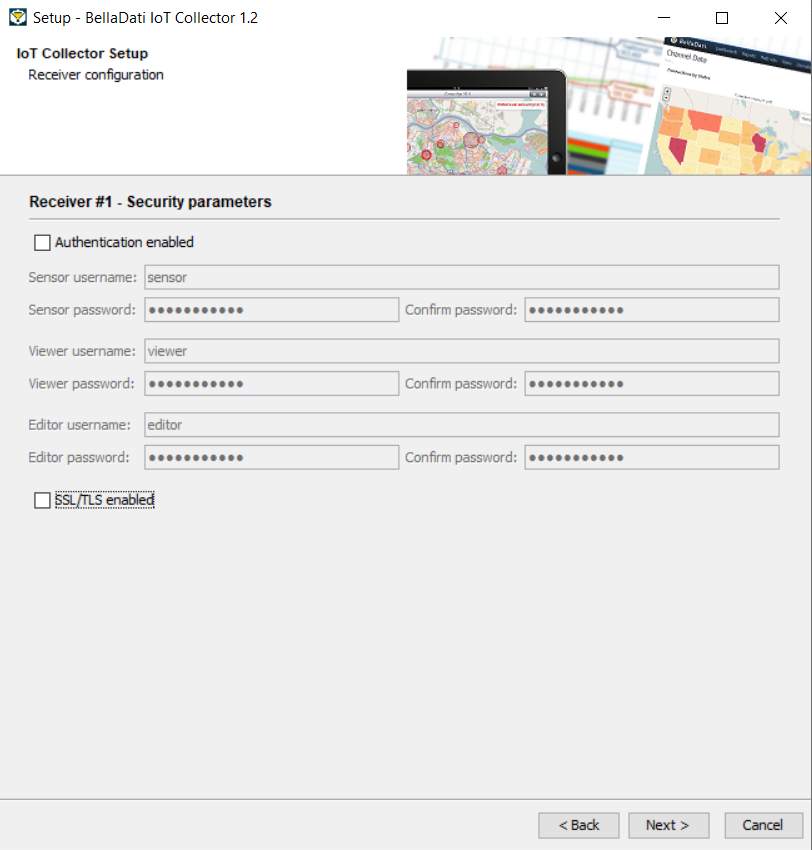
8.2. Receiver - Security Parameters
Approve or edit the following default security settings:
- Authentication enabled
- Sensor username - Unique sensor username
- Sensor password - Password for sensor (default: BellaDati01)
- Viewer username - Unique viewer username
- Viewer password - Password for viewer (default: BellaDati01)
- Editor username - Unique editor username
- Editor password - Password for editor (default: BellaDati01)
- Drop old users at startup - Flag indicating if users should be dropped during module startup
- Merge users at startup - Flag indicating if users should be merged/updated during module startup
- SSL/TLS enabled
- Keystore path - Absolute or relative path to Java keystore file (JKS)
- Keystore password - Password of Java keystore (default: wibble)
| Tip |
|---|
Leave the default values if you are unsure about the configuration. |
Click Next to proceed with the installation.
8.3. Receiver - Heap size
Approve or edit the following default security settings:
- Max heap space - Set maximum avaible heap size memory
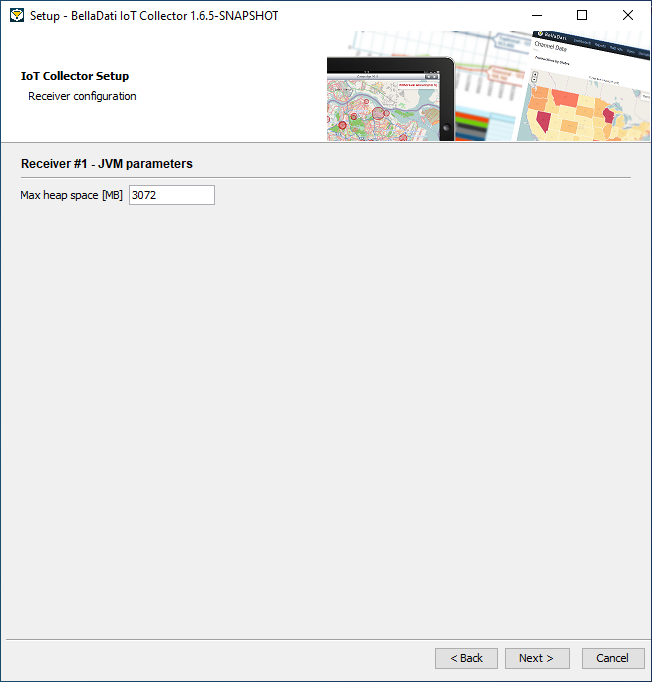
Click Next to proceed with the installation.
9. Sender Configuration
| Note |
|---|
Proceed with the following steps only if you checked Install Sender. Otherwise jump to step 10. |
9.1. Sender - Basic Parameters
Approve or edit the following default settings:
- Name - Name that will identify this sender module uniquely
- Port - HTTP port on which sender endpoints will be running
- Period - Delay after which the timer will fire new send event (in seconds, default: 60)
- Limit - Page size that is used as a filter to obtain data from receiver (default: 1000)
- Delete processed data from receiver database
- Receiver
- Local - Receiver is located on the same machine as this sender
- Remote - Receiver is located on the remote machine
| Tip |
|---|
Leave the default values if you are unsure about the configuration. |
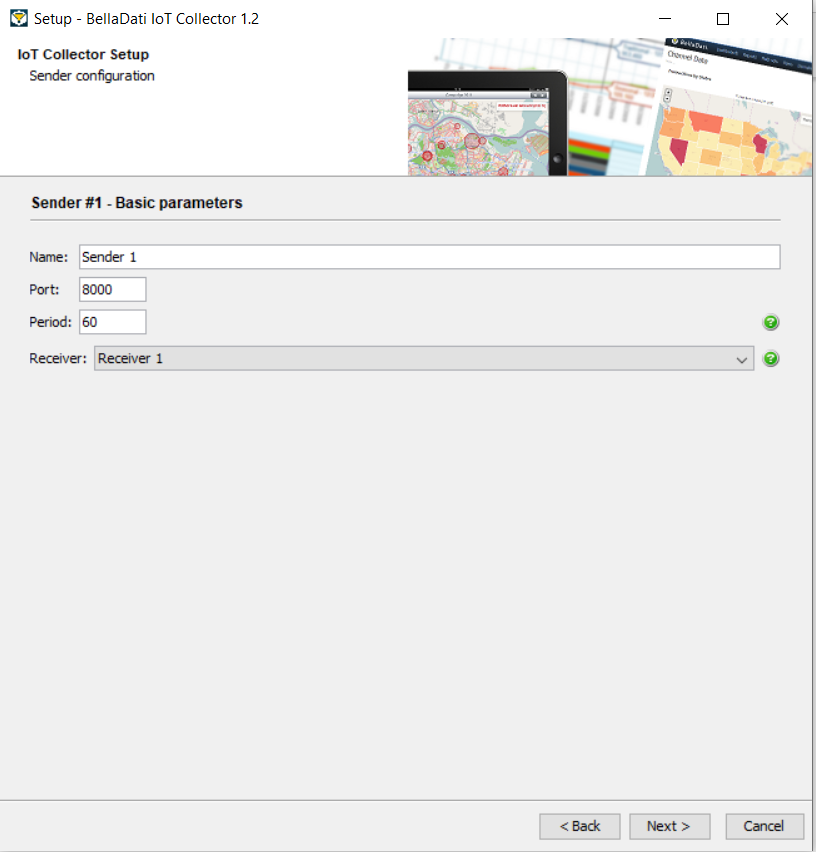
Click Next to proceed with the installation.
9.2. Sender - Security Parameters
Approve or edit the following default security settings:
- Authentication enabled
- Viewer username - Unique viewer username
- Viewer password - Password for viewer (default: BellaDati01)
- Drop old users at startup - Flag indicating if users should be dropped during module startup
- Merge users at startup - Flag indicating if users should be merged/updated during module startup
- SSL/TLS enabled
- Keystore path - Absolute or relative path to Java keystore file (JKS)
- Keystore password - Password of Java keystore (default: wibble)
| Tip |
|---|
Leave the default values if you are unsure about the configuration. |
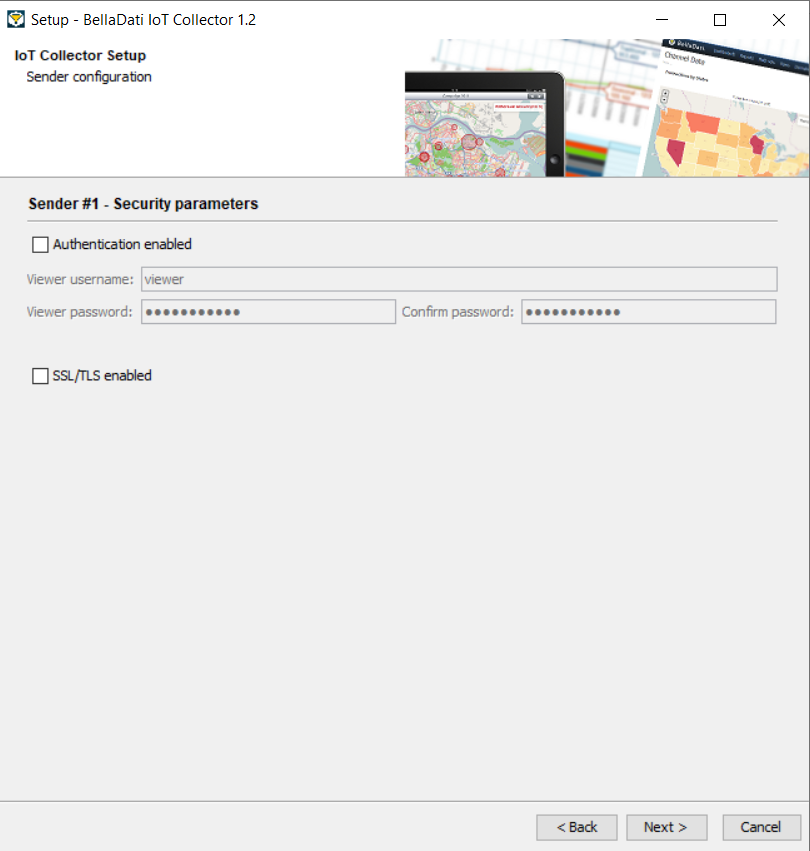
Click Next to proceed with the installation.
9.3. Sender - Heap size
Approve or edit the following default security settings:
- Max heap space - Set maximum avaible heap size memory
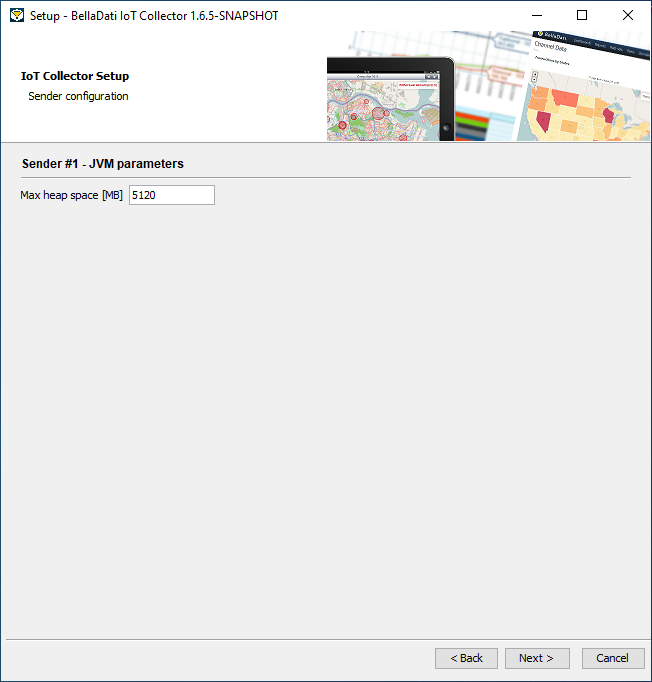
Click Next to proceed with the installation.
10.1. BellaDati - Basic Parameters
Approve or edit the following default settings:
- Name - Name that will identify this BellaDati module uniquely
- Port - HTTP port on which Belladati endpoint will be running
- Period - Delay after which the timer will fire new send event (in seconds, default: 1)
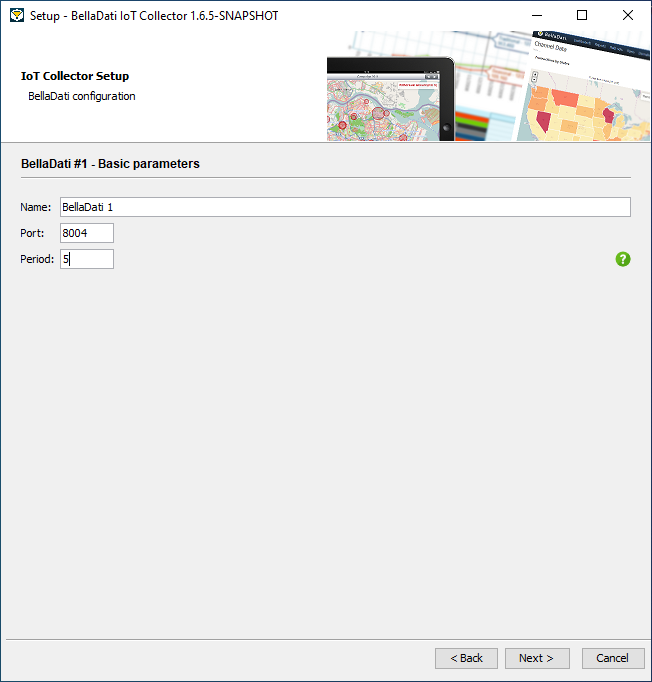
Click Next to proceed with the installation.
10.2. BellaDati - Security Parameters
Approve or edit the following default security settings:
- Authentication enabled
- Viewer username - Unique viewer username
- Viewer password - Password for viewer (default: BellaDati01)
- Drop old users at startup - Flag indicating if users should be dropped during module startup
- Merge users at startup - Flag indicating if users should be merged/updated during module startup
- SSL/TLS enabled
- Keystore path - Absolute or relative path to Java keystore file (JKS)
- Keystore password - Password of Java keystore (default: wibble)
| Tip |
|---|
Leave the default values if you are unsure about the configuration. |
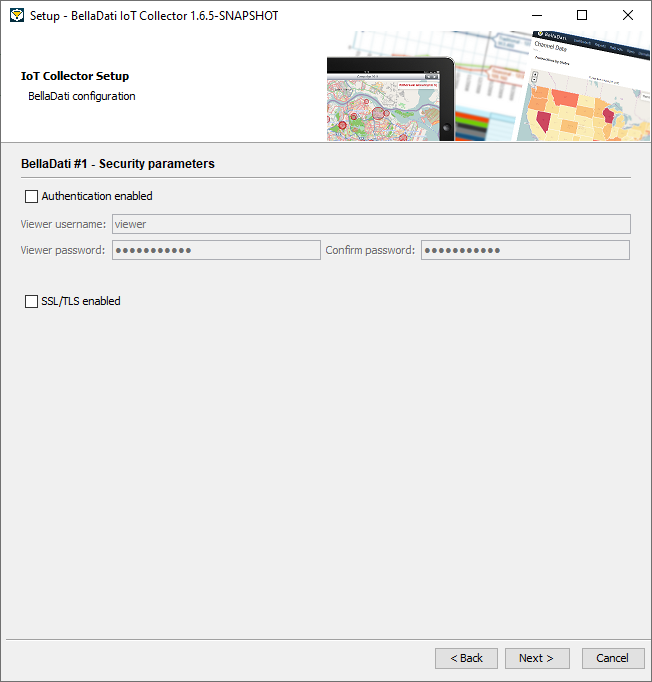
Click Next to proceed with the installation.
10.3. BellaDati - Heap size
Approve or edit the following default security settings:
- Max heap space - Set maximum avaible heap size memory

Click Next to proceed with the installation.
Approve or edit the name of the start menu folder.
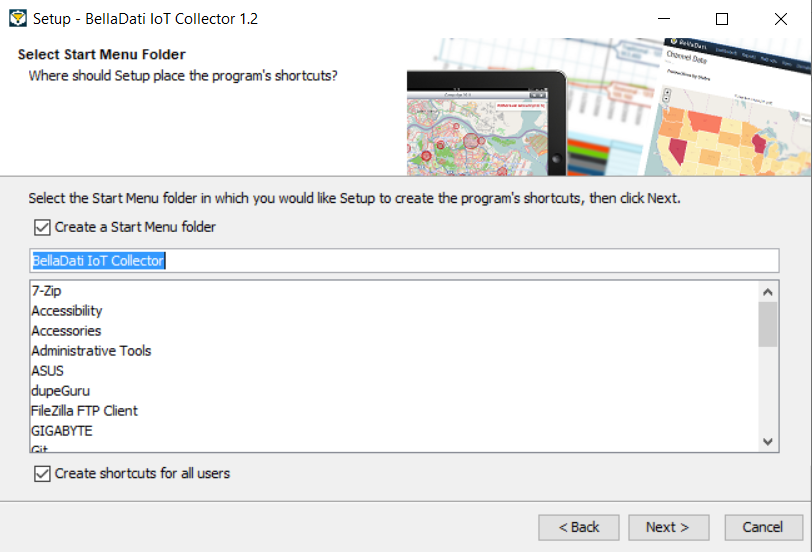
Click Next to proceed with the installation.
12. License Key
| Note |
|---|
Proceed with the following steps only if you checked Install Audit. Otherwise jump to step 1213. |
Send obtained server ID to BellaDati support team and request license key. Enter obtained license key to the following form. Alternatively, leave it empty and enter the license key later via the IoT Console.
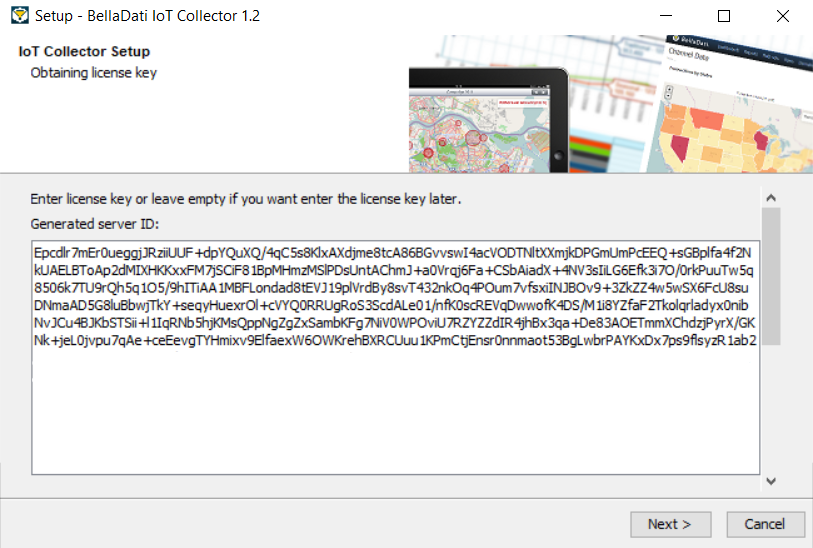
Click Next and wait while IoT Collector is installed on your computer.
13. Startup in Distributed Mode
| Note |
|---|
Proceed with the following steps only if you checked Advanced Installation and Distributed mode with Autostart option. Otherwise jump to step 1314. |
In order to start Collector modules correctly, cluster has to be formed at first. You need to start all audit modules running on other machines at first. Receiver and sender modules will be started after the confirmation that all audit modules are up and running.
Click Next to proceed with the startup. It could take some time to start all modules.
14. Finishing Installation
The installation is complete.
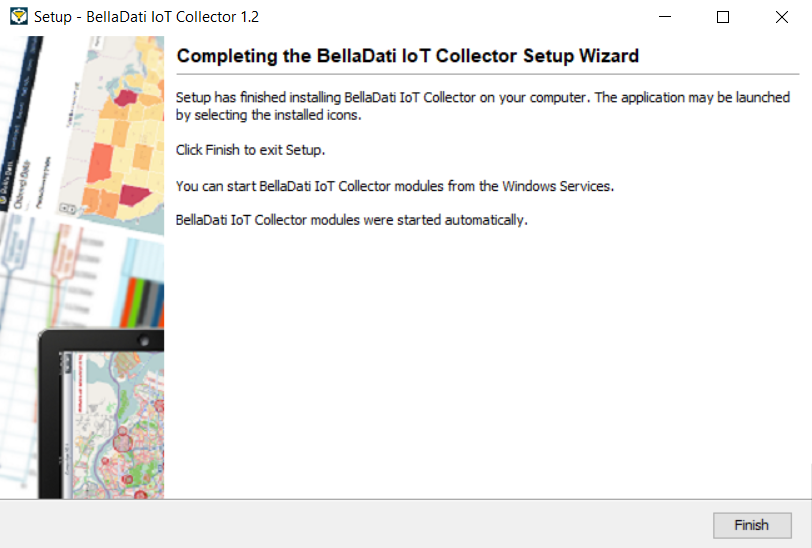
Close the window.
15. Troubleshooting
- If you have any problems during installation, please try to complete installation (retry or ignore errors) and then send us following log file:
- Modules do not autostart after restart of Linux machine. You need to register/edit created services for autostart based on your distribution, version, service system (e.g. SysV, Systemd, Upstart) and init system (e.g. update-rc.d, ntsysv, chkconfig, insserv). Please keep following order during modules startup:
- Start all audit modules
- Start all receiver modules
- Start all sender modules
- To access IoT Collector modules after the installation is complete, point your web browser to http://localhost:<port>/ or https://localhost:<port>/ (based on entered settings in step 7, 8, and 9).
- If you have any problems with IoT Collector functionality, please send us all log files located on following location:
- If you have any problems with IoT Collector Distributed TCP/IP mode functionality try to edit port in your cluster.xml. Then restart your audit and then other modules.