Page History
| Sv translation | ||||||||||||||||||||||||||||||||||||||||||||||||||||||||||||||||||||||||||||||||||||||||||||||||||||||||||||||||||||||||||||||||||||||||||||||||||||||||||||||||||||||||||||||||||||||||||||||||||
|---|---|---|---|---|---|---|---|---|---|---|---|---|---|---|---|---|---|---|---|---|---|---|---|---|---|---|---|---|---|---|---|---|---|---|---|---|---|---|---|---|---|---|---|---|---|---|---|---|---|---|---|---|---|---|---|---|---|---|---|---|---|---|---|---|---|---|---|---|---|---|---|---|---|---|---|---|---|---|---|---|---|---|---|---|---|---|---|---|---|---|---|---|---|---|---|---|---|---|---|---|---|---|---|---|---|---|---|---|---|---|---|---|---|---|---|---|---|---|---|---|---|---|---|---|---|---|---|---|---|---|---|---|---|---|---|---|---|---|---|---|---|---|---|---|---|---|---|---|---|---|---|---|---|---|---|---|---|---|---|---|---|---|---|---|---|---|---|---|---|---|---|---|---|---|---|---|---|---|---|---|---|---|---|---|---|---|---|---|---|---|---|---|---|---|
| ||||||||||||||||||||||||||||||||||||||||||||||||||||||||||||||||||||||||||||||||||||||||||||||||||||||||||||||||||||||||||||||||||||||||||||||||||||||||||||||||||||||||||||||||||||||||||||||||||
Actions are used to define which action should be triggered when data arrive in the sender. Rules are used to define under which circumstances should these actions be triggered. Automated ActionsBy using automated actions, users choose what to do with the data. In other words, they choose what should be the output. There are 6 different actions available:
Users can choose one or more action. It is possible to use each action more than once (since IoT Data Collector 1.2). Adding an Automated ActionTo add an action, users have to click on New action, select which type of action they would like to use, and click on Continue. For some types of actions, further configuration is necessary (see below).
Removing an Automated ActionTo remove an automated action, users have to click on the icon
To finish the operation, users have to click on Apply to save the changes to the sender.
BellaDati RESTThis action will send the data to a BellaDati Data Set via the REST API. To be able to use this action, the connection parameters and mapping have to be specified. General
Connection
Mapping
If the connection is not established at init (e.g. because BellaDati is not running), the action will try to reconnect when sending the data. Send data to BellaDatiRESTin BulksThis action will send the data to a BellaDati Module. To be able to use this action mapping have to be specified. General
Mapping
If the connection is not established, five attempts will be attempted, After that, sender will be paused. Save to FileThis action will save the output to a text file on the server. The path to the file is installation_dir/data/NameOfSender/NameOfReceiver/. General
MQTT PublishThis action is used to publish the data to an MQTT Broker. To be able to use this action, the connection parameters and the message have to be specified. General
Connection
|


| Parameter | Description |
|---|---|
| Name | Name of the action |
| Transformation | Transformation which should be used in this action (optional) |
Connection
| Parameter | Description |
|---|---|
| URL or IP address of the SMTP host | |
| Port | Port where the SMTP host is running |
| Use SSL/TLS | Enables SSL and TLS |
| Username | Username of the SMTP user |
| Password | Passwrod of the SMTP user |
| Sender email | Defines from which address the email will be sent |
| Sender caption | Name of the sender |
| Recipients | List of recipients |
| Subject | Subject of the email |
| Content Type | Content Type of the email (text/plain, text/html) |
| Message content | The content of the message. It is possible to reference the input values by using tags with following format: ${NameOfField}. Example: The pressure is ${pressure} and the temperature is ${temperature}. |
| Continue on error | This toggle influences the behavior of the sender in a situation when the sending of the data fails. When disabled, unprocessed data are not deleted from the receiver and the action is not triggered on the same data again. When enabled, the data are deleted from the receiver and the action is not triggered until new data arrive. |
HTTP Request
By using this option the data will be sent via HTTP with one of the standard methods (POST, GET, DELETE, PUT). This option is useful when the data should be transferred to another service or application. To be able to use this action, the connection parameters and the message have to be specified.
General
| Parameter | Description |
|---|---|
| Name | Name of the action |
| Transformation | Transformation which should be used in this action (optional) |
Connection
| Parameter | Description |
|---|---|
| Method | Which HTTP method should be used. |
| Port | Port of the target endpoint Example: 80 |
| Hostname | Hostname of the target endpoint Example: belladatiiotservice.com |
| Relative URI | Relative URI of the target endpoint Example:/postendpoint |
| HTTP headers | Specification of HTTP headers; one header per row Example: header1=value1 header2=value2 |
| HTTP POST content | Specification of HTTP body. It is possible to reference the input values by using tags with following format: ${NameOfField}. Example: The pressure is ${pressure} and the temperature is ${temperature}. |
| Send as Form | Enables URL-encoding of the data, similar to --data-urlencode from cUrl. When enabled, each row of the content is one entry splitted by =. Example: From=+123456789 Body=This is the message To=+987654321 |
| Authentication type | What type of authentication should be used. Available options:
|
| Use SSL | Enables SSL. |
| Continue on error | This toggle influences the behavior of the sender in a situation when the sending of the data fails. When disabled, unprocessed data are not deleted from the receiver and the action is triggered on the same data again. When enabled, the data are deleted from the receiver and the action is not triggered until new data arrive. |
TCP/IP Publish
This action is used to publish the data to a TCP/IP endpoint. To be able to use this action, the connection parameters and the message have to be specified.
General
| Parameter | Description |
|---|---|
| Name | Name of the action |
| Transformation | Transformation which should be used in this action (optional) |
Connection
| Parameter | Description |
|---|---|
| URL or IP address of the TCP/IP endpoint | |
| Port | Port where the TCP/IP endpoint is running |
| Payload | The content of the message. Payload should follow standards for sending the client requests Example 1: GET /login HTTP/1.1 Host: localhost:8080 It is possible to reference the input values by using tags with following format: ${NameOfField}. Example: |
Action Rules
Action rules can be used to filter outgoing data by using various type of data-driven conditions. Each action rule is defined by the Field, Operation and Value.
To apply the action rule, the action has to be assigned to this rule. It is possible to add more than 1 rule and each rule can have more than 1 condition (fields).
If one action has multiple rules assigned, it has to pass at least one of them (OR operation between the rules) to be executed:
| Rule 1 | Rule 2 | Result |
|---|---|---|
| Passed | Not passed | Executed |
| Passed | Passed | Executed (only once) |
| Not passed | Not passed | Not executed |
If one action rule has multiple conditions (fields), the value has to match all conditions (AND operation).
| Field 1 | Field 2 | Result |
|---|---|---|
| Passed | Not passed | Not executed |
| Passed | Passed | Executed (only once) |
| Not passed | Not passed | Not executed |
Adding an Action Rule
To add a new action rule, users have to click on New filter rule. In the pop-up window, they have to fill in the name of the rule and then choose which actions should be associated with this rule (use CTRL to select/deselect multiple actions). Lastly, they need to specify at least one condition. Each condition consists of Field, Operation, and Value.
Once they have the condition ready, users have to click on Add to save the rule and close the pop-up window.
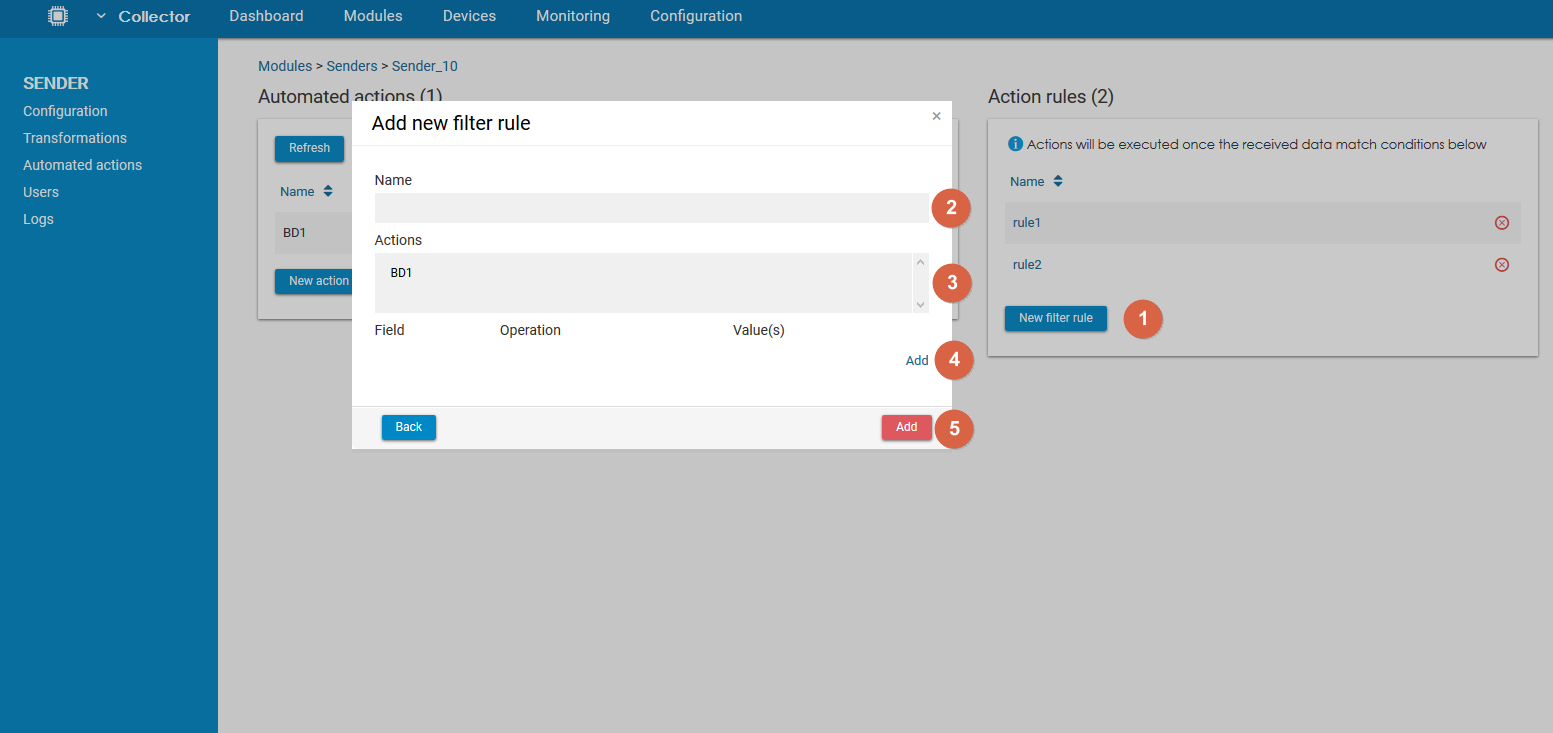
| Info |
|---|
Dot character (".") is used to define the json structure. Last element after dot will be evaluated. Example:
|
As the last step, users have to click on Apply to save the changes to the sender.

Editing an Action Rule
To edit an action rule, users need to click on the row.

Removing an Action Rule
To remove an action rule, users have to click on the icon  and confirm the action.
To finish the operation, users have to click on Apply to save the changes to the sender.

Action Rule Options
Following operations are available:
- greater than
- lower than
- equals
- not equal to
- greater than or equal to
- lower than or equal to
- contains
- doesn't contain
- not empty
- empty
For operation "not empty" and "empty", the compare value is not available.
| Sv translation | ||||||||||||||||||||||||||||||||||||||||||||||||||||||||||||||||||||||||||||||||||||||||||||||||||||||||||
|---|---|---|---|---|---|---|---|---|---|---|---|---|---|---|---|---|---|---|---|---|---|---|---|---|---|---|---|---|---|---|---|---|---|---|---|---|---|---|---|---|---|---|---|---|---|---|---|---|---|---|---|---|---|---|---|---|---|---|---|---|---|---|---|---|---|---|---|---|---|---|---|---|---|---|---|---|---|---|---|---|---|---|---|---|---|---|---|---|---|---|---|---|---|---|---|---|---|---|---|---|---|---|---|---|---|---|
| ||||||||||||||||||||||||||||||||||||||||||||||||||||||||||||||||||||||||||||||||||||||||||||||||||||||||||
Actions are used to define which action should be triggered when data arrive in the sender. Rules are used to define under which circumstances should these actions be triggered. Automated ActionsBy using automated actions, users choose what to do with the data. In other words, they choose what should be the output. There are 5 different actions available:
Users can choose one or more action. It is possible to use each action more than once (since IoT Data Collector 1.2). Adding an Automated ActionTo add an action, users have to click on New action, select which type of action they would like to use, and click on Continue. For some types of actions, further configuration is necessary (see below).
Removing an Automated ActionTo remove an automated action, users have to click on the icon
To finish the operation, users have to click on Apply to save the changes to the sender.
BellaDati RESTThis action will send the data to a BellaDati Data Set via the REST API. To be able to use this action, the connection parameters and mapping have to be specified. Connection
Mapping
If the connection is not established at init (e.g. because BellaDati is not running), the action will try to reconnect when sending the data. Save to FileThis action will save the output to a text file on the server. The path to the file is installation_dir/data/NameOfSender/NameOfReceiver/. MQTT PublishThis action is used to publish the data to an MQTT Broker. To be able to use this action, the connection parameters and the message have to be specified.
|
| Parameter | Description |
|---|---|
| Name | Name of the action (optional) |
| URL of IP address of the SMTP host | |
| Port | Port where the SMTP host is running |
| Use SSL/TLS | Enables SSL and TLS |
| Username | Username of the SMTP user |
| Password | Passwrod of the SMTP user |
| Sender email | Defines from which address the email will be sent |
| Sender caption | Name of the sender |
| Recipients | List of recipients |
| Subject | Subject of the email |
| Content Type | Content Type of the email (text/plain, text/html) |
| Message content | The content of the message. It is possible to reference the input values by using tags with following format: ${NameOfField}. Example: The pressure is ${pressure} and the temperature is ${temperature}. |
| Continue on error | This toggle influences the behavior of the sender in a situation when the sending of the data fails. When disabled, unprocessed data are not deleted from the receiver and the action is not triggered on the same data again. When enabled, the data are deleted from the receiver and the action is not triggered until new data arrive. |
HTTP Request
By using this option the data will be sent via HTTP with one of the standard methods (POST, GET, DELETE, PUT). This option is useful when the data should be transferred to another service or application. To be able to use this action, the connection parameters and the message have to be specified.
| Parameter | Description |
|---|---|
| Name | Name of the action (optional) |
| Method | Which HTTP method should be used. |
| Port | Port of the target endpoint Example: 80 |
| Hostname | Hostname of the target endpoint Example: belladatiiotservice.com |
| Relative URI | Relative URI of the target endpoint Example:/postendpoint |
| HTTP headers | Specification of HTTP headers; one header per row Example: header1=value1 header2=value2 |
| HTTP POST content | Specification of HTTP body. It is possible to reference the input values by using tags with following format: ${NameOfField}. Example: The pressure is ${pressure} and the temperature is ${temperature}. |
| Send as Form | Enables URL-encoding of the data, similar to --data-urlencode from cUrl. When enabled, each row of the content is one entry splitted by =. Example: From=+123456789 Body=This is the message To=+987654321 |
| Authentication type | What type of authentication should be used. Available options:
|
| Use SSL | Enables SSL. |
| Continue on error | This toggle influences the behavior of the sender in a situation when the sending of the data fails. When disabled, unprocessed data are not deleted from the receiver and the action is triggered on the same data again. When enabled, the data are deleted from the receiver and the action is not triggered until new data arrive. |
Action Rules
Action rules can be used to filter outgoing data by using various type of data-driven conditions. Each action rule is defined by the Field, Operation and Value.
It is possible to add more than rule. In that case, the message has to match all the rules to be processed by the automated action. When the sender has more than one action, the rules are applied to all actions.
Adding an Action Rule
To add a new action rule, users have to click on New filter rule. In the pop-up window, they have to fill in the name of the field and then choose which operation they want to use. Lastly, they need to specify the compare value. Once they have the condition ready, users have to click on Add to save the rule and close the pop-up window.
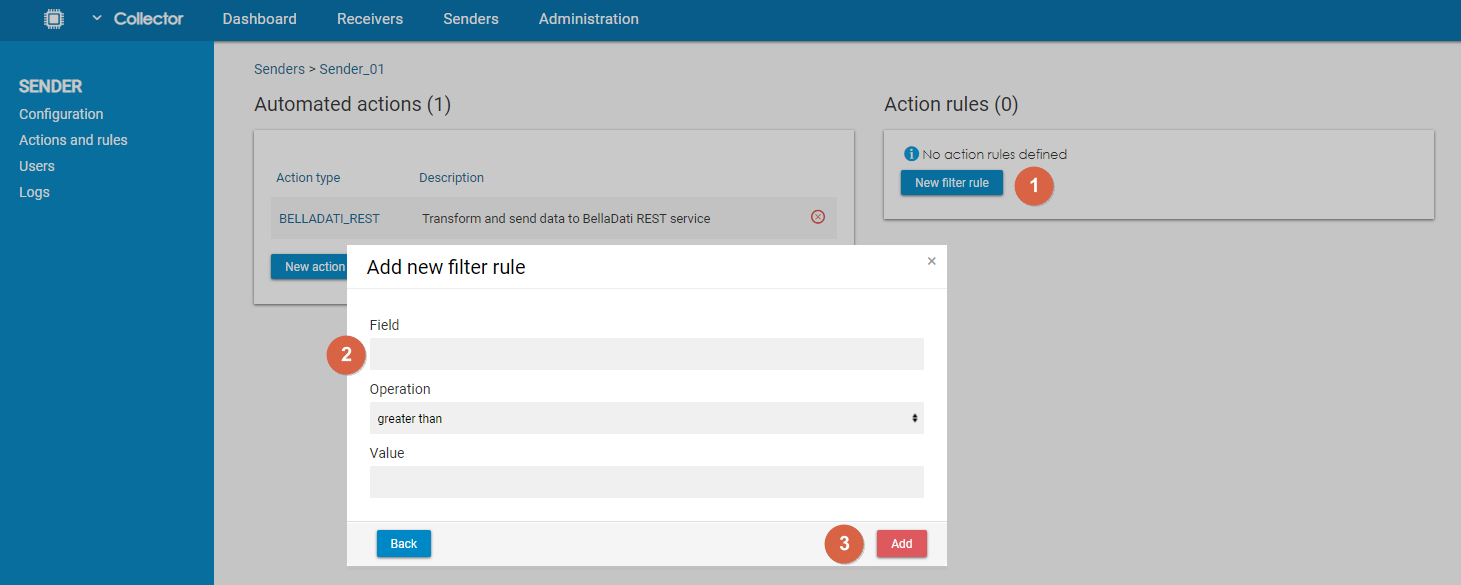
As the last step, users have to click on Apply to save the changes to the sender.
Editing an Action Rule
To edit an action rule, users need to click on the row.

Removing an Action Rule
To remove an action rule, users have to click on the icon and confirm the action.
To finish the operation, users have to click on Apply to save the changes to the sender.

Action Rule Options
Following operations are available:
- greater than
- lower than
- equals
- not equal to
- greater than or equal to
- lower than or equal to
- contains
- doesn't contain
- not empty
- empty
For operation "not empty" and "empty", the compare value is not available.
Overview
Content Tools