Actions are used to define which action should be triggered when data arrive in the sender. Rules are used to define under which circumstances should these actions be triggered.
Automated Actions
By using automated actions, users choose what to do with the data. In other words, they choose what should be the output. There are 6 different actions available:
BellaDati REST
Send data to BellaDati in Bulks
Send to remote database
Save to file
MQTT publish
Email
HTTP request
TCP/IP publish
Users can choose one or more action. It is possible to use each action more than once (since IoT Data Collector 1.2).
Adding an Automated Action
To add an action, users have to click on New action, select which type of action they would like to use, and click on Continue. For some types of actions, further configuration is necessary (see below).
Removing an Automated Action
To remove an automated action, users have to click on the icon and confirm the removal.
To finish the operation, users have to click on Apply to save the changes to the sender.
BellaDati REST
This action will send the data to a BellaDati Data Set via the REST API. To be able to use this action, the connection parameters and mapping have to be specified.
General
Parameter
Description
Name
Name of the action
Transformation
Transformation which should be used in this action (optional)
Connection
Parameter
Description
URL
IP adress or URL of BellaDati
Use SSL
Enables SSL.
Consumer Key
Consumer Key defined in the domain. OAuth has to be enabled in the domain. Learn more.
Consumer Secret defined in the domain. OAuth has to be enabled in the domain. Learn more.
Username
Username of BellaDati user
Password
Password of BellaDati user
Continue on error
This toggle influences the behavior of the sender in a situation when the sending of the data fails.
When disabled, unprocessed data are not deleted from the receiver and the action is triggered on the same data again.
When enabled, the data are deleted from the receiver and the action is not triggered until new data arrive.
Please note that this option is applied both when the action fails during the sending of the data and when it cannot connect to the target (e.g. because of wrong username).
Mapping
Parameter
Description
ID of the target data set
ID of the import template (import settings definition)
ID attribute
Which column (code of the column) should be used to store the ID.
Example: L_ID
Receiver Attribute
Which column (code of the column) should be used to store the Receiver.
Example: L_RECEIVER
Content Attribute
Which column (code of the column)should be used to store the source content (e. g. JSON)
Example: L_JSON
Timestamp Attribute
Which column (code of the column) should be used to store the timestamp
L_TIMESTAMP
Mapping
Mapping of source data and data set columns (attributes and indicators)
Username of user who has write access to specified schema and table
DB Password
Password of user set in DB username
Number of database workers
Each bulk of data will be split into chunks and those chunks will be sent to worker verticles. This is a number of these verticles. Each verticle creates its own connection to the database and transaction.
Rows per transaction
Each verticle will get this number of rows to insert. Combination of workers and rows per transaction can be used to optimalize performance and memory consumption. The more workers, the more consumed memory, the better performance.
All those informations can be found in Advanced settings of your dataset
Save to File
This action will save the output to a text file on the server. The path to the file is installation_dir/data/NameOfSender/NameOfReceiver/.
General
Parameter
Description
Name
Name of the action
Transformation
Transformation which should be used in this action (optional)
MQTT Publish
This action is used to publish the data to an MQTT Broker. To be able to use this action, the connection parameters and the message have to be specified.
General
Parameter
Description
Name
Name of the action
Transformation
Transformation which should be used in this action (optional)
Connection
Parameter
Description
URL of IP address of the MQTT Broker
Port
Port where the MQTT Broker is running
Transport type
TCP of Websocket (ws/wss)
Path
Available only for Websocket Transport type. Specifies the relative path where the MQTT Websocket broker is running
Topic
Topic under which the messages should be published
QoS
Which level of Quality of Service should be used
Message content
The content of the message. It is possible to reference the input values by using tags with following format: ${NameOfField}.
Example: The pressure is ${pressure} and the temperature is ${temperature}.
Authentication type
What type of authentication should be used. Available options:
None
Basic
Digest
Client certificate
Use SSL
Enables SSL.
Continue on error
This toggle influences the behavior of the sender in a situation when the sending of the data fails.
When disabled, unprocessed data are not deleted from the receiver and the action is triggered on the same data again.
When enabled, the data are deleted from the receiver and the action is not triggered until new data arrive.
Please note that this option is applied only when the action fails during the sending of the data. When the action fails because of different reason (e.g. because it cannot connect to the target), the whole action will fail.
Example:
Incorrect port - Continue on error is not applied.
Email
This action will send the data via an email. To be able to use this action, the connection parameters and the message have to be specified.
General
Parameter
Description
Name
Name of the action
Transformation
Transformation which should be used in this action (optional)
Connection
Parameter
Description
URL or IP address of the SMTP host
Port
Port where the SMTP host is running
Use SSL/TLS
Enables SSL and TLS
Username
Username of the SMTP user
Password
Passwrod of the SMTP user
Sender email
Defines from which address the email will be sent
Sender caption
Name of the sender
Recipients
List of recipients
Subject
Subject of the email
Content Type
Content Type of the email (text/plain, text/html)
Message content
The content of the message. It is possible to reference the input values by using tags with following format: ${NameOfField}.
Example: The pressure is ${pressure} and the temperature is ${temperature}.
Continue on error
This toggle influences the behavior of the sender in a situation when the sending of the data fails.
When disabled, unprocessed data are not deleted from the receiver and the action is not triggered on the same data again.
When enabled, the data are deleted from the receiver and the action is not triggered until new data arrive.
HTTP Request
By using this option the data will be sent via HTTP with one of the standard methods (POST, GET, DELETE, PUT). This option is useful when the data should be transferred to another service or application. To be able to use this action, the connection parameters and the message have to be specified.
General
Parameter
Description
Name
Name of the action
Transformation
Transformation which should be used in this action (optional)
Connection
Parameter
Description
Method
Which HTTP method should be used.
Port
Port of the target endpoint
Example: 80
Hostname
Hostname of the target endpoint
Example: belladatiiotservice.com
Relative URI
Relative URI of the target endpoint
Example:/postendpoint
HTTP headers
Specification of HTTP headers; one header per row
Example:
header1=value1
header2=value2
HTTP POST content
Specification of HTTP body. It is possible to reference the input values by using tags with following format: ${NameOfField}.
Example: The pressure is ${pressure} and the temperature is ${temperature}.
Send as Form
Enables URL-encoding of the data, similar to --data-urlencode from cUrl.
When enabled, each row of the content is one entry splitted by =.
Example:
From=+123456789
Body=This is the message
To=+987654321
Authentication type
What type of authentication should be used. Available options:
None
Basic
Digest
Client certificate
Use SSL
Enables SSL.
Continue on error
This toggle influences the behavior of the sender in a situation when the sending of the data fails.
When disabled, unprocessed data are not deleted from the receiver and the action is triggered on the same data again.
When enabled, the data are deleted from the receiver and the action is not triggered until new data arrive.
TCP/IP Publish
This action is used to publish the data to a TCP/IP endpoint. To be able to use this action, the connection parameters and the message have to be specified.
General
Parameter
Description
Name
Name of the action
Transformation
Transformation which should be used in this action (optional)
Connection
Parameter
Description
URL or IP address of the TCP/IP endpoint
Port
Port where the TCP/IP endpoint is running
Payload
The content of the message. Payload should follow standards for sending the client requests
Example 1:
GET /login HTTP/1.1
Host: localhost:8080

Example 2:
POST /contact_form.php HTTP/1.1
Host: localhost:8080
Content-Length: 64
Content-Type: application/x-www-form-urlencoded

name=Joe%20User&request=Send%20me%20one%20of%20your%20catalogue
It is possible to reference the input values by using tags with following format: ${NameOfField}.
Example:
POST /contact_form.php HTTP/1.1
Host: localhost:8080
Content-Length: 64
Content-Type: application/x-www-form-urlencoded

name=Joe%20User&request=Send%20me%20one%20of%20your%20${catalogue}
Action Rules
Action rules can be used to filter outgoing data by using various type of data-driven conditions. Each action rule is defined by the Field, Operation and Value.
To apply the action rule, the action has to be assigned to this rule. It is possible to add more than 1 rule and each rule can have more than 1 condition (fields).
If one action has multiple rules assigned, it has to pass at least one of them (OR operation between the rules) to be executed:
Rule 1
Rule 2
Result
Passed
Not passed
Executed
Passed
Passed
Executed (only once)
Not passed
Not passed
Not executed
If one action rule has multiple conditions (fields), the value has to match all conditions (AND operation).
Field 1
Field 2
Result
Passed
Not passed
Not executed
Passed
Passed
Executed (only once)
Not passed
Not passed
Not executed
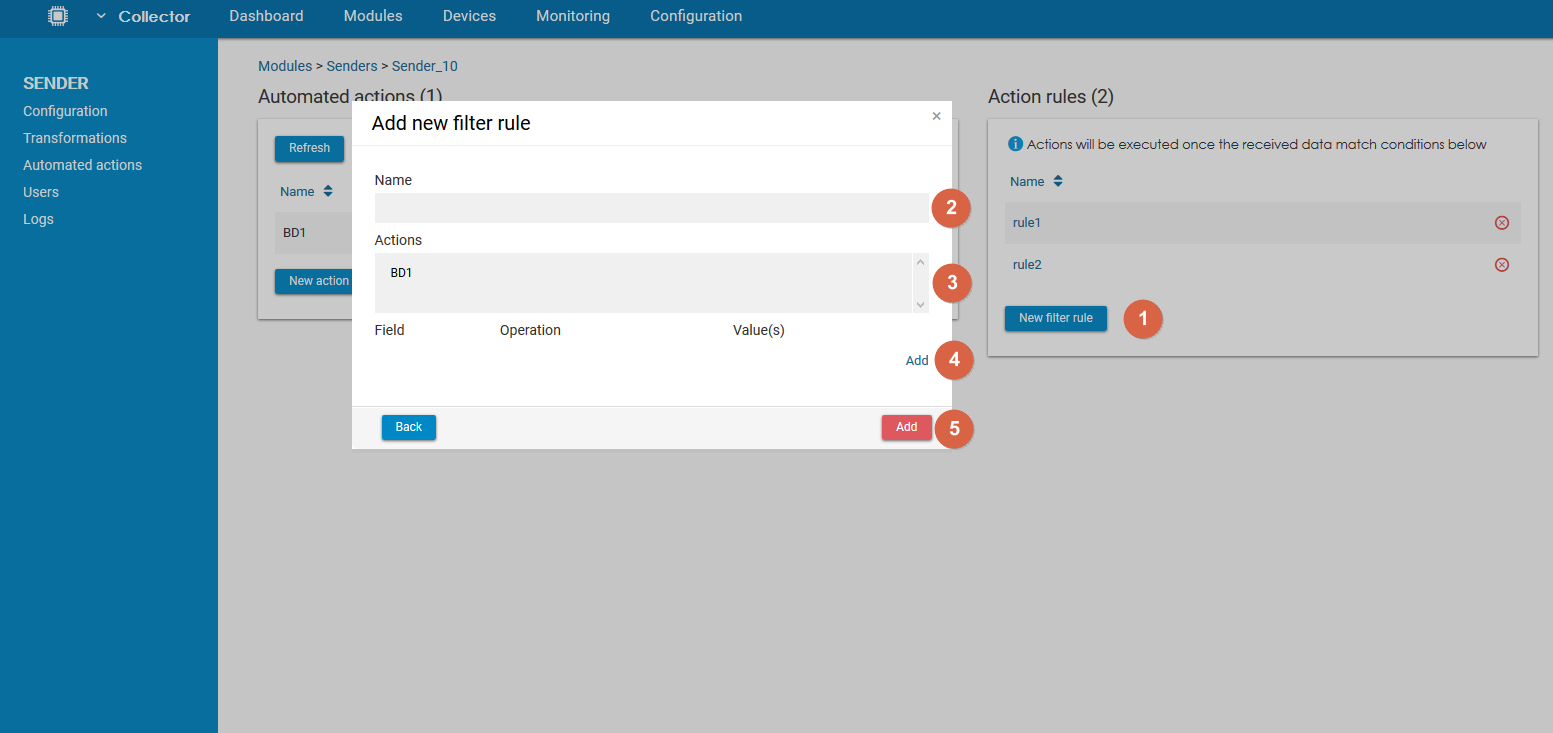
Adding an Action Rule
To add a new action rule, users have to click on New filter rule. In the pop-up window, they have to fill in the name of the rule and then choose which actions should be associated with this rule (use CTRL to select/deselect multiple actions). Lastly, they need to specify at least one condition. Each condition consists of Field, Operation, and Value.
Once they have the condition ready, users have to click on Add to save the rule and close the pop-up window.
Info
Dot character (".") is used to define the json structure. Last element after dot will be evaluated.
Example:
Element structure is: ch.A.raw
Evaluated element will be: raw
As the last step, users have to click on Apply to save the changes to the sender.
Editing an Action Rule
To edit an action rule, users need to click on the row.
Removing an Action Rule
To remove an action rule, users have to click on the icon and confirm the action.
To finish the operation, users have to click on Apply to save the changes to the sender.
Action Rule Options
Following operations are available:
greater than
lower than
equals
not equal to
greater than or equal to
lower than or equal to
contains
doesn't contain
not empty
empty
For operation "not empty" and "empty", the compare value is not available.