Page History
| Sv translation | |||||||||||||||||||||||||
|---|---|---|---|---|---|---|---|---|---|---|---|---|---|---|---|---|---|---|---|---|---|---|---|---|---|
| |||||||||||||||||||||||||
This tutorial explains how to use Import templates when using the BellaDati Rest Action in the sender. It covers the following topics:
Preparation of the source fileTo be able to prepare the import template, it is necessary to prepare a sample CSV file with the same structure the data which are being sent from the sender to BellaDati. In this example, the data sent from the sensor have the following structure:
The data are sent via MQTT Publisher to the MQTT Broker running on the receiver. When processed in the BellaDati IoT Data Collector, the values will be transformed into JSON and additional information is added to the message. The same structure has to be used in the sample CSV file:
The file has the following structure:
You can download the CSV file from here. Preparation of the import templateThis file has to imported to the destination data set. On the import settings page, it is necessary to map the values to correct columns:
Next, it is possible to add additional columns which will contain the parsed values from the JSON.
To get the date, use this formula:
To get the MQTT topic, use this formula.
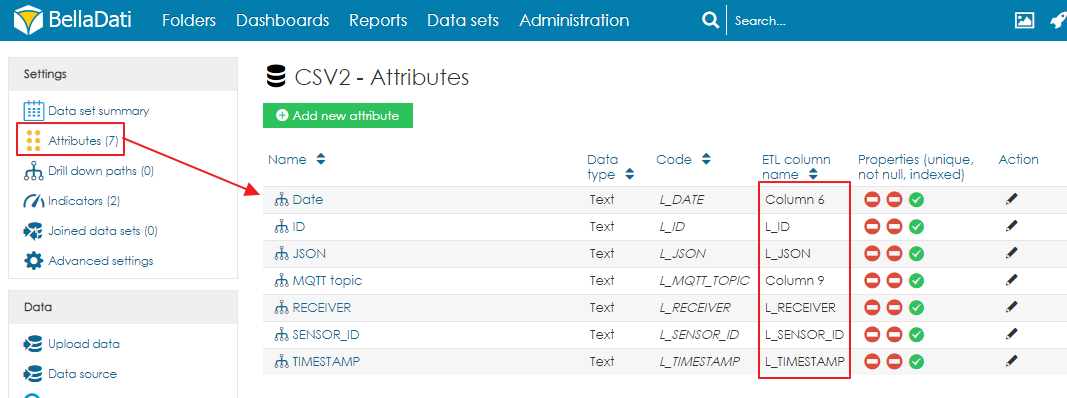
To learn how to work with JSON, please read the following article: http://support.belladati.com/doc/Importing+from+File Once the import settings are finished, click on Continue and import the data. After the import, make sure that the ETL names of attributes are correctly set. If they are not correct, change them to match the code of the attribute.
You can download the XML backup of the final data set from here. Please note that you need to import the data to create the import template. Usage of the import template
|


| Sv translation | |||||||||||||||||||||||||
|---|---|---|---|---|---|---|---|---|---|---|---|---|---|---|---|---|---|---|---|---|---|---|---|---|---|
| |||||||||||||||||||||||||
This tutorial explains how to use Import templates when using the BellaDati Rest Action in the sender. It covers the following topics:
Preparation of the source fileTo be able to prepare the import template, it is necessary to prepare a sample CSV file with the same structure the data which are being sent from the sender to BellaDati. In this example, the data sent from the sensor have the following structure:
The data are sent via MQTT Publisher to the MQTT Broker running on the receiver. When processed in the BellaDati IoT Data Collector, the values will be transformed into JSON and additional information is added to the message. The same structure has to be used in the sample CSV file:
The file has the following structure:
You can download the CSV file from here. Preparation of the import templateThis file has to imported to the destination data set. On the import settings page, it is necessary to map the values to correct columns:
Next, it is possible to add additional columns which will contain the parsed values from the JSON.
To get the date, use this formula:
To get the MQTT topic, use this formula.
To learn how to work with JSON, please read the following article: http://support.belladati.com/doc/Importing+from+File Once the import settings are finished, click on Continue and import the data. After the import, make sure that the ETL names of attributes are correctly set. If they are not correct, change them to match the code of the attribute.
You can download the XML backup of the final data set from here. Please note that you need to import the data to create the import template. Usage of the import template
|
Overview
Content Tools