| Note |
|---|
通知にアクセスできるようにするには、ユーザーは少なくともデータセットへの読み取り専用アクセス権を持っている必要があります。 |
データが選択された条件に達すると、データ駆動型通知は、指定したユーザーに電子メールまたはプッシュ通知を自動的に送信します。データセットにデータ駆動型通知を設定できます。 | Info |
|---|
データ駆動型の通知は、BellaDati 2.9.8から利用可能です。 |
通知の作成通知は、データセットの詳細から作成できます。 [データ]セクションの[通知]オプションをクリックして、選択したデータセットから新しい通知を作成し、既存の通知を一覧表示します。 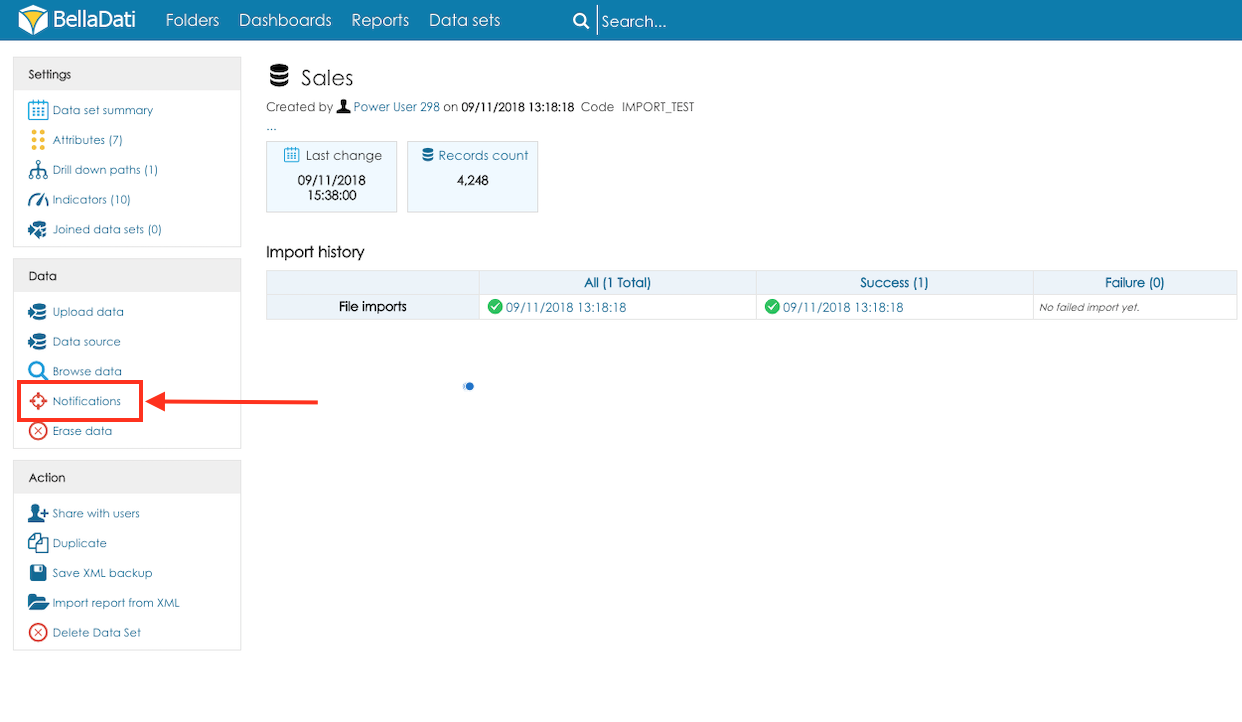
[新規通知]ボタンをクリックして、通知ウィザードを開きます。 
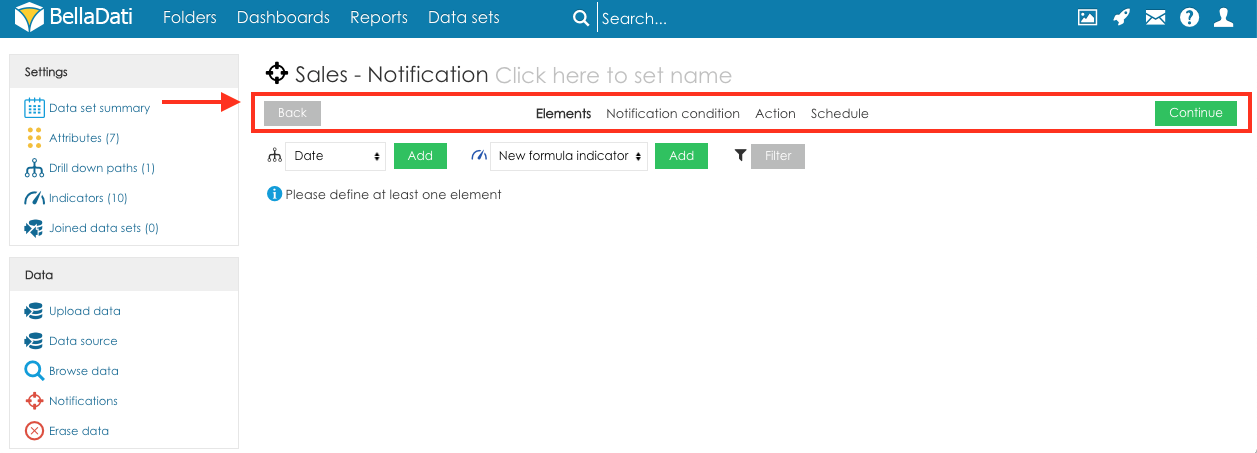
通知ウィザードは、新しい通知の作成に必要な手順をガイドします。各ステップは個別のタブとして表示されます。 画面上部のナビゲーションを使用して、通知ウィザードでナビゲートします: 戻るボタンは前のタブを表示します 続行ボタンをクリックすると、次のタブに移動します - タブ名には、選択したタブの詳細が表示されます
1. 要素(エレメント) The condition will be checked for every country. 要素は、指定された条件の評価に使用される列です。タブ要素は、指定された条件の評価に使用される列を選択するために使用されます。属性、インジケータ、数式インジケータ、フィルターを追加できます。属性は、条件の集約を定義します。例えば、ユーザーが国列を選択すると、データは国ごとに集計されます(1行= 1国)。条件はすべての国でチェックされます。 ユーザーは、数式インジケータを作成することもできます(プロセスはレポートで数式インジケータを作成する時と同じです)。条件の評価に使用されるテーブルのプレビューは、要素を追加するためのパネルの下に表示されます。プレビューはデータサンプルのみに基づいて作成されます。つまり、一部のデータは検証されますが、空にすることができます。プレビューのヘッダーの列の名前の横に表示される矢印を使用して、属性と日付の順序を変更できます。 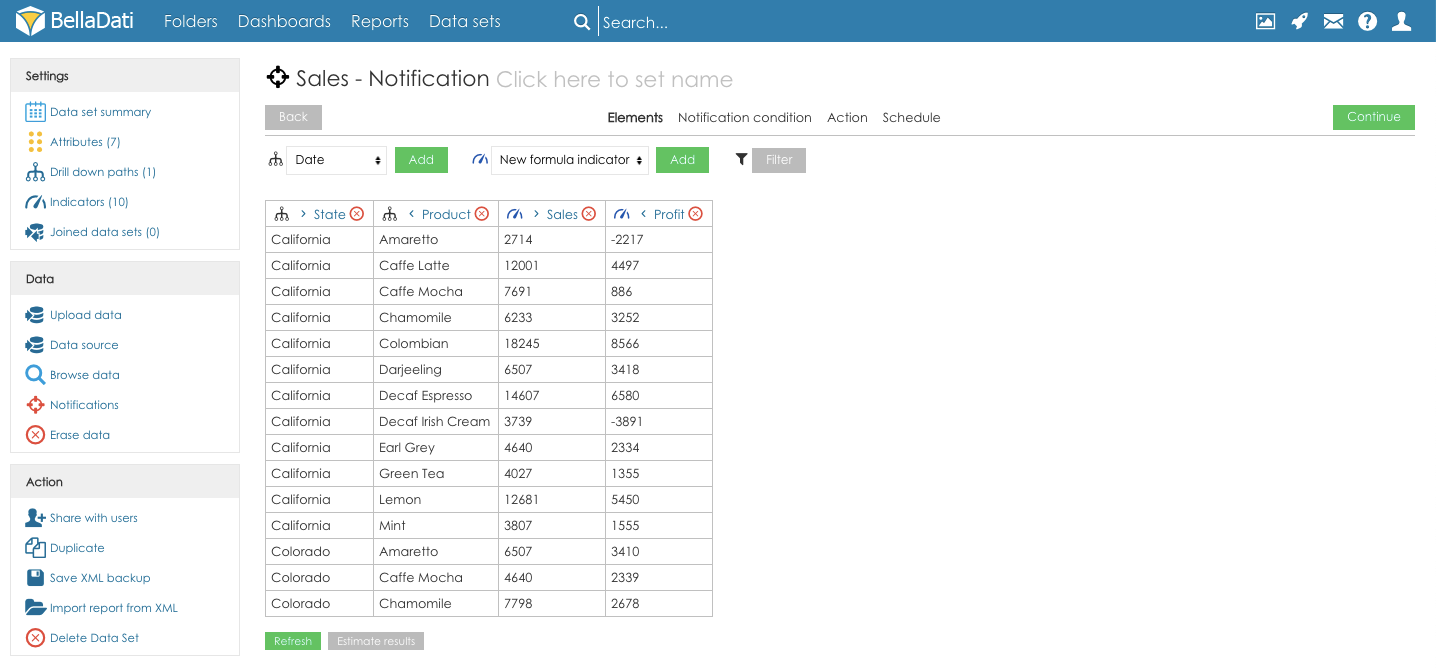 Click Click
the button Continue to proceed to the next step of the Notification configuration[続行]ボタンをクリックして、通知設定の次の手順に進みます: 2. 通知条件The condition defined on the tab Notification condition will be used for the notification evaluation. Elements available for the condition evaluation: - No condition - notification will be always sent
- Indicator element selected on the tab Elements
The value can be compared against a static value or formula. The condition is evaluated for each row defined on the tab Elements 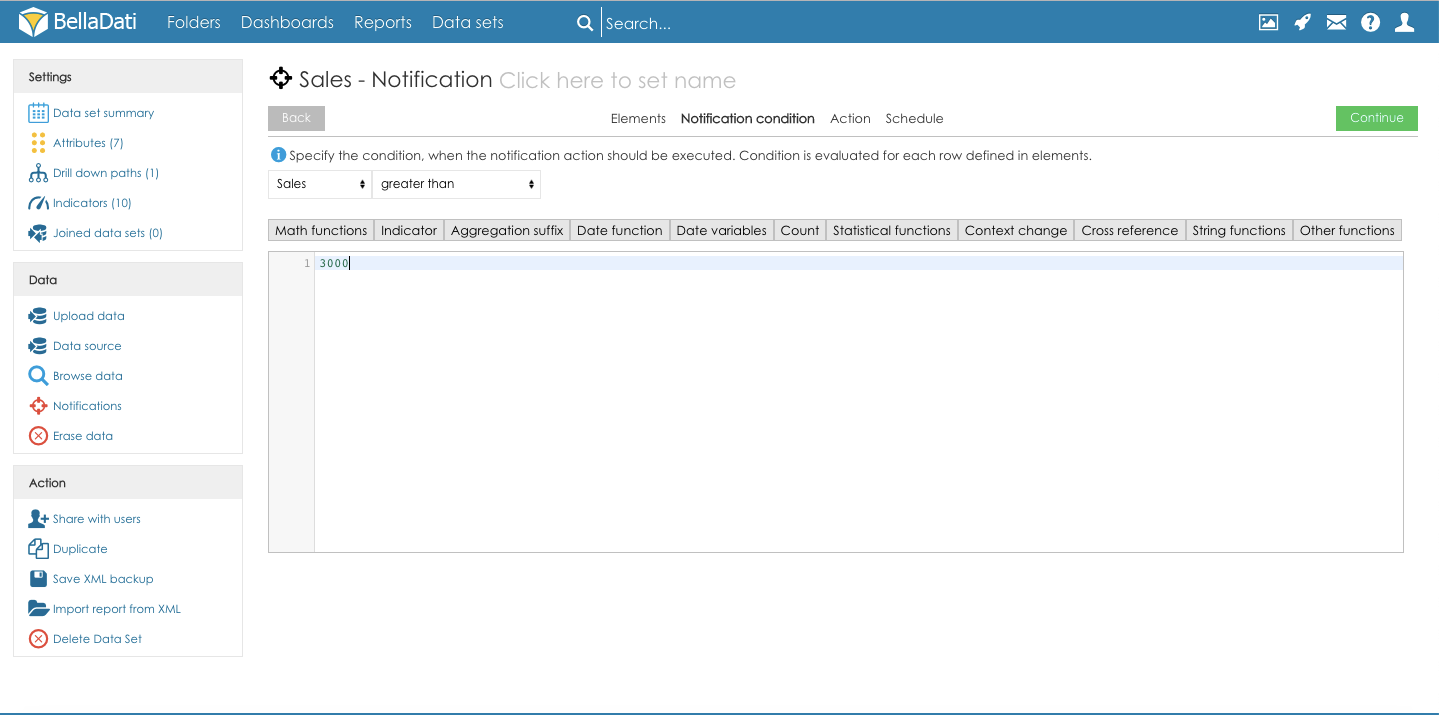 Image Removed Image Removed
Click the button Continue to proceed to the next step of the Notification configuration: 3. アクションSelected action will be used to send the notification in case the Notification condition is met. - Click the button Add notification action to start creating a new notification
- Select notification action:
- Send email - email notification will be sent to the selected users
- Send FCM notification - push notification will be sent to the smartphones of the selected users (make sure that Firebase configuration is correctly set and Device IDs of the users' smartphones are available in the elements)
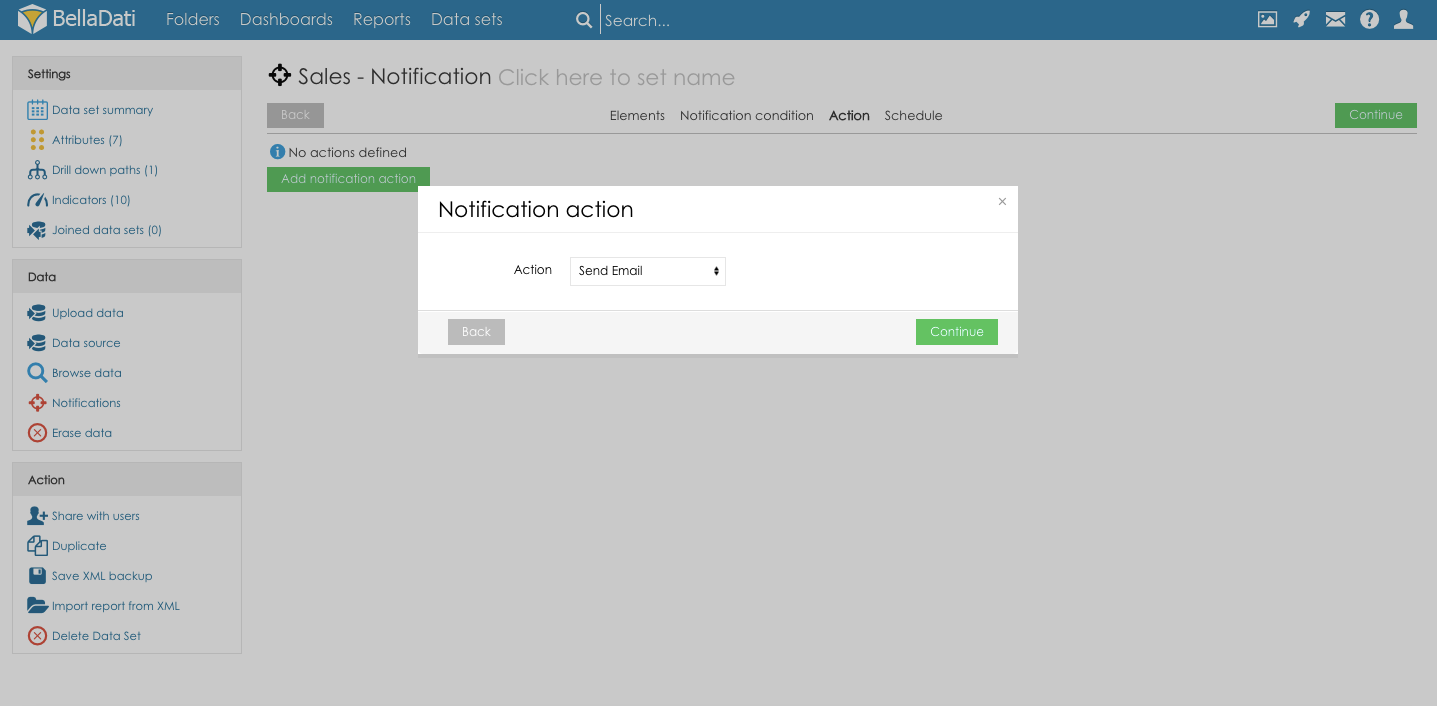 Image Removed Image Removed
- Define message and recipients (the setup is the same for both, email and FCM notifications):
- Subject - Custom message sent in the notification
- Message for recipients - Custom message sent to the notification recipients
- Recipients - select BellaDati users who will receive the notification
- Recipients groups - select BellaDati user groups which will receive the notification
- Take recipients from element - if some element contains the recipients who should be notified when the condition is met, select the column which contains the recipient's contact
- Variables - the Subject and Message for recipients can contain dynamic values based on the actual row value. Following variables are available:
- ${compare_value} - row value based on the aggregation defined in the Elements
- ${operation} - the operation selected in the Notification condition
- ${condition_value} - condition value defined in the Notification condition
- ${L_ATTRIBUTE_CODE} - code of the attribute selected in the Elements
- ${indicator_name} - name of the indicator defined in the Elements
- Click the button Continue to proceed to the next step of the Notification configuration
 Image Removed Image Removed
4. スケジュールThe notification schedule defines the date interval in which the notification will be executed. Following options are available: - Execute on data change - the notification will be executed everytime the data is changed
- When - time of the notification - the notification will be scheduled to the predefined time
- Schedule - select the interval in which the notification will be repeated
- Allow once in interval [min] - this parameter defines the limit (in minutes) of how often the notification can be sent. If the limit is set to 60 and the condition is reached in less than 60 minutes after the first notification was sent, the next notification is ignored.
- Dry run - click the button Dry run to see the results of the notification evaluation
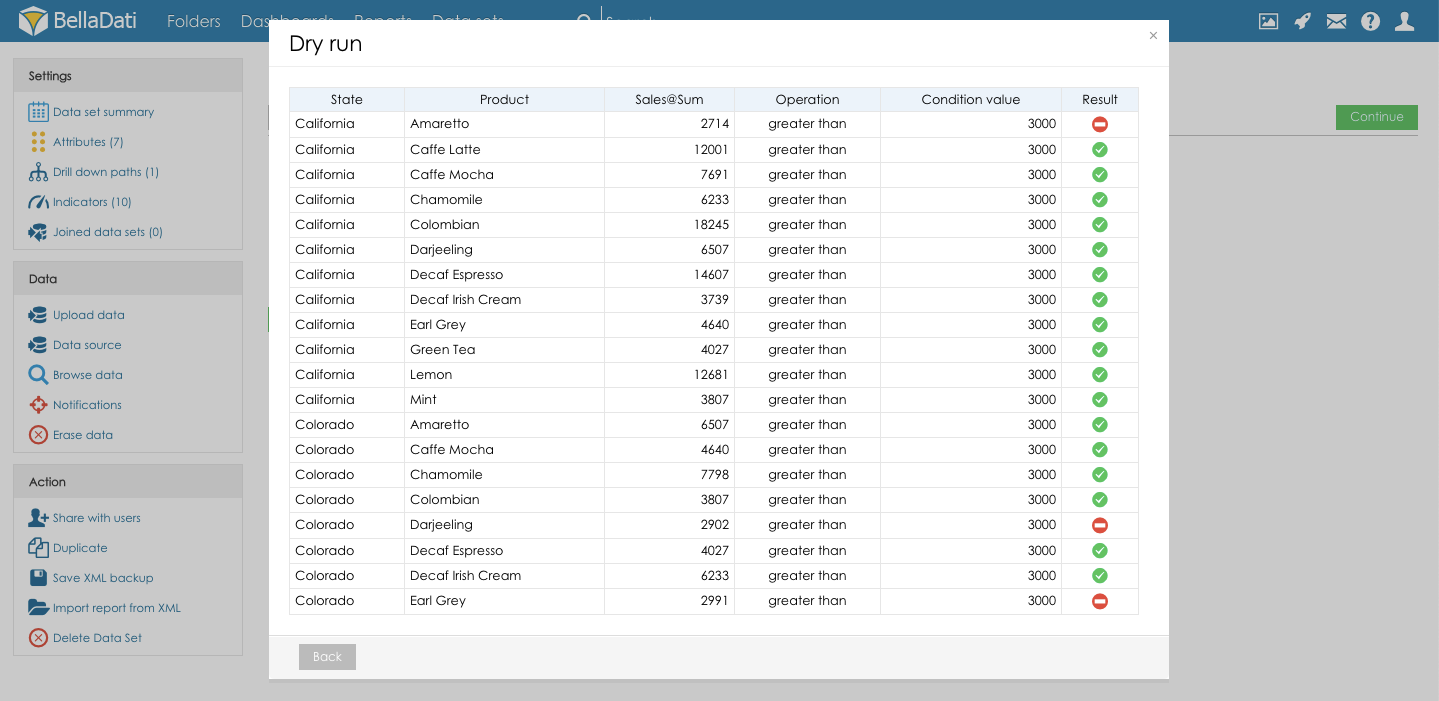 Image Removed Image Removed
Click the button Continue to schedule the notification. 通知の管理Notifications associated with the selected data setNotifications associated with the data set can be accessed from the data set details. Click the option Notification in the section Data to create new notification and list existing notifications from the selected data set. Image Removed The notifications overview provides the details of the notification and the following actions: - Check now - will execute the notification manually
- Show log - Will display the overview of the notifications checks and the results
- Delete - will delete the notification
すべての通知All the notifications can be managed from the screen Data sets - click the action Notifications to open the list of all the Notifications.  Image Removed Image Removed
Screen Notifications provides details about: タブ通知条件で定義された条件は、通知評価に使用されます。条件評価に使用できる要素: - 条件なし - 通知は常に送信されます
- タブ要素で選択されたインジケータ要素
値は、静的な値または式と比較できます。タブの要素で定義された各行に対して条件が評価されます。 Image Added [続行]ボタンをクリックして、通知設定の次の手順に進みます: 3. アクション選択したアクションは、通知条件が満たされた場合に通知を送信するために使用されます。 - [通知アクションを追加]ボタンをクリックして、新しい通知の作成を開始します。
- 通知アクションを選択:
- メールを送信 - 選択したユーザーにメール通知が送信されます。
- FCM通知を送信 - プッシュ通知は選択したユーザーのスマートフォンに送信されます(Firebaseの構成が正しく設定され、ユーザーのスマートフォンのデバイスIDが要素で利用可能であることを確認してください)。
Image Added
- メッセージと受信者を定義します(セットアップは電子メールとFCM通知の両方で同じです):
- 件名 - 通知で送信されるカスタムメッセージ
- 受信者へのメッセージ - 通知の受信者に送信されるカスタムメッセージ
- 受信者 - 通知を受け取るBellaDatiユーザーを選択します
- 受信者グループ - 通知を受け取るBellaDatiユーザーグループを選択します
- 要素から受信者を取得 - 一部の要素に条件が満たされたときに通知する受信者が含まれる場合、受信者の連絡先を含む列を選択します
- 変数 - 受信者の件名とメッセージには、実際の行の値に基づいた動的な値を含めることができます。次の変数を使用できます:
- ${compare_value} - 要素で定義された集計に基づく行の値
- ${operation} - 通知条件で選択された操作
- ${condition_value} - 通知条件で定義された条件値
- ${L_ATTRIBUTE_CODE} - 要素で選択された属性のコード
- ${indicator_name} - 要素で定義されたインジケータの名前
- [続行]ボタンをクリックして、通知構成の次の手順に進みます。
Image Added 4. スケジュール通知スケジュールは、通知が実行される日付間隔を定義します。次のオプションが利用可能です: - データ変更時に実行 - データが変更されるたびに通知が実行されます
- いつ - 通知の時間 - 通知は事前定義された時間にスケジュールされます
- スケジュール - 通知を繰り返す間隔を選択します
- 間隔[分]で1回許可 - このパラメーターは、通知を送信できる頻度の制限(分単位)を定義します。制限が60に設定され、最初の通知が送信されてから60分以内に条件に到達した場合、次の通知は無視されます
- 予行演習 - [予行演習]ボタンをクリックして、通知評価の結果を確認します
Image Added [続行]ボタンをクリックして、通知をスケジュールします。 通知の管理選択したデータセットに関連付けられた通知データセットに関連付けられた通知には、データセットの詳細からアクセスできます。 [データ]セクションの[通知]オプションをクリックして、選択したデータセットから新しい通知を作成し、既存の通知を一覧表示します。 Image Added 通知の概要には、通知の詳細と次のアクションが記載されています: - 今すぐ確認 - 通知を手動で実行します
- ログを表示 - 通知チェックと結果の概要を表示します
- 削除 - 通知を削除します
すべての通知すべての通知は、画面の[データセット]から管理できます - [通知]アクションをクリックして、すべての通知のリストを開きます。 Image Added 通知画面は、次に関する詳細を提供します: - 通知名 - クリックすると、データセット通知のリストにリダイレクトされます
- 関連するデータセットの名前 - クリックすると、データセットの概要にリダイレクトされます
- 通知に適用される選択された通知アクション
- データ変更時の実行 - 有効/無効
- 所有者 - 通知を作成するユーザー
- 作成済み - 通知が作成された日時
- 最後のイベント - 通知条件が満たされ、通知が送信された最後の時間
- ログを表示ボタン - 通知チェックの概要を表示します
- Notification Name - clicking will redirect to the list of the data set notifications
- Name of the associated Data set - clicking will redirect to the data set summary
- Selected Notification action applied in the notification
- Execution on data change - enabled/disabled
- Owner - the user who create the notification
- Created - date and time when the notification has been created
- Last event - last time when the notification condition has been met and the notification has been sent
- Button Show log - Will display the overview of the notifications checks

|