Page History
...
| Sv translation | |||||||||||||||||||||||||||||
|---|---|---|---|---|---|---|---|---|---|---|---|---|---|---|---|---|---|---|---|---|---|---|---|---|---|---|---|---|---|
| |||||||||||||||||||||||||||||
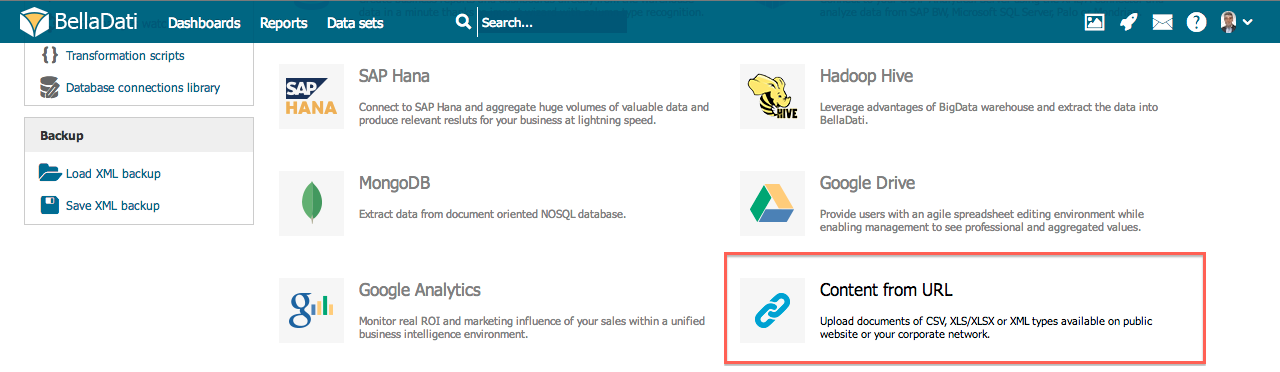
BellaDatiはURLやウェブサービス、REST APIからデータをインポートすることができます。 URLでの接続はファイルのインポートと類似しています。その上、URLのインポートは自動で繰り返し実行されるようスケジューリングできます。
URLへの接続データソースコネクターデータソースに接続するページからURLから接続を選択してください。 |
| Note |
|---|
ログイン情報とパスワードは任意のパラメーターです。 |
日付と時刻変数
URLやHTTPポストコンテンツを大々的に変更する必要がある場合、既定義の変数を使用できます。BellaDatiは現在、日付、時刻、時刻表示をユーザー定義形式で得る機能をサポートしています:
名前 | 説明 | 例 |
|---|---|---|
|
|
|
|
|
|
|
|
|
|
| $time(now, HH:mm:ss) |
| 現在の時刻表示バリューを返します。 |
|
DateString
- now – 日付を表します
- actualyear – 年の最初の日を表します (1.1.20XX)。 例えば、21.9.2010で選択されたactualyearは日付 1.1.2010を表します。
- actualquarter - 四半期の最初の日を表します(1.1.20XX, 1.4.20XX, 1.7.20XX, 1.10.20XX)。例えば、21.9.2010で選択されたactualquarterは日付1.7.2010を表します。
- actualmonth -月の最初の日を表します(1.1.20XX, 1.2.20XX, ...)。例えば、21.9.2010で選択されたactaulmonthは日付1.9.2010を表します。
- actualweek -週の最初の日を表します(月曜日)。 例えば、21.9.2010で選択されたactualweekは日付20.9.2010 (この週の月曜日)を表します。
- 絶対的な日付入力は、操作者がこの構文を使うことで調整できます: date +|- n[d|w|m|q|y]、 nが整数の時、d は日、 w は週、m は月、qは四半期、yは年を表します。例えばこのように定義できます: actualyear + 2m -4d。今日は21.9.2010であるため、このバリューは1.1.2010 + 2 months - 4 days、つまり日付は25.2.2010を表します。
TimeString
- now – 時刻を表します
- actualhour -時間を0分と0秒で表します
- actualminute -分を0秒で表します
- actualsecond -秒を表します
チュートリアルビデオ
| HTML |
|---|
<iframe width="560" height="315" src="https://www.youtube.com/embed/wMG1n4jEf2k" frameborder="0" allow="accelerometer; autoplay; encrypted-media; gyroscope; picture-in-picture" allowfullscreen></iframe> |
SOAPウェブサービスに接続
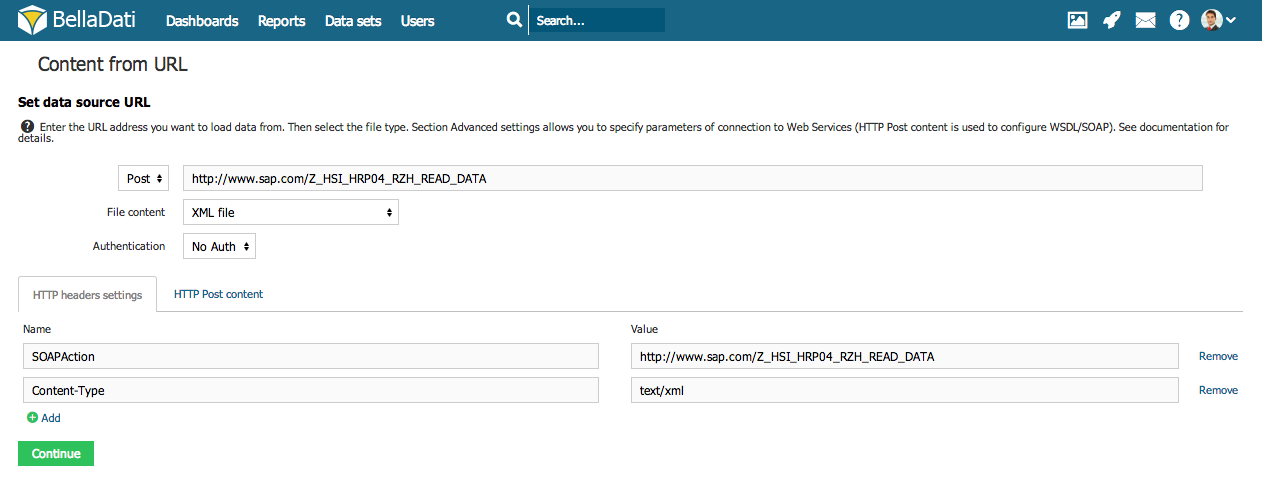
BellaDatiはHTTPプロトコルを通して、ネットワーク上の利用可能なリソースを接続することができます。 このシンプルな使用法の他に、ウェブサービスとして利用可能なより複雑なリソースを接続することもできます。ウェブサービスは、プレーンなHTTPプロトコルに基づくSOAP プロトコルを使用しています。SOAPプロトコルは標準のXML形式であり、BellaDatiで完全にサポートされています。以下は実行例です:
- あなたのウェブサービスのエンドポイントURLを入力し、XMLファイル形式を選択します。
- アドバンスセッティングを開き、POST方法を選択、以下のパラメーターを設定します。:
- SOAPアクション – 値はあなたのウェブサービスについて説明するWSDLファイルに含まれています。soapAction タグで定義されています。例えば: <soap:operation soapAction="http://www.sap.com/Z_HSI_HRP04_RZH_READ_DATA"/>
- コンテンツ-種類 – 値をtext/xmlに設定
- 表される構造にPOSTコンテンツを挿入:
| Info |
|---|
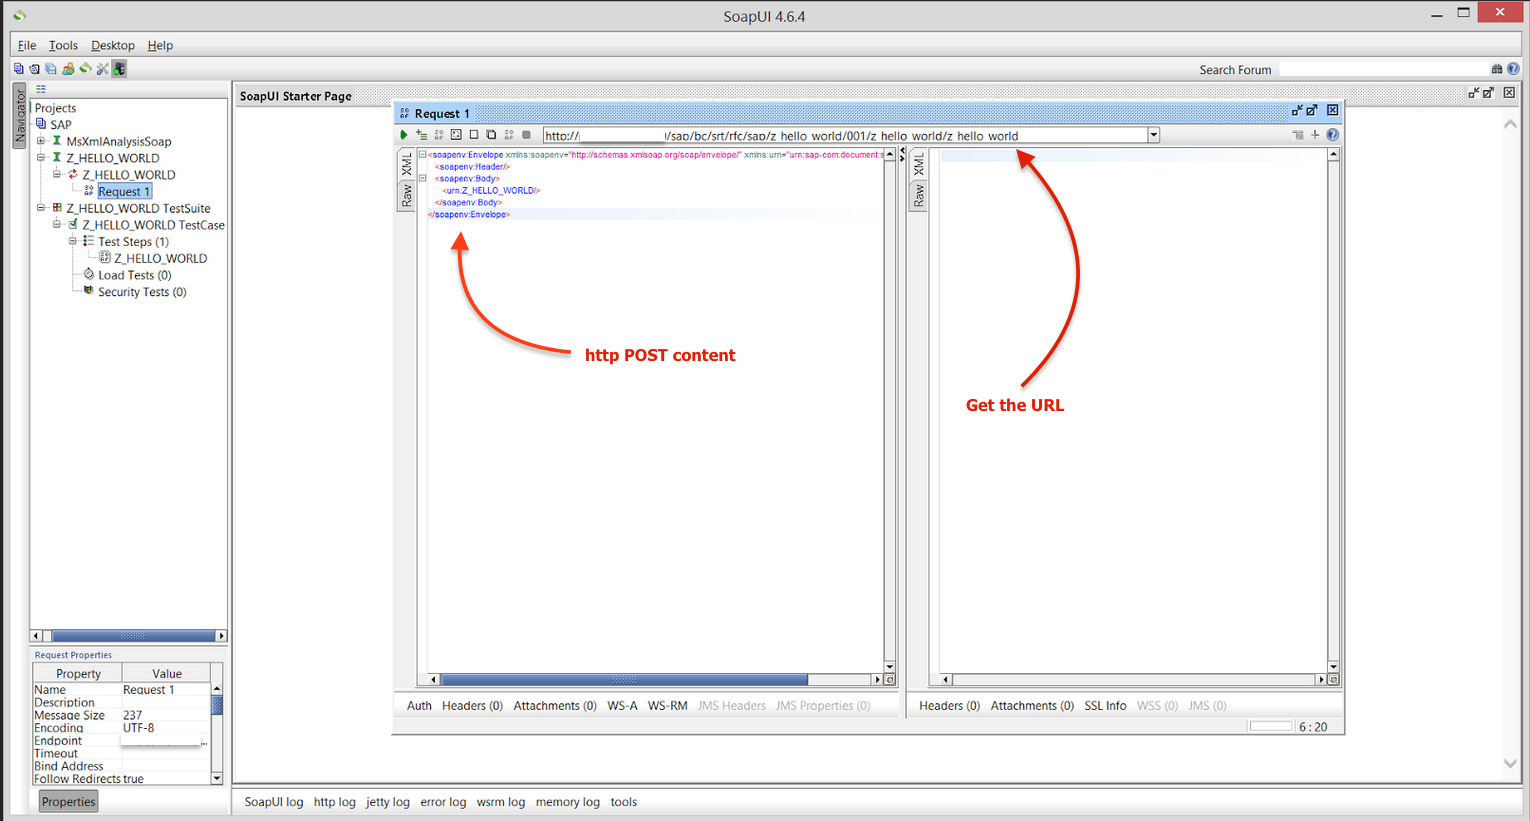
SAPウェブサービスへの接続で問題がある場合は、WSDLに基づいたXMLの正しい構造を生み出すSoapUI のような、外部のツールを用いることをお勧めします。 SoapUIはさらに、正しいhttp ポストコンテンツを生み出す手助けをします。
|
RESTウェブサービスへの接続
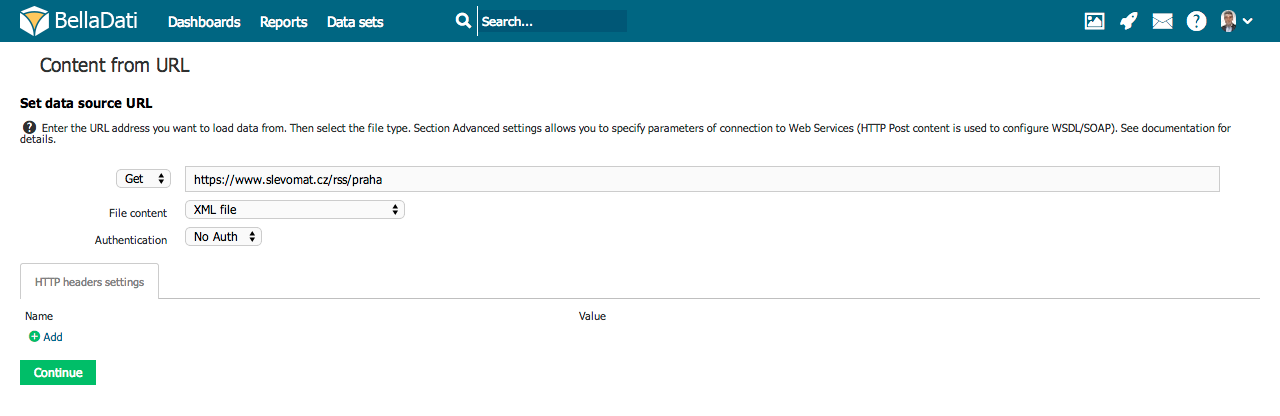
BellaDatiを用いて、HTTPを通して RESTウェブサービスへ接続することもできます。適切なHTTP GETヘッダータイプとファイルタイプ (例 CSV)を選択してください。
認証
サポートされる認証方法は次の通りです:
- BasicとDigest HTTPアクセス認証 (RFC2617 基準)。
| Info |
|---|
REST APIはセキュリティートークンのOAuth基準 をサポートしています。 |
For OAuth1a, following connection parameters are available:
- Consumer Key,
- Consumer Secret,
- Request Token URL,
- Token Authorization URL,
- Access Token URL.
For OAuth2, it is also possible to define Resource and State parameters, which are used for example when connecting to Office 365 services.
Connecting to Office 365 via HTTP Connector
This example will show how to connect to Office 365 via HTTP Connector and how to import list of contacts from the e-mail account.
- Select Connect over HTTP from list of data sources.
- Fill in the URL, in this example https://outlook.office.com/api/v1.0/me/contacts/?$orderby=displayname%20asc.
- Change File content to JSON.
- Select OAuth2 authentication.
- Add HTTP header with name Accept and value text/*, multipart/mixed, application/xml, application/json; odata.metadata=none.
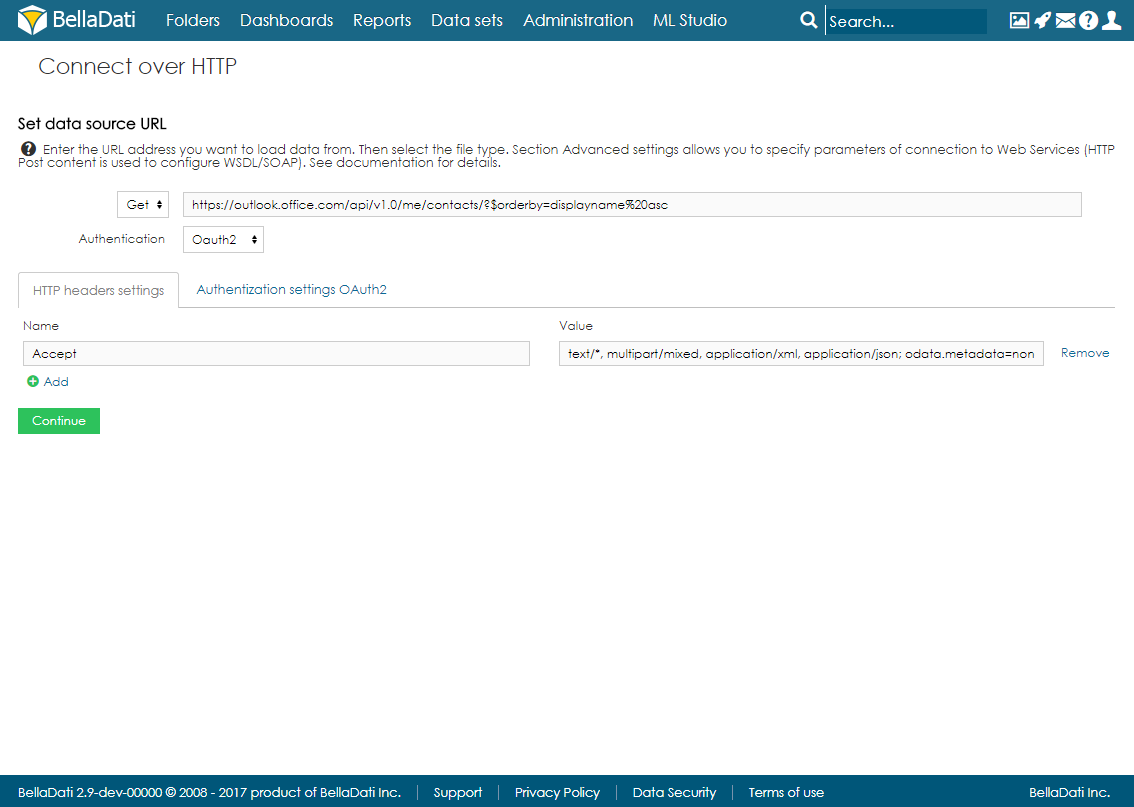
- In Authentication settings, fill in the OAuth Access Token which you generated in Office 365 and set the OAuth Token Type to Bearer (see Office 365 settings below).
- Click on Sign in using OAuth and fill in all the parameters. Set the scope accordingly to the token.
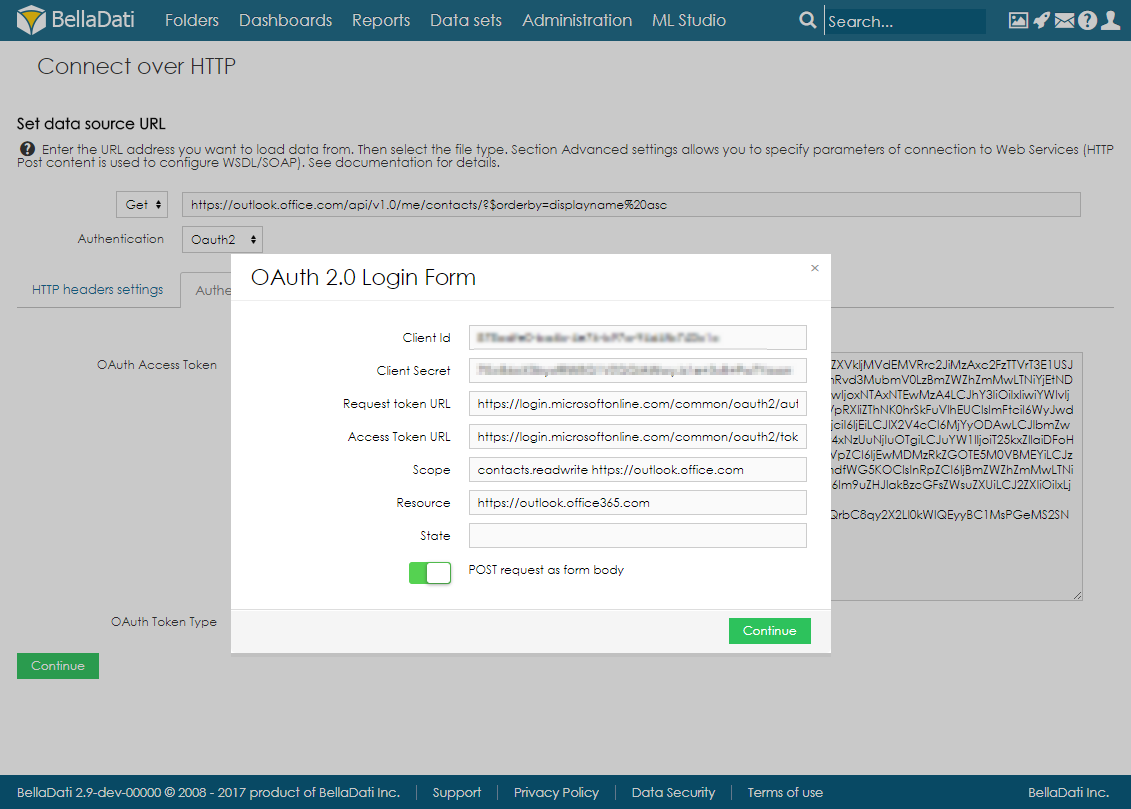
- Click on Continue and import the data.
Office 365 settings
- Go to https://portal.azure.com/
- In the left menu, click on Azure Active Directory and then on App registrations .
- Add new application registration, select Web app/API and fill in the URL of your BellaDati application.
- In Reply URLs, add new record: URLofYourBD/auth/callback/oauth2
- In Required permissions, add:
- Office 365 Exchange Online (Microsoft.Exchange) - Read contacts in all mailboxes
- Windows Azure Active Directory (Microsoft.Azure.ActiveDirectory) - Sign in and read user profile
- In Keys, add a new key and copy the credentials.
次に
- データソースに戻る
- 取り込み設定
- 取り込みスケジューリング
List siblings
...
Overview
Content Tools