With this tutorial we aim to show you how to build iOS application using BellaDati analytics features trough REST API. Main focus is on
- OAuth authentication with BellaDati using xAuth method
- BellaDati REST API calls
- Processing of REST API (JSON and non-JSON format)
- Handling of BellaDati HTTP errors
We will use Swift programming language and XCode Playground to allow us to experiment lavishly with our code. Tutorial pre-requisites are
- BellaDati application installed on your machine or cloud (min.version 2.7.15.3)
- REST API enabled in your BellaDati application's domain
- BellaDati data warehouse should contain at least 3 datasets and reports in your domain
- XCode version 7.3 with Swift 2.2 installed
- Download Swift code for this tutorial

Let's check version of BellaDati first. Depending on the url, where your BellaDati is installed. You can enter following into the web-browser
Checking BellaDati version
/*In case of calling your local installation write following*/

http://localhost:8080/belladati/api/

/*In case of calling BellaDati cloud run by BellaDati Inc*/

https://service.belladati.com/api/

/*Output of this code depending on your version is*/

BellaDati 2.7.15.3-00000 2008 product of BellaDati Inc.
This was actually our very first REST API call. It is also the only REST API call that does not require an authentication with BellaDati. Let's check Swift and Xcode version. Run following commands from terminal
Checking Xcode and Swift version
xcrun swift -version

/*For Swift Output should be*/

Apple Swift version 2.2 (swiftlang-703.0.18.1 clang-703.0.29)

/*Xcode version*/

xcodebuild -version

/*Output should be like */

Xcode 7.3

Build version 7D175
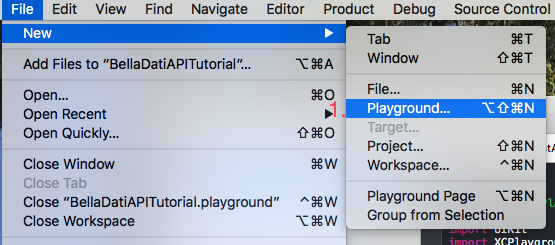
If you are ready to go.Let's hit the playground.Since we are using XCode and it's Playground, the best way to immediately interact with this tutorial and run the code is trough copy pasting the code into your New Playground. First things first. Let's create New Playground called BellaDatiAPITutorial and in the Dialog window in the Platform section select iOS.
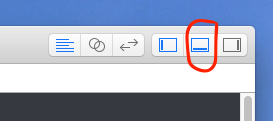
If you did not yet downloaded Swift code for this tutorial. Please, do it and copy-paste it into the BellaDatiAPITutorial playground. Also, make sure you can see Debug area in Xcode view. If you can not see it, push the button (red marked on the picture) in the upper right corner of XCode's window.If it is greyed. You can not see debug area ![]()
XCode window setup should look similar like the one on the picture below.You may also notice, that our code produced following message:"Wrong password and username combination".It is message related to handling BellaDati API HTTP errors and we implemented 2 of them 403 and 404.We will fix this message in the next steps by setting correct credentials. Also, please note that, if you have received internal Xcode error: "Failed to obtain sandbox extension for path". No worries. It is not important for the next steps.

Before we will move ahead - the code
Let's discuss our code a bit. Our tutorial code is based on Swift. It includes implementation of OAuth 1.0 (which is used by BellaDati for authentication). It can parse JSON response from API calls. It can identify if BellaDati replied with JSON or replied with picture. Last but not least it can identify few BellaDati HTTP standard error codes. OAuth 1.0 and also JSON parsing (with limitations mentioned in the code) has been implemented without using 3rd party libraries to keep this tutorial setup dead simple. You can feel free to use it in your own project as well.
Authentication variables setup
Before we will move to API calls. We have to change values of few variables in the code to make it work with your BellaDati installation. These variables are located at the beginning of the code. Look for the following variables in first few lines.
belladatiurl
- o_auth_consumer_key
- x_auth_username
- x_auth_password

You can also notice, that variable api_call is set to reports/.Once you set correct values for variables above. Code in Playground will directly call /api/reports REST API and it will print parsed and non parsed JSON content. Code automatically adds "/api/" string to calls. Therefore you can assign variable api_call with String values containing format such as: "reports/" or "/dataSets" without using "/api/" part.
Changing api_call variable
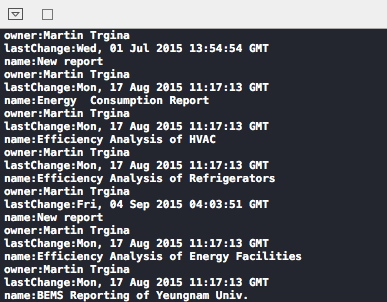
If you have filled all variables above with correct values and you keep api_call = "reports/".Than function authenticateBellaDati will launch other functions for authentication, authorization, json parsing and response type recognition. Also as you can see in the application code, function authorizeBellaDati actually assemble complete API CALL string which is http://localhost:8080/belladati/api/reports and in the Debug console we can happily see 2 kinds of outputs. One is in the JSON format and second is in format after parsing JSON by our function parseJSON.
Non parsed JSON content (no filter applied, includes all keys:values)
| Parsed JSON with applied filter
|
|---|

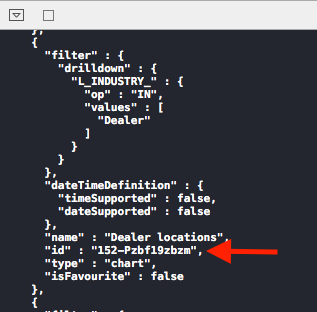
You can notice that in the case of non parsed JSON content id key along with its value is listed. It is because our code is using filter. That filter can be influenced by variable jsonParams. And this filter by default works only for parsing /reports REST API request. So let's try to add id into the filter to see what happens

Now you should be able to see also id value in the second output.Actually we have not been completely honest with you. Same filter we specified in the code can work also for dataSets/ api call. Only thing you have to do is to change field string value "reports" into "dataSets" string value and you should be able to see info about your data set on your screen. So go ahead an try it if you feel adventurous.
Generating pictures from Views (Charts,Tables...)
Let's say you need to generate only static results of analysis inside your app. In other words how to get picture of View(Views are chart,table and other objects in Reports) in your report? For such case we can call following reports/views/id:/image. Such View id: you can find in response of reports/:id. And this Report :id you can get from API CALL reports/. In your real application it will be done by code. For our manual approach steps are as following.
| var api_call = /reports | var api_call = reports/:id | var api_call = reports/views/id:/image/?width=600&height=400 |
|---|---|---|
 |  |  |
By adding parameters ?width=600&height=400 to reports/id:/thumbnail REST API call we specified also the size of the the received picture. Without params the default dimension values are width = 1024 height = 768. Now let's see our picture. Push CMD+F on the Mac keyboard and Find will pop-up in Xcode. Into the find command line write image and the 2nd found is let image. Which is property of authorizeBellaDati function. Than click on the QuickLook icon to see the content of image constant.See picture below.

In this tutorial we have covered basics of oAuth (xAuth method) with BellaDati and discovered few basic api calls. We parsed the JSON response, that these REST API calls return and we also generated only static reports(pictures) for our iOS app. It is very small piece of BellaDati framework that spins upto Machine Learning REST API. But we hope it motivated you to start building exciting iOS analytics apps.
Overview
Content Tools