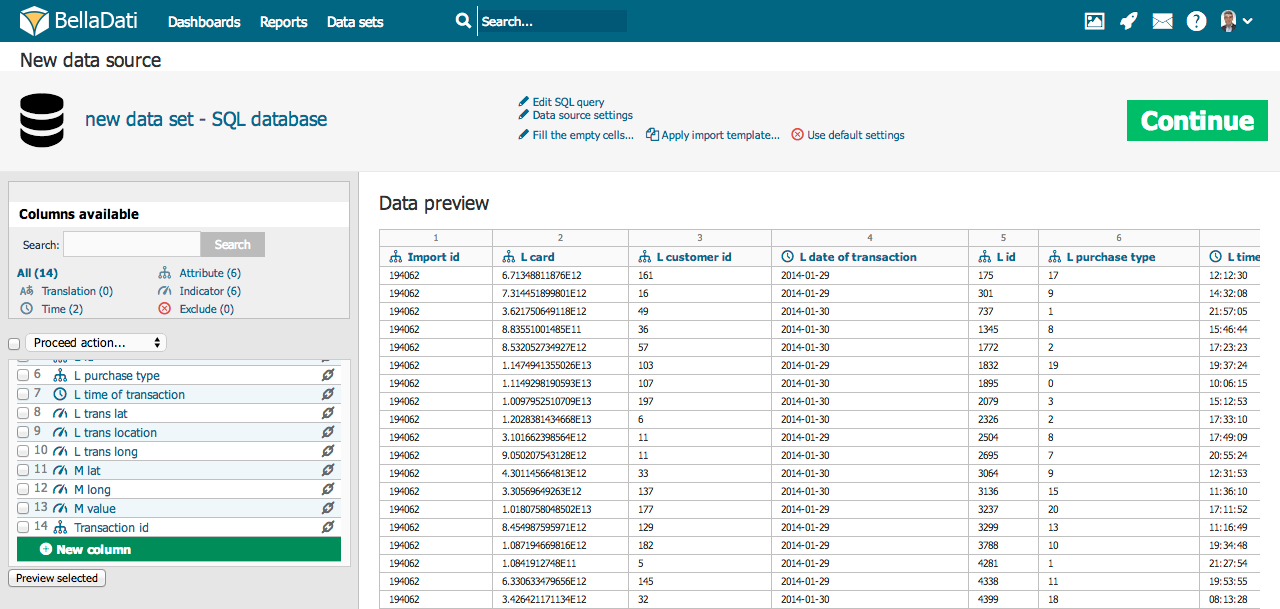
Import settings page allows you to control ETL (Extract-Transform-Load) operations and verify the structure of data being imported. The main task is to define the mapping of tabular data to attributes, indicators and date/time dimensions.
Following adjustments and actions are available:
- First row is header: Use the texts in the first row as names for corresponding columns; only for plain text (clipboard), CSV or Excel
- Excluded rows: Allows you to exclude some rows from the beginning of the file imported (eg. additional information, not data).; only for plain text (clipboard), CSV or Excel
- Encoding: Select appropriate encoding for the source file (UTF-8, ISO-8859-1, Win-1250, Win-1252, Auto are available); only for plain text, CSV or XML
- Separator: Auto-detection (the most frequent separator is the semicolon ";"), otherwise select character that separates each column (comma, tab, semicolon, space, vertical bar, custom); only for plain text (clipboard) and CSV
- Fill the empty cells: Generally for the whole import, or this substitution can be performed individually for particular columns.
- Apply import template: See "import templates" chapter below.
- Use default settings: Resets all import settings to defaults.
- Get new columns: Gets new columns from updated data source - when there is existing import template, newly added columns from data set don't exist in template from previous import)
Another functions are:
- Data cleaning and transforming using the transformation scripting
- Assigning imported columns to existing attributes or indicators
- Renaming columns
- Column merging
- Adding new columns
- Preview changes
Automatic encoding detection is not always reliable. We recommend to check for strange characters in the preview.
Availability of the adjustments on the screenshot above could vary depending on file format imported. Options are stated for manual import, see data sources for specific information about automated imports.
Column Settings
ETL name - it is the name of the column as it is coming with the source data (e.g. SQL column name, CSV header row column, etc). ETL name is not affected by renaming the column at the import settings page. The purpose of storing the ETL name is simple - BellaDati can easily map the incoming data on the existing objects (attribute/indicator) - e.g. when you change the order of columns in your data, but the column names remain the same, BellaDati will map the column onto the right object.
Column limits - BellaDati automatically limits the number of columns available for import. The current limits are:
- All data sources except Excel upload: At most 1000 columns.
- Excel upload: We recommend a maximum of 256 columns.
If you want to change the type of particular column, click on the name of the selected column in the list of columns (in the left side of the import screen). It's also possible to change meaning of more columns to one type in just ne step - just mark selected columns by clicking in the checkboxes next to them and then select their meaning from menu above.
There are eight possible meanings of columns (data types):
Date/Time (Separate) - time index of particular rows. It can be displayed in a lot of different time formats (also depending on language - for more information see the related part of this chapter). You can choose multiple date/time columns in single import.
Datetime - datetime index of particular rows. It can be displayed in a lot of different datetime formats (also depending on language - for more information see the related part of this chapter). You can choose multiple datetime columns in single import. Milliseconds are also supported by datetime.
Long text - defines long text - description. This column type should be used for columns which contain values with length longer than 220 characters. Cannot be used in the visualisations and aggregations. Suitable for following use cases:
- View source data in columns which have contain values with length longer than 220 characters.
- Display values with length longer than 220 characters in the KPI labels and tables - firstValue() & lastValue() functions should be used in this case.
Attribute - defines categories of the drill-down path. It's usually a short text (e.g. affiliate, product, customer, employee, division etc.). Every attribute column creates exactly one attribute in the data set. Those attributes can be freely combined in the drill-down paths.
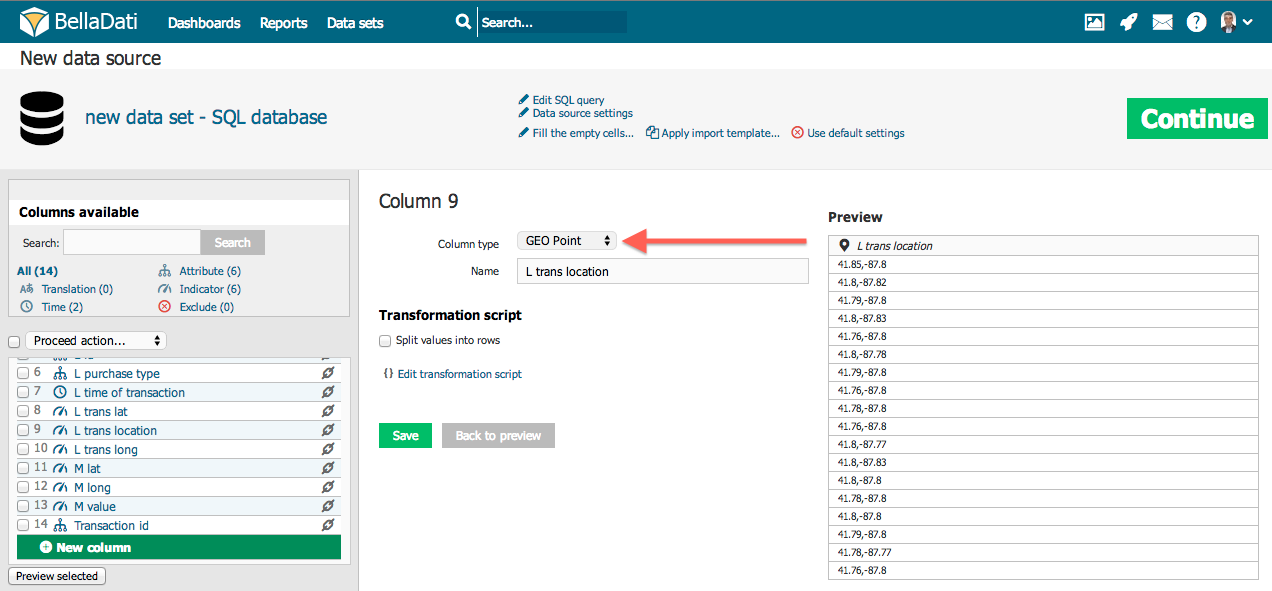
GEO Point - you can map the latitude/longitude onto the GEO point attribute type. This attribute can be then used in Geo Map view type to plot data into its particular location.
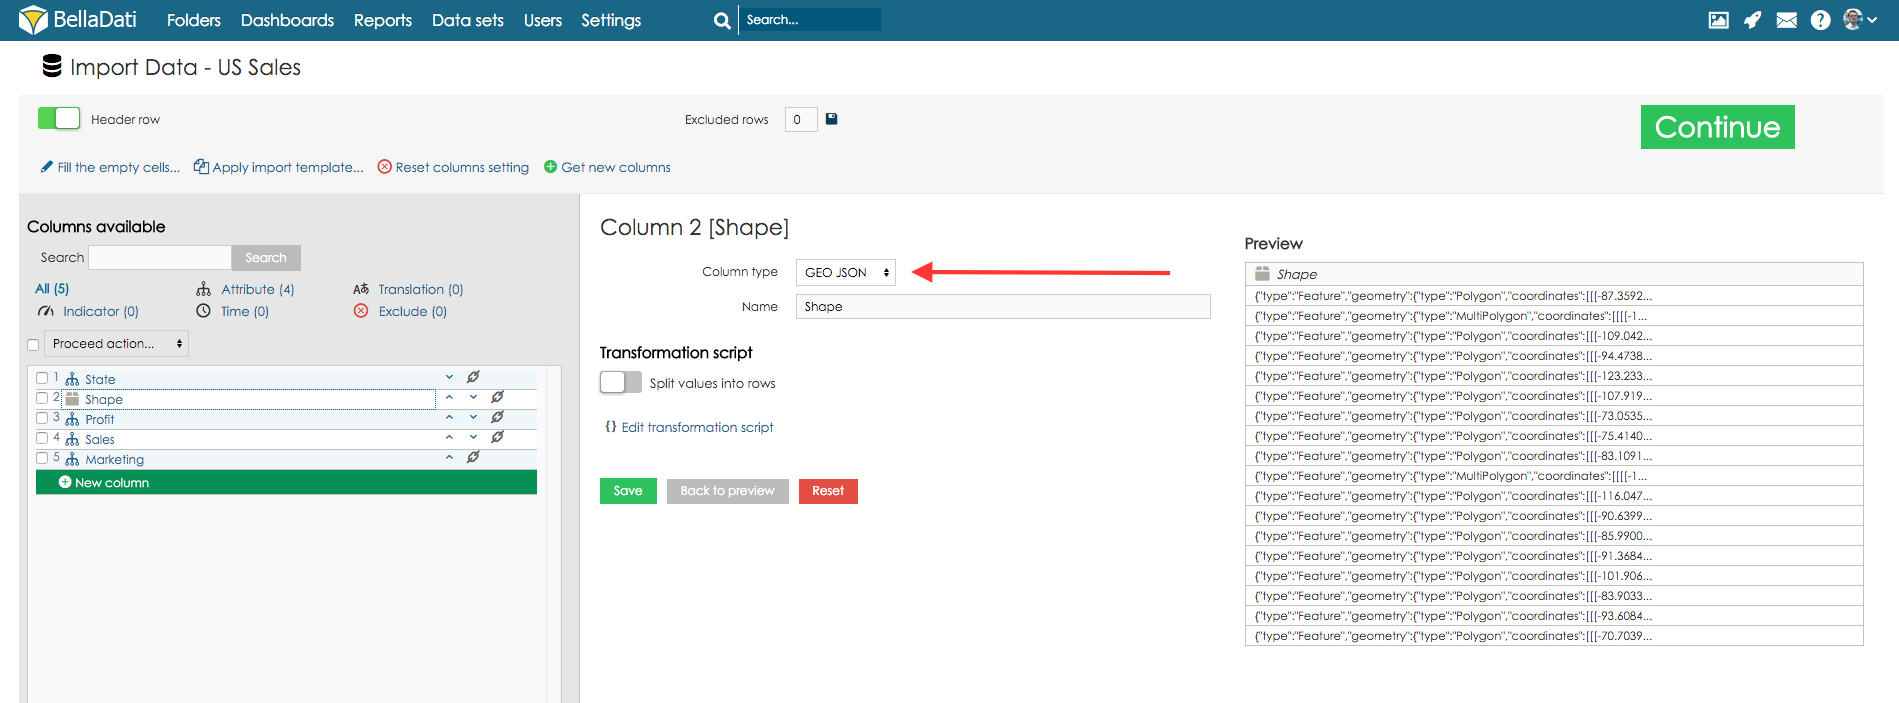
GEO JSON - you can map shape onto the GEO JSON attribute type. This attribute can be then used in Geo Map view type to plot data into its particular location displayed as shape.
Translation - defines language translation of other column identified as Attribute
Indicator - indicators are usually the numeric data, which are the main point of the user's interest.
Don't import - these columns won't be imported at all (it's useful if column contains no, invalid or unimportant data).
Preview of marked columns may be displayed by clicking on the "Preview selected" button. In this way you can gen a better view into you data and their meaning settings. If your data contain too much columns, you can use a search label above the column list to find appropriate column a check its settings. Under this searching field is displayed statistics, which shows number of particular types of columns.
Datetime
If your source data contains Datetime values, you can map them to Datetime attribute. This single column will contain both, date and time, e.g. 5 Apr 2014 10:43:43 AM. See the following example:
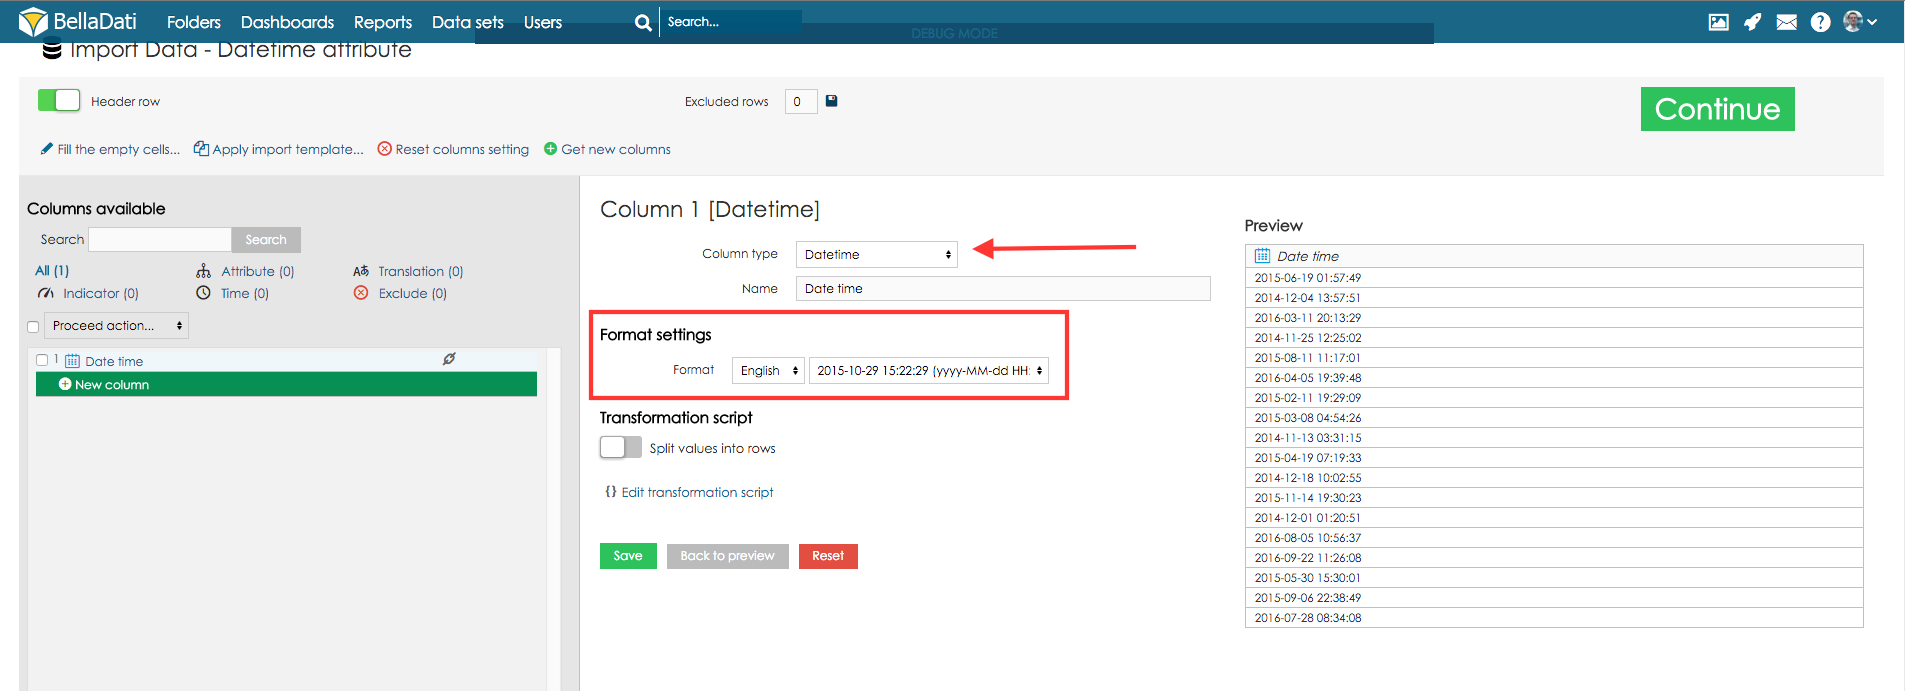
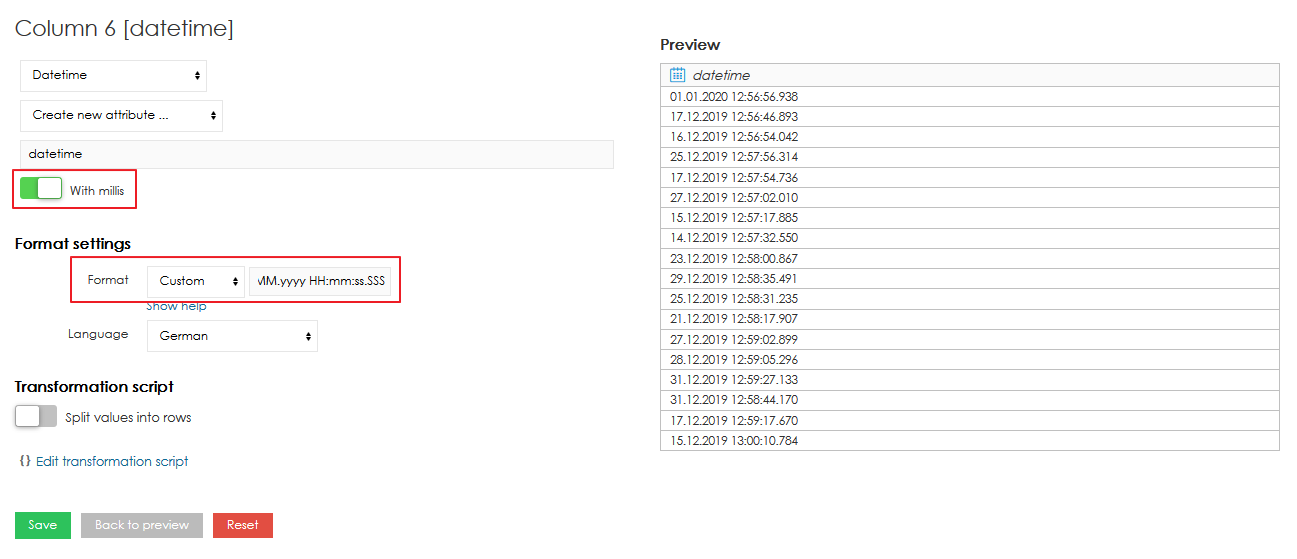
Datetime attribute also supports values with milliseconds. To use the milliseconds, option "" has to be enabled and correct datetime format has to be used ("SSS" for milliseconds, see below).
Datetime Format
Every time column has a specific type of format. This format should be automatically detected during import. However it's possible, that you have your time data in some very specific format. In this case you can use the list of available format in different languages.
If you don't choose from available formats, you can also define your own specific custom format for your data. In this case, you should choose your language from the list below and enter a code, which describes your data format according to these meanings (note, that the number of characters influences the interpretation of the code):
Code | Meaning | Number of characters in code |
|---|---|---|
y | Year | Two characters (yy) represents two digits year number (89). Otherwise is the code interpreted as four digits year number (1989). |
M | Month in year | Three or more characters (MMM) are interpreted as text representation of month (e.g. "January" or "Jan"). In other cases are characters interpreted as number of month in year (1-12). |
d | Day in month | Number of characters (d) in code should be equal to minimal number of digits in source data. It's always a numeric format. |
E | Day in week | Number of character determines, if the day is displayed in its full name (EEEE - "Monday") or in its shortcut (EE - "Mo"). |
| H | Hour in day | Number of characters (H) in code should be equal to minimal number of digits in source data. It's always a numeric format. |
| m | Minute in hour | Number of characters (m) in code should be equal to minimal number of digits in source data. It's always a numeric format. |
| s | Second in minute | Number of characters (s) in code should be equal to minimal number of digits in source data. It's always a numeric format. |
| S | Millisecond | Number of characters (S) in code should be equal to minimal number of digits in source data. It's always a numeric format. |
Separator character should be equal to separator character contained in source data (space, dot, semicolon, etc.). If your source data contains time in more separated columns (months, days, years), it's necessary to merge those columns first (described in previous part of this chapter). Next table shows some combination of source data and appropriate time code.
Source data | Appropriate code |
|---|---|
09/15/10 | MM.dd.yy |
26/03/1984 | dd/MM/yyyy |
15.September 2010 | dd.MMMM yyyy |
15 Sep 10 | dd MMM yy |
Wed 15 09 10 | EE dd MM yy |
Sep 15, 2010 | MMM d, yyyy |
| 15:55:35.231 | HH:mm:ss.SSS |
| 28 October 2015 15:55 | dd MMMM yyyy HH:mm |
| 1.01.2020 12:56:56.938 | dd.MM.yyyy HH:mm:ss.SSS |
Date/Time
If your source data contains date/time values, you can map them to the appropriate Date Attributes or Time Attributes. Single column can contain both, date and time, e.g. 5 Apr 2014 10:43:43 AM. In this case, the date part, 5 Apr 2014 will be mapped to date attribute, the time part, 10:43:43 AM to time attribute. See the following example:
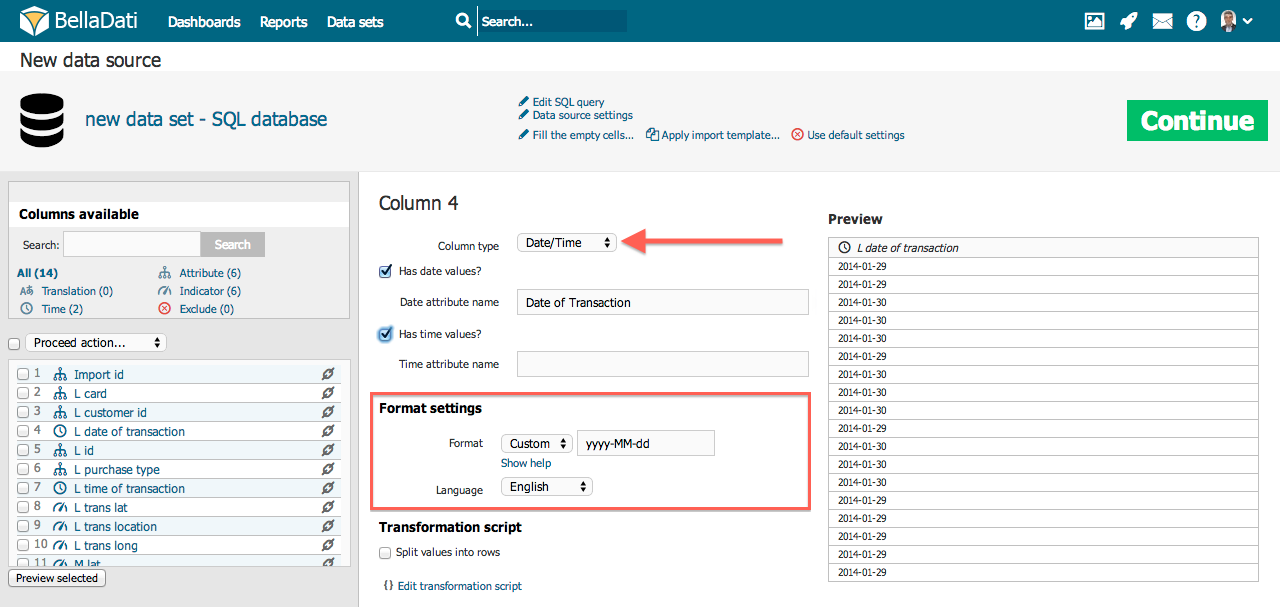
Definition of Date/Time format is the same as for the Datetime column.
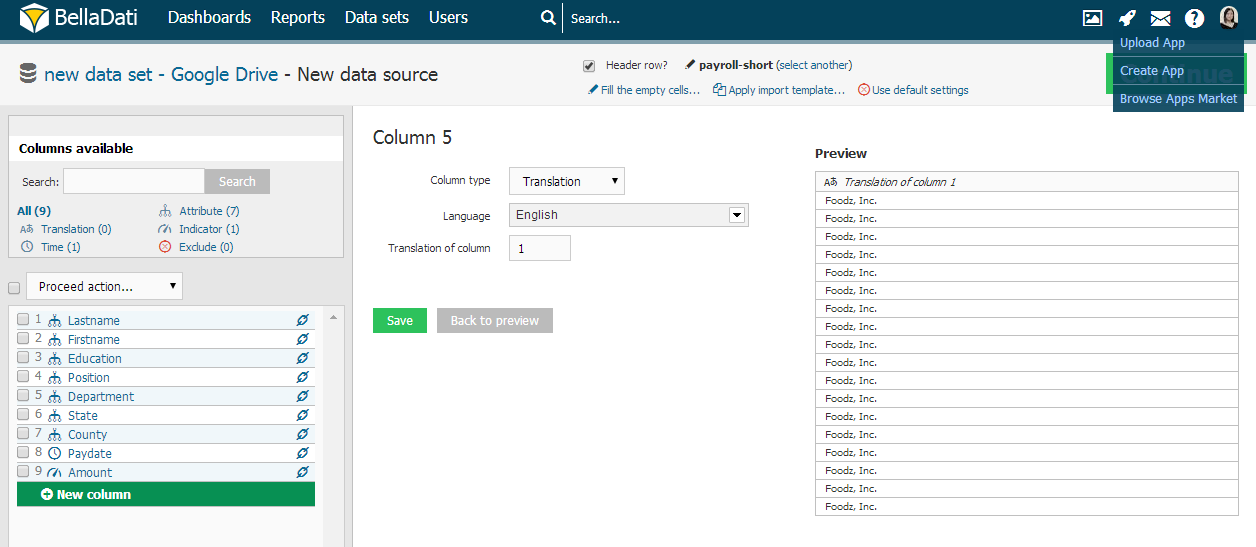
Translation
BellaDati allows you to directly import Attribute translations. In order to set up Attribute translation navigate to column with language metaphrase and:
- choose Translation in Column Type
- select translation Language
- specify index of original column
GEO Point
In order to map the longitude/latitude onto the GEO Point attribute, you have to specify the latitude/longitude in single column in format latitude;longitude, e.g. 43.56;99.32. Decimal separator is . (dot). You can do it using the transformation script, e.g. value(2) + ";" + value(1) in case the longitude is stored in column 1 and latitude in column 2.
GEO JSON
BellaDati allows you to use GEO JSON directly in the data set. GEO JSON has to be specified in format like followings:
- {"geometry":{"coordinates":[[[38.792341,33.378686],[36.834062,32.312938],[35.719918,32.709192],[35.700798,32.716014],[35.836397,32.868123],[35.821101,33.277426],[38.792341,33.378686]]],"type":"Polygon"},"type":"Feature"}
- {"type": "FeatureCollection","features": [{ "type": "Feature","geometry": {"type": "Point", "coordinates": [102.0, 0.5]},"properties": {"prop0": "value0"}}]}
- { "type": "FeatureCollection","features": [{ "type": "Feature","geometry": {"type": "Point", "coordinates": [102.0, 0.5]},"properties": {"prop0": "value0"}},{ "type": "Feature","geometry": { "type": "LineString", "coordinates": [[102.0, 0.0], [103.0, 1.0], [104.0, 0.0], [105.0, 1.0]]},"properties": {"prop0": "value0","prop1": 0.0}},{ "type": "Feature","geometry": {"type": "Polygon","coordinates": [[ [100.0, 0.0], [101.0, 0.0], [101.0, 1.0],[100.0, 1.0], [100.0, 0.0] ]]},"properties": {"prop0": "value0","prop1": {"this": "that"}}}]}
- {"type":"Feature","geometry":{"type":"MultiPolygon","coordinates":[[[[120.715609,-10.239581],[138.668621,-7.320225],[102.498271,1.3987],[103.07684,0.561361],[103.838396,0.104542],[104.53949,-1.782372],[104.887893,-2.340425],[105.622111,-2.428844],[106.108593,-3.061777],[105.857446,-4.305525],[105.817655,-5.852356]]]]}}
Properties
Properties are available since version 2.9.1
For attributes, it is possible to change their properties:
Filling of Empty Cells
It's usual that imported data contains empty cells. It's usually necessary to replace this empty cells with own values (e.g. "0", "none", "N/A" etc.). If you want to do this, you have two possibilities, how to fill in these empty cells:
- globally - fill empty cells with chosen value in all columns (located below batch column settings)
- locally - fill empty cells with chosen value in particular column (located in the window of particular column settings)
Global changing is available in the top blue line directly under encoding settings. After clicking just type the value, which will be entered in all empty cells in your data.
Local changing is available after clicking on column name in the list. There you can enter your own value for empty cells (but only for this particular column). You can easily combine these two methods - for example you can fill in all the empty cells with "0" value, but one particular attribute column can be refilled with "N/A" value.
Merging Columns
Column merging function enables to load data from more source columns to one target column during import process.
Typical use cases are:
- Time is separated in more columns (days, months and years or time in different columns)
- Two columns representing one entity (e.g. first name and surname of one person)
Click the chain icon in the columns list, choose another column to merge with and select appropriate separator which will be added between values (space, comma, dot, semicolon, pipe). You can disconnect merged columns too.
Another way to merge columns and set up more advanced options is by transformation scripts.
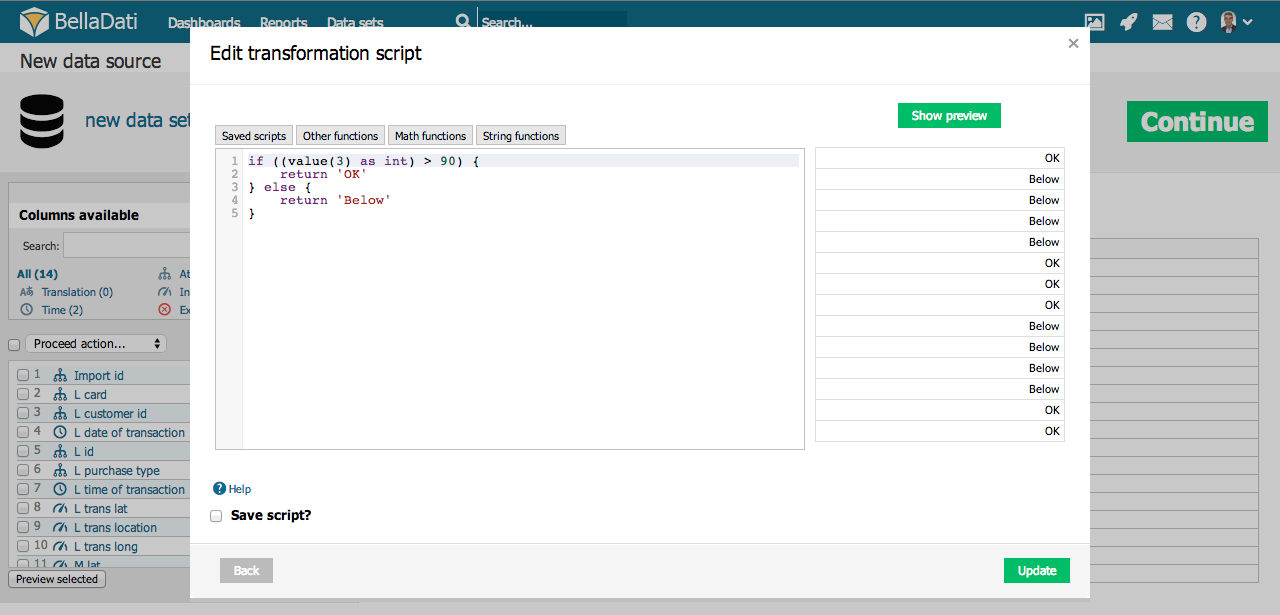
Transformation Scripts
Transformation scripts allow advanced data transformations during import. These scripts are based on Groovy programming language syntax.
Transformation scripts allows you the following:
- Modify values stored in BellaDati data warehouse according defined functions and conditions.
- Create new columns (date/time, attributes, indicators) with transformed or combined values from other columns. Values in different cells are indexed from 0 and displayed near column names within import settings screen.
- Perform advanced calculations in date/time (eg. period of some action undertaken between two dates).
Basic script commands:
- value() - returns actual value of the current cell
- value(index) - returns value of cell on desired (indexed) position in the actual row
- name() - returns name of the column
- name(index) - returns name of the column at desired position
- format() - returns value of the format in actual column (only time and indicator column types)
- actualDate() - returns actual date in dd.MM.yyyy format
- actualDate('MM/dd/yyyy') - returns actual date in chosen format (e.g. MM/dd/yyyy)
- excludeRow() - excludes the row
These transformations are applied for each import including scheduled automatic imports from Data Sources.
Go to Transformation scripting guide for more details.
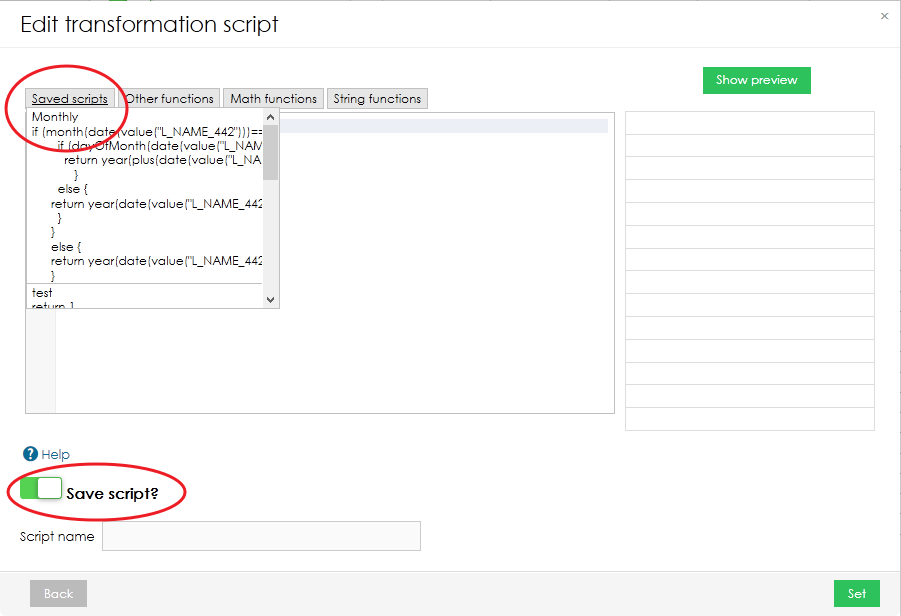
Reusing Transformation Scripts
If you know that you are going to use your script again in the future, you can save it by switching the toggle in bottom left corner. Your saved scripts can be found in the top menu in "Edit transformation script" pop-up window.
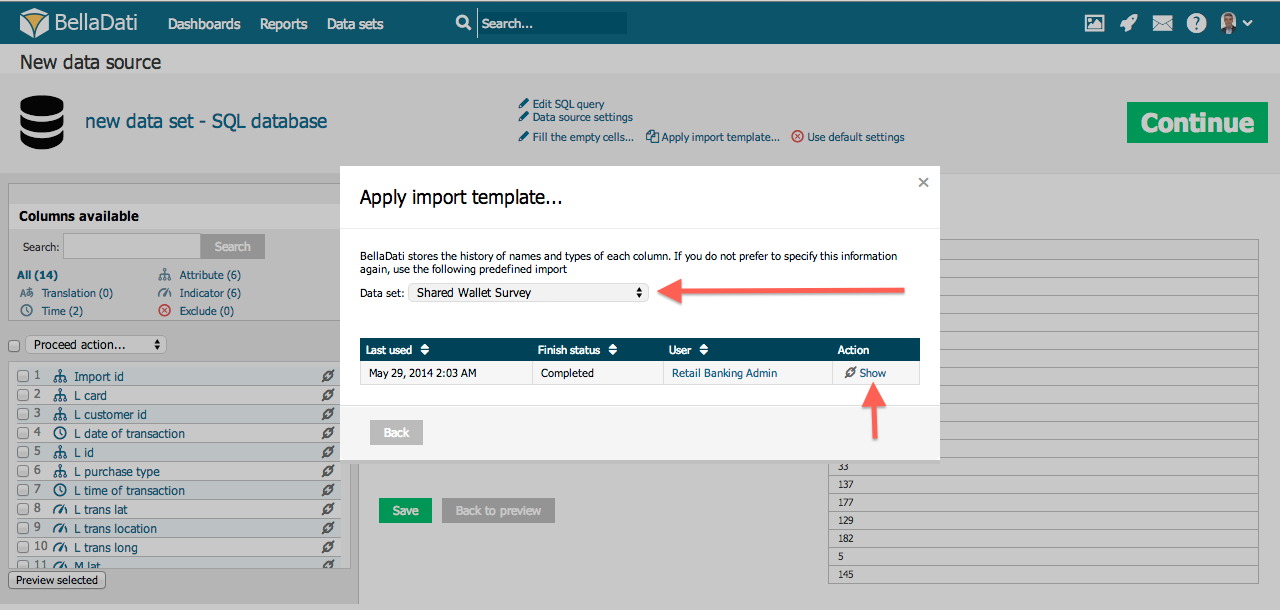
Import Templates
This function allows you to reuse import settings from previous imports or different data sets. It is available by clicking on "Apply import template" link on the top of the page.
In the popup, you can:
- Select data set
- Select import template assigned to this data set according requested date and import status
- Display import template details (column settings)
- Sort import templates
Applying the template will overwrite all current import settings.
You can choose from any existing import settings used in all data sets you have access to. These templates are created automatically after the import has been successfully finished.
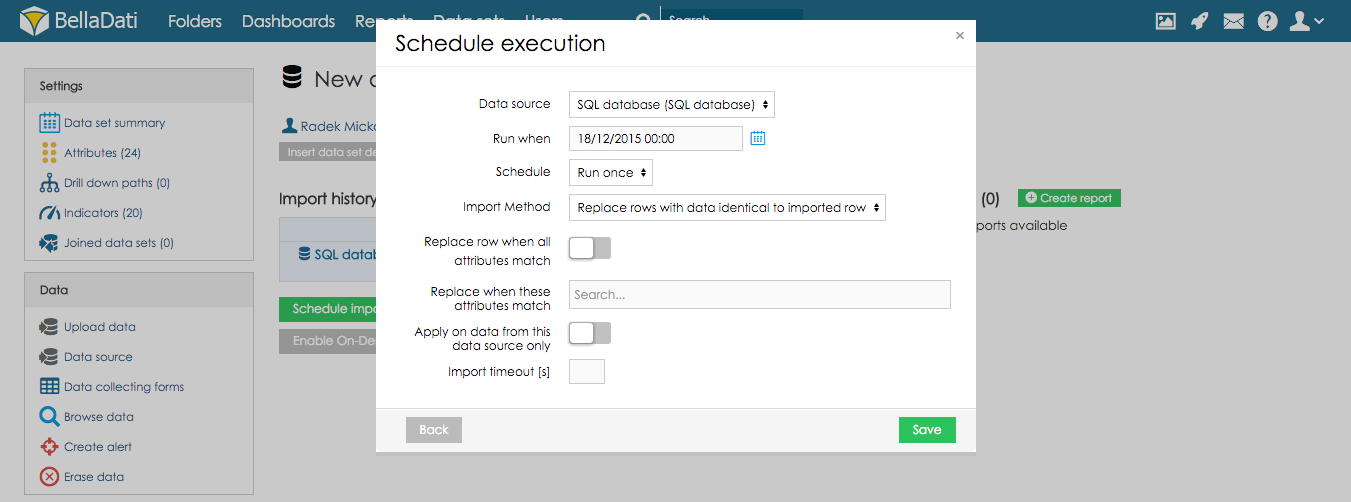
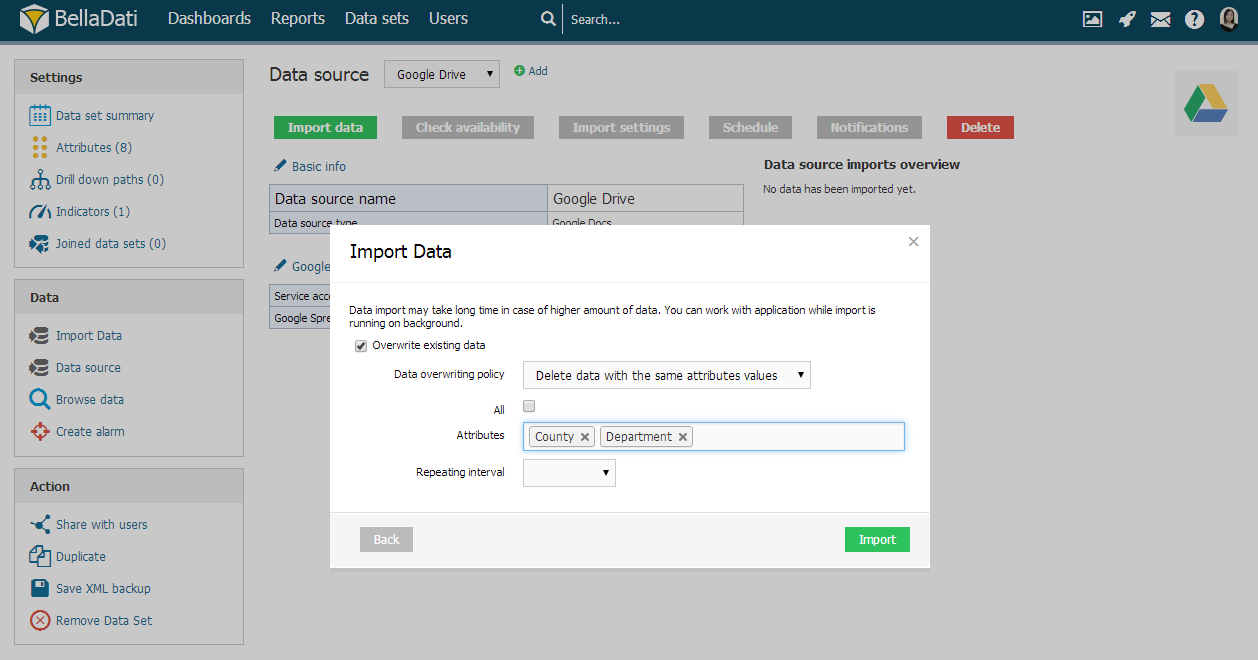
Data Overwriting Policy
When there are already existing data in the data set, you can choose the following options what to do with these data:
- Append rows to data set: Imported data will be appended to existing (default).
- Delete all rows in the data set: Deletes all rows in the data set (can be applied only to one data source).
- Delete all rows based on date range: data in selected date range will be deleted
- Delete rows with data identical to imported row: Deletes all existing records with the same combination of selected attributes as in the imported data.
- Replace rows with data identical to imported row: replaces all records with the same combination of selected attributes as in the imported data.
Replace rows with data identical to imported row
When replacing data according attributes, BellaDati allows you to:
- select All attributes.
- select specific attributes - the import procedure will compare desired attributes and will overwrite the row if the current attribute is equal to the value already stored in the database.
Delete rows with data identical to imported row
When deleting data according attributes, BellaDati allows you to:
- select All attributes.
- select specific attributes - the import procedure will compare desired attributes and will overwrite the row if the current attribute is equal to the value already stored in the database.
This import method can be applied only for the data imported from selected data source.
This import method can be applied only for the data imported from selected data source.
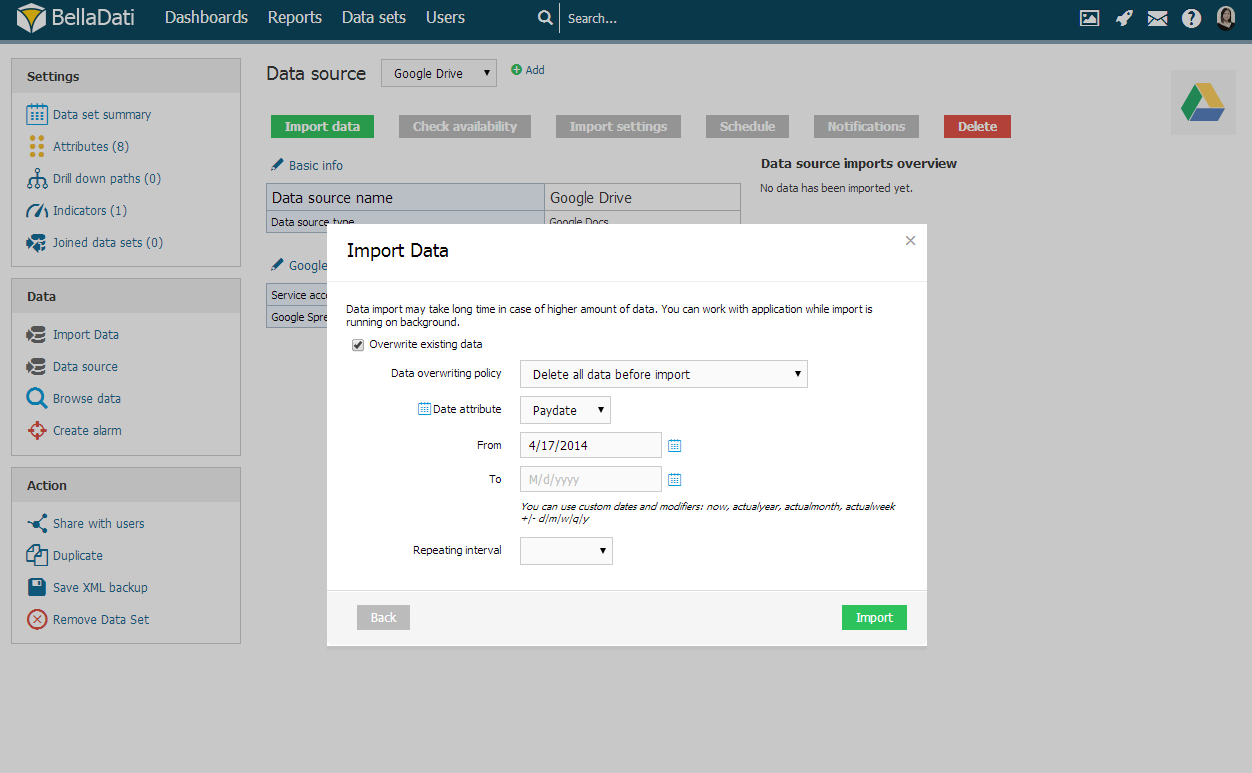
Delete all data before import
When deleting all data before import, BellaDati allows you to select specific time interval. Setup From and To to restrict data erasing.
Use calendar icons to comfortably select desired time intervals.
You can use custom dates and modifiers: now, actualyear, actualmonth, actualweek +|- d|m|w|q|y.
Import Progress
Import of lot of data may take a long time to complete.
Data are being imported asynchronously, therefore BellaDati functions are still available during import. The user can be logged out during the import too.
Data set summary page shows actual import progress bar with estimated time and percentage.
Before import finishes, you are able to:
- Cancel running import: All data related to this import will be erased from BellaDati data warehouse.
- Nofity by e-mail: An e-mail will be send to you after the import has been finished.
Next Steps
- Check the import results after the import
- Create report
- Browsing data
- Transformation scripting - detailed guide
Overview
Content Tools