This guide describes how to install BellaDati WAR on Payara. Please refer to the Get started with Payara for more information about how to install Payara. |
BellaDati supports Payara Server 5. Please download and install the Payara Platform Community Edition. |
| The BellaDati WAR file is the BellaDati application packaged in a WAR archive. It must be deployed into an existing application server and needs to be connected to a data warehouse running on an existing database server. |
Please read the following important notes before you begin installing BellaDati on Payara:
Make sure you have the right version of Java. See Installing Java for more details.
Since Belladati 2.10 Java 11 is required. |
Watch the video tutorial and or follow guidelines below

Please follow the instructions on the Setting up the PostgreSQL Database page.
Download the BellaDati WAR distribution as a ZIP archive from the BellaDati download page and extract its content using a tool such as 7-Zip for Windows or Linux's GNU tar tools. Only one of the files in the ZIP archive is used for this setup - belladati.war.
Avoid using Windows' built-in file extraction tool! This tool silently fails to extract files with long names. Other users have also reported problems with WinRAR.
Avoid using Solaris' default tar utility! Please use GNU tar on this operating system to extract BellaDati, as GNU tar handles long file names better.
Since version 2.7.14 there is no special configuration change needed, however, there are several advanced settings (e.g. enforcing the SSL), which are configurable in application.properties only.
Configuration settings are explained in detail in the BellaDati WAR Configuration Overview. |
BellaDati requires more memory than what Payara provides by default. This may lead to OutOfMemory errors when running BellaDati if these memory settings are not increased.
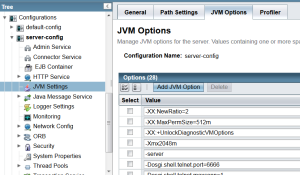
To increase the available memory, log in into the Payara Administration console (by default available at port 4848). Open the Application server's JVM Settings menu and click on JVM Options. Change the setting for -XX:MaxPermSize to 512m and -Xmx to 2048m and change -client to -server as shown in the screenshot below. If any of these options doesn't exist yet, create it. Please make sure you don't have set a -server and -client option at the same time.

If you are using the command line, execute the following commands instead:
$PAYARA_HOME/bin/asadmin delete-jvm-options \"-client\" $PAYARA_HOME/bin/asadmin delete-jvm-options \"-Xmx512m\" $PAYARA_HOME/bin/asadmin delete-jvm-options \"-XX:MaxPermSize=192m\" $PAYARA_HOME/bin/asadmin create-jvm-options \"-server\" $PAYARA_HOME/bin/asadmin create-jvm-options \"-Xmx2048m\" $PAYARA_HOME/bin/asadmin create-jvm-options \"-XX:MaxPermSize=512m\" |
Restart Payara. For other environments and more information on memory settings, see the System Requirements and Recommended JVM Options.
We highly recommend to increase maximum thread pool size for thread pools called "http-thread-pool" and "thread-pool-1" in thread pool settings.
Please configure JDBC settings using JVM options as listed in BellaDati Application Properties.
The default location for logs generated by BellaDati (see Configure logging for more details) is relative to the exploded belladati.war which is not suitable for long term storage.
To change the logs directory, log in into the Payara Administration console (by default available at port 4848), open the Application server's JVM Settings menu and click on JVM Options. Add new option -Dlogs.location=<location> where <location> is the desired absolute path to the parent directory in which logs will be stored.
If you are using the command line, execute the following commands instead:
$PAYARA_HOME/bin/asadmin create-jvm-options \"-Dlogs.location=<location>\" |
Restart Payara.
You can use the Admin Console to deploy BellaDati into Payara.
Administration console.Applications.Deploy button.Browse and select the belladati.war file.asadmin commandIn order to deploy BellaDati, execute this command:
$PAYARA_HOME/bin/asadmin deploy --user admin /belladati.war |
This command deploys the BellaDati WAR file under the /belladati context.
Point your browser to http://localhost:8080/belladati. This starts the Setup Wizard, which will take you through BellaDati's setup procedure.
Payara application server can be started/stopped from the command line or by using the service. This differs depending on the operating system used:
#server start $PAYARA_HOME\bin\asadmin start-domain #server stop $PAYARA_HOME\bin\asadmin stop-domain |
If you want to install Payara as Windows service, you can either execute the following script or create it using the sc command manually:
$PAYARA_HOME\bin\asadmin create-service |
Please note, that this script requires the Administrator privileges and .NET 3.5 installed on the machine.