Page History
| Sv translation | |||||||||||||||||||||||||
|---|---|---|---|---|---|---|---|---|---|---|---|---|---|---|---|---|---|---|---|---|---|---|---|---|---|
| |||||||||||||||||||||||||
This tutorial explains how to use Import templates when using the BellaDati Rest Action in the sender. It covers the following topics:
Preparation of the source fileTo be able to prepare the import template, it is necessary to prepare a sample CSV file with the same structure the data which are being sent from the sender to BellaDati. In this example, the data sent from the sensor have the following structure:
The data are sent via MQTT Publisher to the MQTT Broker running on the receiver. When processed in the BellaDati IoT Data Collector, the values will be transformed into JSON and additional information is added to the message. The same structure has to be used in the sample CSV file:
The file has the following structure:
You can download the CSV file from here. Preparation of the import templateThis file has to imported to the destination data set. On the import settings page, it is necessary to map the values to correct columns:
Next, it is possible to add additional columns which will contain the parsed values from the JSON.
To get the date, use this formula:
To get the MQTT topic, use this formula.
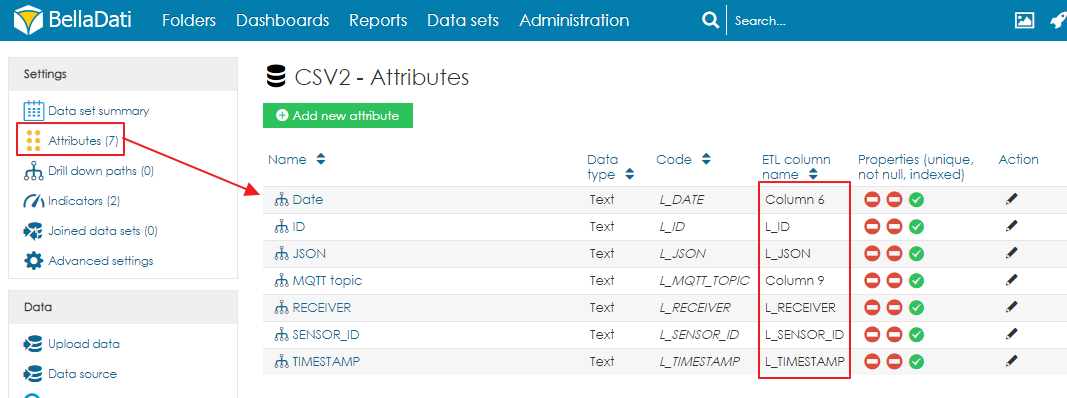
To learn how to work with JSON, please read the following article: http://support.belladati.com/doc/Importing+from+File Once the import settings are finished, click on Continue and import the data. After the import, make sure that the ETL names of attributes are correctly set. If they are not correct, change them to match the code of the attribute.
You can download the XML backup of the final data set from here. Please note that you need to import the data to create the import template. Usage of the import template
|


| Sv translation | |||||||||||||||||||||||||
|---|---|---|---|---|---|---|---|---|---|---|---|---|---|---|---|---|---|---|---|---|---|---|---|---|---|
| |||||||||||||||||||||||||
このチュートリアルでは、SenderでBellaDati Restアクションを使用するときにインポートテンプレートを使用する方法について説明します。次のトピックについて説明します:
ソースファイルの準備インポートテンプレートを準備するには、SenderからBellaDatiに送信されるデータと同じ構造のサンプルCSVファイルを準備する必要があります。 この例では、センサーから送信されるデータの構造は次の通りです This tutorial explains how to use Import templates when using the BellaDati Rest Action in the sender. It covers the following topics:
Preparation of the source fileTo be able to prepare the import template, it is necessary to prepare a sample CSV file with the same structure the data which are being sent from the sender to BellaDati. In this example, the data sent from the sensor have the following structure:
The data are sent via MQTT Publisher to the MQTT Broker running on the receiver. When processed in the BellaDati IoT Data Collector, the values will be transformed into JSON and additional information is added to the message. The same structure has to be used in the sample CSV fileデータは、MQTTパブリッシャーを介して、Receiverで実行されているMQTTブローカーに送信されます。 BellaDati IoTデータコレクターで処理されると、値はJSONに変換され、追加情報がメッセージに追加されます。同じ構造をサンプルCSVファイルで使用する必要があります:
The file has the following structureファイル構造は次の通りです:
You can download the CSV file from here. Preparation of the import template
ここからCSVファイルをダウンロードできます。 インポートテンプレートの準備このファイルは、宛先データセットにインポートする必要があります。インポート設定ページで、値を正しい列にマップする必要がありますThis file has to imported to the destination data set. On the import settings page, it is necessary to map the values to correct columns:
Next, it is possible to add additional columns which will contain the parsed values from the JSON.
次に、JSONからの解析された値を含む追加列を追加することが可能です。
日付を取得するには、次の式を使用しますTo get the date, use this formula:
To get the MQTT topic, use this formula.トピックを取得するには、次の式を使用します。
JSONの操作方法については、次の文章をご覧ください: http://support.belladati.com/doc/Importing+from+File Once the import settings are finished, click on Continue and import the data. After the import, make sure that the ETL names of attributes are correctly set. If they are not correct, change them to match the code of the attribute.
You can download the XML backup of the final data set from here. Please note that you need to import the data to create the import template. Usage of the import templateインポート設定が完了したら、[続行]をクリックしてデータをインポートします。 インポート後、属性のETL名が正しく設定されていることを確認してください。正しくない場合は、属性のコードと一致するように変更してください。
ここから、最終的なデータセットのXMLバックアップをダウンロードできます。インポートテンプレートを作成するには、データをインポートする必要があることに注意してください。 インポートテンプレートの使用
|
Overview
Content Tools