Page History
| Sv translation | ||||||||||||||||||
|---|---|---|---|---|---|---|---|---|---|---|---|---|---|---|---|---|---|---|
| ||||||||||||||||||
With this tutorial we aim to show you how to build iOS application using BellaDati analytics features trough REST API. Main focus is on
We will use Swift programming language and XCode Playground to allow us to experiment lavishly with our code. Tutorial pre-requisites are
Let's check version of BellaDati first. Depending on the url, where your BellaDati is installed. You can enter following into the web-browser
This was actually our very first REST API call. It is also the only REST API call that does not require an authentication with BellaDati. Let's check Swift and Xcode version. Run following commands from terminal
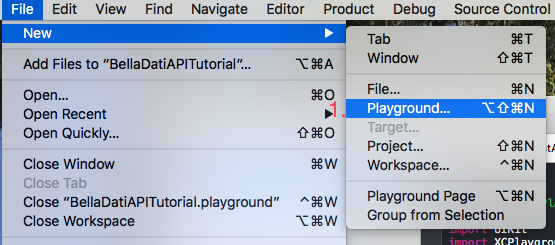
If you are ready to go.Let's hit the playground.Since we are using XCode and it's Playground, the best way to immediately interact with this tutorial and run the code is trough copy pasting the code into your New Playground. First things first. Let's create New Playground called BellaDatiAPITutorial and in the Dialog window in the Platform section select iOS.
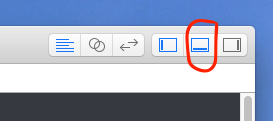
If you did not yet downloaded Swift code for this tutorial. Please, do it and copy-paste it into the BellaDatiAPITutorial playground. Also, make sure you can see Debug area in Xcode view. If you can not see it, push the button (red marked on the picture) in the upper right corner of XCode's window.If it is greyed. You can not see debug area XCode window setup should look similar like the one on the picture below.You may also notice, that our code produced following message:"Wrong password and username combination".It is message related to handling BellaDati API HTTP errors and we implemented 2 of them 403 and 404.We will fix this message in the next steps by setting correct credentials. Also, please note that, if you have received internal Xcode error: "Failed to obtain sandbox extension for path". No worries. It is not important for the next steps.
Before we will move ahead - the codeLet's discuss our code a bit. Our tutorial code is based on Swift. It includes implementation of OAuth 1.0 (which is used by BellaDati for authentication). It can parse JSON response from API calls. It can identify if BellaDati replied with JSON or replied with picture. Last but not least it can identify few BellaDati HTTP standard error codes. OAuth 1.0 and also JSON parsing (with limitations mentioned in the code) has been implemented without using 3rd party libraries to keep this tutorial setup dead simple. You can feel free to use it in your own project as well. Authentication variables setup Before we will move to API calls. We have to change values of few variables in the code to make it work with your BellaDati installation. These variables are located at the beginning of the code. Look for the following variables in first few lines.
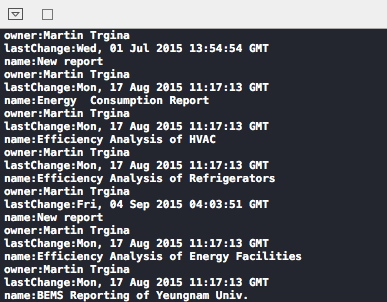
You can also notice, that variable api_call is set to reports/.Once you set correct values for variables above. Code in Playground will directly call /api/reports REST API and it will print parsed and non parsed JSON content. Code automatically adds "/api/" string to calls. Therefore you can assign variable api_call with String values containing format such as: "reports/" or "/dataSets" without using "/api/" part. Changing api_call variableIf you have filled all variables above with correct values and you keep api_call = "reports/".Than function authenticateBellaDati will launch other functions for authentication, authorization, json parsing and response type recognition. Also as you can see in the application code, function authorizeBellaDati actually assemble complete API CALL string which is http://localhost:8080/belladati/api/reports and in the Debug console we can happily see 2 kinds of outputs. One is in the JSON format and second is in format after parsing JSON by our function parseJSON.
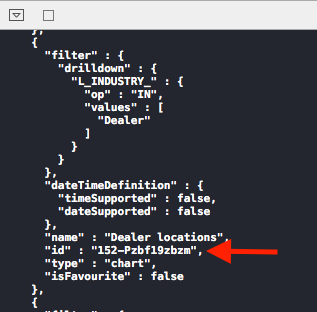
You can notice that in the case of non parsed JSON content id key along with its value is listed. It is because our code is using filter. That filter can be influenced by variable jsonParams. And this filter by default works only for parsing /reports REST API request. So let's try to add id into the filter to see what happens
Now you should be able to see also id value in the second output.Actually we have not been completely honest with you. Same filter we specified in the code can work also for dataSets/ api call. Only thing you have to do is to change field string value "reports" into "dataSets" string value and you should be able to see info about your data set on your screen. So go ahead an try it if you feel adventurous. Generating pictures from Views (Charts,Tables...)Let's say you need to generate only static results of analysis inside your app. In other words how to get picture of View(Views are chart,table and other objects in Reports) in your report? For such case we can call following reports/views/id:/image. Such View id: you can find in response of reports/:id. And this Report :id you can get from API CALL reports/. In your real application it will be done by code. For our manual approach steps are as following.
By adding parameters ?width=600&height=400 to reports/id:/thumbnail REST API call we specified also the size of the the received picture. Without params the default dimension values are width = 1024 height = 768. Now let's see our picture. Push CMD+F on the Mac keyboard and Find will pop-up in Xcode. Into the find command line write image and the 2nd found is let image. Which is property of authorizeBellaDati function. Than click on the QuickLook icon to see the content of image constant.See picture below.
In this tutorial we have covered basics of oAuth (xAuth method) with BellaDati and discovered few basic api calls. We parsed the JSON response, that these REST API calls return and we also generated only static reports(pictures) for our iOS app. It is very small piece of BellaDati framework that spins upto Machine Learning REST API. But we hope it motivated you to start building exciting iOS analytics apps.
|


| Sv translation | ||||||||||||||||||
|---|---|---|---|---|---|---|---|---|---|---|---|---|---|---|---|---|---|---|
| ||||||||||||||||||
このチュートリアルでは、REST APIを使用してBellaDati分析機能を使用してiOSアプリケーションを構築する方法を紹介します。主な焦点は:
Swiftプログラミング言語とXCode Playgroundを使用して、私たちのコードを贅沢に試すことができます。チュートリアルの前提条件は:
まずはBellaDatiのバージョンを確認してみましょう。BellaDatiがインストールされているURLに応じて、Webブラウザに次のように入力できます。
これは私たちの最初のREST API呼び出しでした。また、これはBellaDatiで認証を必要としない唯一のREST API呼び出しです。SwiftとXcodeのバージョンを確認しましょう。 ターミナルから次のコマンドを実行します。
準備ができている場合、はPlaygroundをヒットしてみましょう。.XCodeを使用しているので、このチュートリアルとすぐにやり取りしてコードを実行する最善の方法は、コードを新しいプレイグラウンドに貼り付けることです。まずは、BellaDatiAPITutorialを呼ばれた新しいプレイグラウンドを作成して、プラットフォームのダイアログウィンドウでiOSを選択してください。
まだこのチュートリアルにSwift codeをダウンロードしていない場合 、それを実行し、それをコピーしてBellaDatiAPITutorialのプレイグラウンドに貼り付けてください。また、Xcodeビューでデバッグ領域が表示されていることを確認してください。それが見えない場合は、Xcodeのウィンドウの右上隅にあるボタン(画像上に赤色で表示)を押してください。 グレーである場合に デバッグ領域は表示されません。 Xcodeのウィンドウの設定は、下の図のようになります。また、「パスワードとユーザー名の組み合わせが間違っています」というメッセージが表示されていることがわかります。BellaDati API HTTPエラーの処理に関するメッセージで、403と404のうちの2つを実装しました。私たちは、正しい資格情報を設定することにより、次の手順でこのメッセージを修正します。パスのサンドボックスの拡張機能の取得に失敗しました」内部Xcodeのエラーを受け取ったら、 心配ないでください。それは、次のステップでは重要ではありません。
先に移動する前に - コード私たちのコードビットを相談しましょう。私たちのチュートリアルのコードは、Swiftに基づきます。それはOAuth1.0(認証のためにBellaDatiで使用されている)の実装が含まれています。これは、APIコールからのJSON応答を解析できます。 BellaDatiはJSONで答えるまたは絵で答えるかどうかを識別できます。最後に、BellaDatiのHTTP標準エラーコードのいくつかを特定できます。OAuth 1.0とJSON解析(コードに記述されている制限付き)は、このチュートリアルの設定を単純なままにするためにサードパーティのライブラリを使用せずに実装されています。自分のプロジェクトでも自由に使うことができます。
認証変数の設定 API呼び出しに移動する前に、コード内のいくつかの変数の値を変更して、BellaDatiインストールで動作させる必要があります。これらの変数は、コードの先頭にあります。 最初の数行で次の変数を探します。
また、api_call変数がreports/.に設定されます。上記の変数に正しい値を設定してから。Playgroundコードが直接に/api/reports REST APIを呼び出し、解析されるかつ非解析されたJSONコンテンツ印刷されます。コードが自動的に呼び出しに"/ api /"文字列が追加されます。 "/ api/"の部分を使用せずに、reports/ と /dataSetsなどフォーマットを含む文字列でapi_call変数を付けます。 APIコール変数の変更上記すべての変数を正しい値で記入した場合api_call = "reports/"を保持しています。authenticateBellaDati関数より認証、認可、JSON解析、応答型認識のための他の関数を起動します。また、アプリケーションコードでもわかるように、関数authorizeBellaDatiは実際にhttp:// is http://localhost:8080/belladati/api/reportsである完全なAPI CALL文字列を組み立て、デバッグコンソールで2種類の出力を見ることができます。一つは、JSON形式であり、二つは当社のparseJSON機能によってJSONを解析した後のフォーマットです。
パースされていないJSONのコンテンツIDキーとその値がリストされていることがわかります。私たちのコードはフィルターを使用しているからです。 そのフィルタは、変数jsonParamsの影響を受ける可能性があります。そして、このフィルタは、デフォルトではREST APIリクエストを解析/報告するためにのみ機能します。 では、idをフィルタに追加して、何が起こるかを見てみましょう。
今、あなたは2番目の出力でもid値を見ることができるはずです。実際に完全に正直ではありませんでした。コードで指定した同じフィルタは、dataSets / api呼び出しでも動作します。フィールドの文字列値 "reports"を "dataSets"文字列値に変更するだけで、データセットに関する情報を画面に表示することができます。あなたが冒険しているなら、それを試してみてください。 ビューから画像を生成する(チャート、テーブルなど)例えば、たとえば、アプリ内で静的解析結果のみを生成する必要があるとします。言い換えれば、レポートのビューを取得する方法(レポート内のチャート、テーブル、その他のオブジェクト)はレポートに表示されますか?そのような場合に次のreports/views/id:/image呼び出すことができます。View idのようにreports/:idのレスポンスに見つけることができます。そして、このReport :idでAPI CALL reports/から取得できます。あなたの実際のアプリケーションでは、コードで完了します。 私たちの手作業によるアプローチの手順は次のとおりです。
?width=600&height=400 to reports/id:/thumbnail REST APIパラメーターを追加することで、受信した画像のサイズを指定しました。パラメーター値がない場合にデフォルト値は幅=1024、高さ=768とする。今度は、私たちの絵を見てみましょう。MacのキーボードではCMD+ Fを押して、Find がXcodeで出ます。検索コマンドライン・ライト・イメージと第2FOUNDに画像を許可されます。authorize BellaDati関数の特性です。Quick Lookのアイコンをクリックして、画像定数の内容を表示します。下の画像をご参照してください。
このチュートリアルでは、BellaDatiでのOAuth(xAuth法)の基本をカバーし、いくつかの基本的なAPI呼び出しを発見しました。JSONレスポンスを解析し、これらのREST API呼び出しが返され、私たちのiOSアプリ用の静的レポート(画像)のみが生成されました。これは、Machine Learning REST APIにスピンアップBellaDatiフレームワークの非常に小さな作品です。しかし、エキサイティングなiOSアナリティクスアプリの構築を開始する意欲があることを願っています。
|
Overview
Content Tools