This guide describes how to install BellaDati WAR on Tomcat 6.0 or Tomcat 7.0. You can download the Tomcat container from the Apache site.
Tip for Windows users:
We are recommending to use the 32-bit/64-bit Windows Service Installer, which allows you to run BellaDati as a Windows service.
The BellaDati WAR is the BellaDati application packaged in WAR archive. It must be deployed into an existing application server and needs to be connected to data warehouse running on an existing database server. If you are using a BellaDati virtual appliance, follow the Installing BellaDati Virtual Appliance guide instead of the instructions below.
Before You Begin
Please read the following important notes before you begin installing BellaDati on Tomcat 6.0 or 7.0:
- Make sure you have the right version of JAVA. See Installing Java for more details.
- Tomcat 6.0.24 contains a critical bug. Please use a higher version of Tomcat 6.0 or Tomcat 7.0 instead.
- Deploying multiple BellaDati WAR application in a single Tomcat container is not supported. We do not test this configuration and upgrading any of the applications (even for point releases) is likely to break it.
- We recommend not deploying any other applications in the same Tomcat container that runs BellaDati, especially if these other applications have large memory requirements or require additional libraries in Tomcat's lib subdirectory. Multiple applications in a container can impact stability as a crash in one application could make the entire container inaccessible. Additionally, in order to upgrade or reconfigure any of the applications, you'll need to restart the whole container.
1. Setup data warehouse
Please follow the instructions on Setting up the PostgreSQL Database page.
2. Download and extract BellaDati WAR Archive
Download the BellaDati WAR distribution as ZIP archive from BellaDati download page and extract its content using a tool such as 7-Zip for Windows or Linux's GNU tar tools. Only one of the files in the ZIP archive is used for this setup - belladati.war.
![]() Avoid using Windows' built-in file extraction tool! This tool silently fails to extract files with long names. Other users have also reported problems with WinRAR.
Avoid using Windows' built-in file extraction tool! This tool silently fails to extract files with long names. Other users have also reported problems with WinRAR.
![]() Avoid using Solaris' default tar utility! Please use GNU tar on this operating system to extract BellaDati, as GNU tar handles long filenames better.
Avoid using Solaris' default tar utility! Please use GNU tar on this operating system to extract BellaDati, as GNU tar handles long filenames better.
3. Configure BellaDati WAR
You have successfuly downloaded and extracted the BellaDati WAR distribution as described in the previous step. To configure Belladati, you need to extract and modify a configuration file placed inside the WAR archive by following these easy steps:
1. Extract application.properties file from the WAR file using a tool such as 7-Zip for Windows or Linux's unzip tool.
unzip belladati.war WEB-INF/classes/conf/application.properties
2. Edit extracted file WEB-INF/classes/conf/application.properties. Under JDBC properties, remove the # sign in the line below when running on Tomcat. Remove all other lines from JDBC properties. The configuration should look like:
# APPLICATION properties
application.url=http://localhost:8080
application.production-mode=true
application.secure-mode=false

# JDBC properties
# when running on Tomcat:
jdbc.resource=java:/comp/env/jdbc/belladati_db

# SMTP properties
smtp.server.address=localhost
smtp.server.username=
smtp.server.password=

# EMAIL properties
email.sender=support@belladati.com
email.footer=BellaDati Inc.

# OpenID properties
application.mybelladati.url=https://my.belladati.com
application.registration=http://www.belladati.com/try
application.registration.openid=

# Google analytics properties
application.google-site-verification=
application.google-analytics-account=
application.google-analytics-account.mercato=

# Lucene index dir
lucene.indexes=indexes
Parameters are explained in BellaDati WAR Configuration Overview.
3. Save configuration file WEB-INF/classes/conf/application.properties and update the WAR archive. On Linux, the command looks like:
zip -d belladati.war WEB-INF/classes/conf/application.properties
zip -u belladati.war WEB-INF/classes/conf/application.properties
4. Update Your Tomcat Installation's Libraries for BellaDati
Your Tomcat installation requires a JDBC driver allowing BellaDati to communicate with the database. To add this JDBC driver to Tomcat, refer to the instructions below:
5. Configure Tomcat
5.1 Set JAVA Environment
If you have installed the Tomcat Windows Service, you can skip this step.
5.1.1 For Linux/Solaris
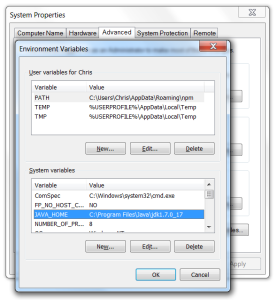
Before you start Tomcat, make sure you have configured the JAVA_HOME variable, which points to the installed JAVA. You can do it in this way:
$ export JAVA_HOME=/path/to/jdk
Make sure this variable is automatically set after system starts (append it to the .profile).
You can also specify it in the file $TOMCAT_HOME/conf/tomcat6.conf file. :
JAVA_HOME="/opt/java64"
5.1.2 For Windows
Windows users can specify the environment parameters in the Environment Variables window.
5.2 Configure Tomcat's Context
A BellaDati 'context' now needs to be set up in Tomcat. To do this:
- Create the directory structure
conf/Catalina/localhost/within your Tomcat installation directory if it doesn't already exist. - Create the
belladati.xmlfile and copy it toconf/Catalina/localhostsubdirectory of your Tomcat installation directory (created in the previous step).<Context path="/belladati" docBase="path/to/belladati.war" debug="0" useHttpOnly="true"> <Resource name="jdbc/belladati_db" auth="Container" type="javax.sql.DataSource" driverClassName="org.postgresql.Driver" url="jdbc:postgresql://db_host:5432/belladati_db" username="belladati_dbuser" password="password" maxActive="20" maxIdle="10" maxWait="-1"/> </Context> - Update the docBase attribute in the first line as well as url, username and password in lines 5 and 6 to match your system configuration.
Here is an example file.
If you are installing in Windows, make sure that the paths you specify for the location of the WAR file and database are full paths with drive letters (e.g. C:\path\to\belladati.war).
5.3 Set Tomcat Home Directory Permissions
By default BellaDati is creating several directories within the Tomcat home folder. Tomcat should run under a user with read and write access to this directory.
5.4 Configure Memory Settings in Tomcat
Memory settings need to be modified in Tomcat to avoid the following issues:
- BellaDati requires more memory than what Tomcat provides by default. This may lead to
OutOfMemoryerrors when running BellaDati if these memory settings are not increased.
To prevent these issues, follow the appropriate instructions for your operating system below.
Please note that the value 2048MB for -Xmx (maximum memory pool) is recommended for evaluation purposes only. Please refer to the JVM parameters chapter to find suggested settings for production deployments.
For Linux/Solaris
Edit Tomcat's bin/setenv.sh file (or create this file if it does not exist) and add the following to this file:
export CATALINA_OPTS="$CATALINA_OPTS\ -Dmail.mime.decodeparameters=true -Dfile.encoding=UTF-8 -Xms1024m -Xmx2048m -XX:MaxPermSize=512m"
Alternatively, you can edit the $TOMCAT_HOME/conf/tomcatX.conf or /etc/default/tomcatX.conf file:
JAVA_OPTS="-Dmail.mime.decodeparameters=true -Dfile.encoding=UTF-8 -Xms1024m -Xmx2048m -XX:MaxPermSize=512m"
For Windows
If you are running 32 bit JVM on Windows, you can use max 1344MB (-Xmx1344)
If Tomcat is not installed as a service:
- Edit Tomcat's
bin/setenv.batfile (or create this file if it does not exist) and add the following to this file:
set CATALINA_OPTS=%CATALINA_OPTS% -Dmail.mime.decodeparameters=true -Dfile.encoding=UTF-8 -Xms1024m -Xmx2048m -XX:MaxPermSize=512m\
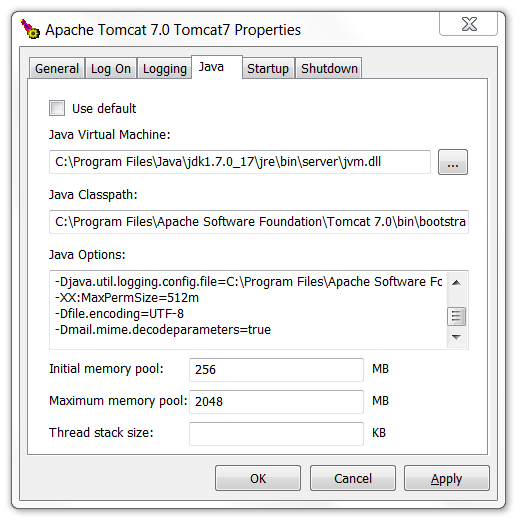
If Tomcat is installed and running as a service:
- Right-click Tomcat's system tray icon and select Configure from the resulting popup menu, which opens the Apache Tomcat Properties dialog box.
- In this dialog box, click on the Java tab and specify the following values (depending on available system memory):
Field
Value
Java Options (append to the existing value)
-XX:MaxPermSize=512m
-Dfile.encoding=UTF-8
-Dmail.mime.decodeparameters=true
Initial memory pool
256 MBMaximum memory pool
2048 MB
For other environments and more information on memory settings, see System Requirements.
5.5 Modify Tomcat's server.xml
In order for BellaDati to correctly display internationalized characters in user and group names, you need to modify the conf/server.xml file in your Tomcat installation directory by specifying the URIEncoding="UTF-8" property within the connector definition for your HTTP protocol.
The connector definition is specified by the following element in your server.xml file:
<Connector port="8080" protocol="HTTP/1.1"
connectionTimeout="20000"
redirectPort="8443"/>
You should modify this element by specifying the URIEncoding="UTF-8" attribute:
<Connector port="8080" protocol="HTTP/1.1"
connectionTimeout="20000"
redirectPort="8443" URIEncoding="UTF-8"/>
![]() Please Note:
Please Note:
- Since this property must be specified at the connector level for your application server, this setting will affect all other web applications deployed to the same application server installation running BellaDati. While this setting should not adversely effect these other web applications, you should be aware of this point.
- BellaDati will run fine without this property set. However, you will run into issues if a user or group is created which contains international characters. Hence, it is recommended that you set this property.
6. Start or Restart Tomcat
BellaDati is now ready to run in Tomcat.
Run as Service
Start the Tomcat service used for Belladati. Restart it if it's already running.
Run Manually
If Tomcat is not running as a service, start (or restart) the Tomcat server with Tomcat's bin/startup.sh or bin/startup.bat scripts.
7. Run the Setup Wizard
Point your browser to http://localhost:8080/belladati
You should now see the Setup Wizard, which will take you through the BellaDati's setup procedure.
Overview
Content Tools