BellaDati is an enterprise scale application with extended support to run in a clustered environment to achieve HA or other desired operation levels.
BellaDati is not depending on the selected cluster environment, you can run it on GlassFish, Websphere or JBoss, but there are several parameters contained in application.properties (see BellaDati WAR Configuration) which need to be changed in order to run BellaDati in the cluster):
Example for 4 servers cluster
application.actor.server.port=2335
tapestry.clustered-sessions=true
application.servers=172.31.38.23:2335,172.31.13.180:2335,172.31.45.195:2335,172.31.2.41:2335
The example above defines parameters for 4 machines in a cluster. The server's IPs are 172.31.38.23, 172.31.13.180, 172.31.45.195 and 172.31.2.41
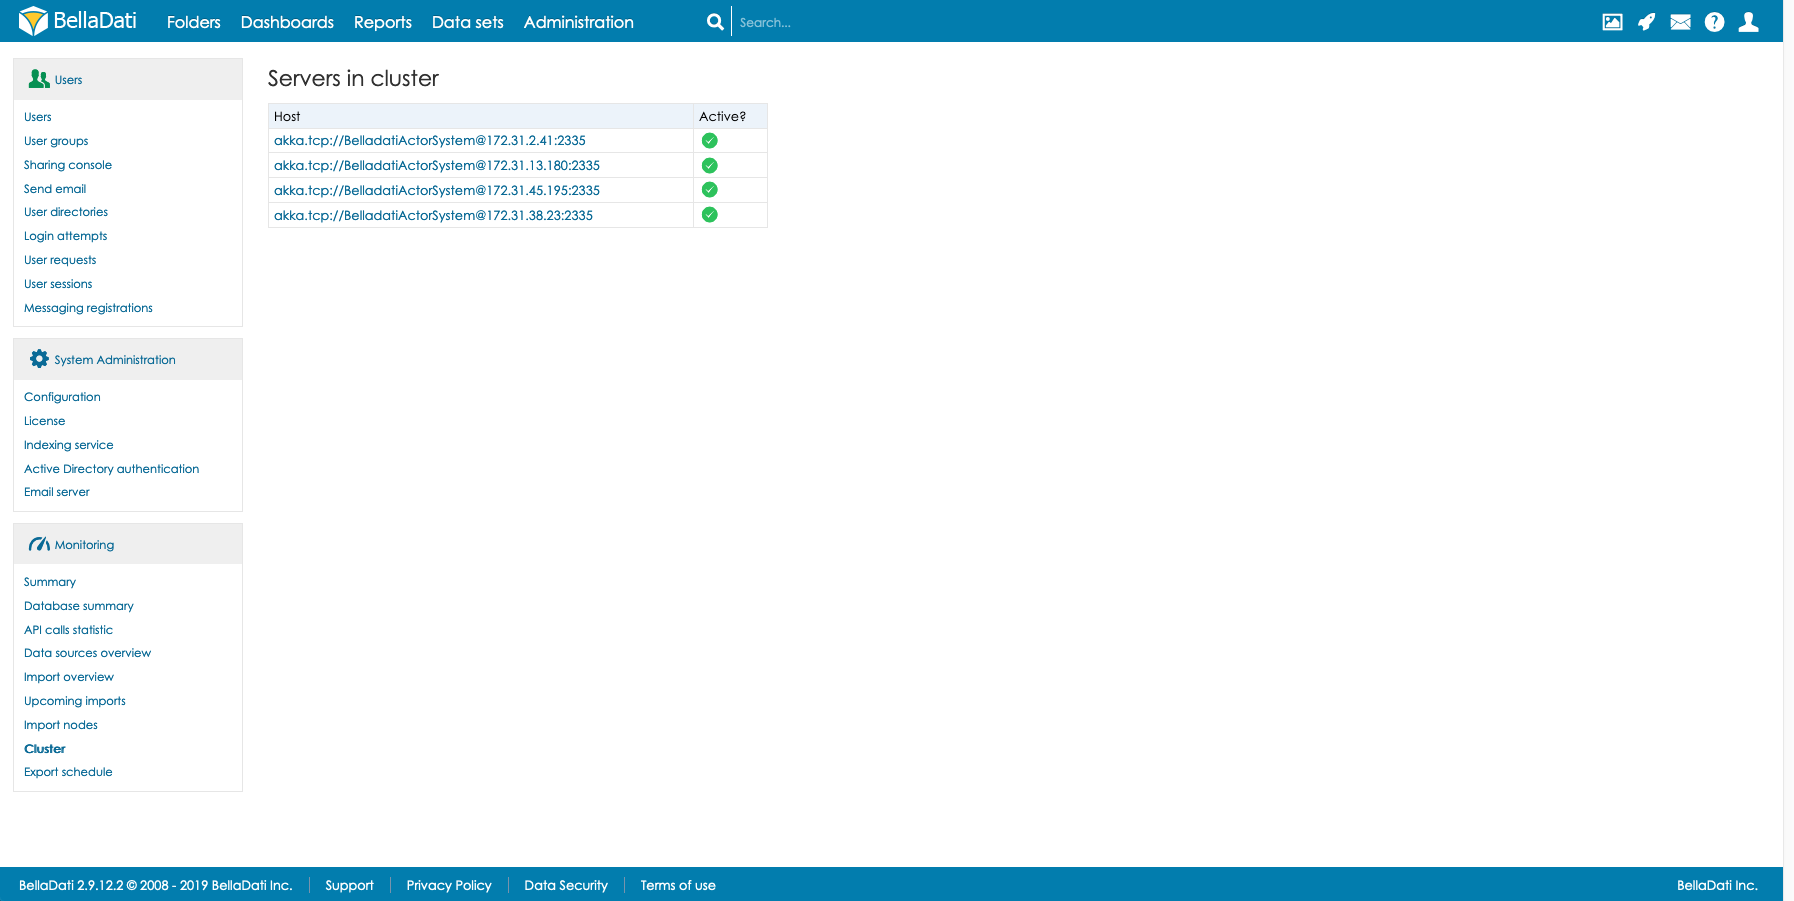
Cluster overview page
BellaDati administrators have access to cluster overview page , which provides useful information regarding each of clustered servers.
Glassfish cluster on Linux
Installing cluster node prerequisites:
- Each of servers for cluster installation satisfies system requirements as described in https://support.belladati.com/techdoc/System+Requirements
- BellaDati must be installed on one server machine (next called "belladati-main" ) ; for detail information see https://support.belladati.com/techdoc/Installation+and+Update
- BellaDati database is running. Connectivity to the database is allowed from each off clustered servers. The Database Engine is not required to run on one of cluster dedicated servers.
- The servers (main server with BellaDati installation and Node servers for installing instance node) must have a valid hostname and must be visible to each other
- The resolvable hostname must be contained in /etc/hostname and /etc/hosts must contain all server names on all servers. Using of FQDN (fully qualified domain name) is must for most of Operating Systems.
- JAVA and JAR (part of Java distribution) must be installed on the servers to be used as instance node
- One SSH user with password or certificate authentication is available on each of the servers. The user is allowed to connect and transport data.
- Traffic is allowed between servers on many ports; it is recommended to use all traffic allowed - internal network
- Editing application.properties as defined above is must - the file is located in BellaDati installation subdirectory .../domain/domain1/applications/belladati/WEB-INF/classes/conf/application.properties on belladati-main server
Installation process example & description
This example shows an installation on 4 VM of AWS (Amazon Web Services) cloud running Red Hat line OS CentOS-7. HW configuration for each of the machine is: 2 virtual CPUs, 4 GiB RAM memory and 20 GiB storage.
There are two networks available : private and public. Private network is used for cluster settings. All traffic in private network is allowed. Public network inbound rules allow only ssh, http and postgres port connections for defined IPs.
BellaDati version 2.9.12 is installed on server named belladati-main at the start of installation.
Database engine PostgreSQL 10.9 runs on remote VM named dbs. User belladati_dbuser can see database belladati_db from each of the four VMs. This is set up in PostgreSQL configuration files pg_hba.conf and postgresql.conf.
Additional two VMs are named node1 and node2
Server hostnames are of FQDN (fully qualified domain name) type - example : ip-172-31-38-23.eu-central-1.compute.internal; for server with private IP 172.31.38.23
Hosts tables for all servers are the same.
Open JDK Runtime server is installed; java -version , jar commands are available for all accounts. It is recommended to use the same Java version as installed during BellaDati installation.
Account "cluster" is added on servers. The home directory is /home/cluster, user is in wheel.
The whole installation process is divided into several blocks
Environment Setting up
Cluster Installation
Setting up Cluster Configuration
Starting Cluster
Modifying BellaDati License
Updating BellaDati
Environment Setting up
![]() Root runs the bellow mentioned commands
Root runs the bellow mentioned commands
- Adding ssh user "cluster" on each of the servers; home directory is /home/cluster, user is in group wheel
- Test ssh user "cluster" login to each of the servers ;
User password authentication is allowed.
![]() This example installation utilize internal, Firewall protected network; connections from outbound are strictly restricted for limited set of IP adresses; password authentication is sufficient from security point of view.
This example installation utilize internal, Firewall protected network; connections from outbound are strictly restricted for limited set of IP adresses; password authentication is sufficient from security point of view.
Initial table describing working environment
| servers | Private IP | Installed | Description |
|---|---|---|---|
belladati-main
| 172.31.2.41 | BellaDati application (version 2.9.12) installed by installer (GlassFish AS, JAVA openjdk, etc. is included)
| Directory: /usr/local/BellaDati, Port 8080 PATH set up JAVA commands , GlassFish commands (asadmin); psql command available { PATH=/usr/local/BellaDati/jre/bin:/usr/local/Belladati/jre/jre/bin: /usr/local/BellaDati/glassfish5/bin:/usr/local/Belladati/glassfish5/glassfish/bin: /sbin:/bin:/usr/sbin:/usr/bin } PostgreSQL command: psql -h hostname -p port -U username -d dbsname is available |
node1
| 172.31.13.180 | JAVA openjdk , postgresql-client | PATH set up to JAVA commands ( java -version, jar ...) PostgreSQL command: psql -h hostname -p port -U username -d dbsname is available |
node2
| 172.31.45.195 | JAVA openjdk,postgresql-client | PATH set up to JAVA commands (java -version, jar) PostgreSQL command: psql -h hostname -p port -U username -d dbsname is available |
| dbs | 172.31.38.23 | PostgreSQL (version 10): port 5432, dbs belladati_db, usr belladati_dbuser JAVA openjdk
| PATH set up to postgresql commands all commands available PATH set up to JAVA commands ( java -version, jar...)
|
Installation directory for BellaDati application on server belladati-main contains directory jre. The files in the directory and its subdirectories are adequate for these purposes (clustering). Just copy the "jre" directory to the rest of servers (e.g. to account cluster home directory /home/cluster) , modify PATH (e.g. create shell file to /etc/profile.d/belladatipath.sh with line export PATH=/home/cluster/jre/bin:/home/cluster/jre/jre/bin:$PATH). JAVA environment is going to be identical for all cluster servers.
| |||
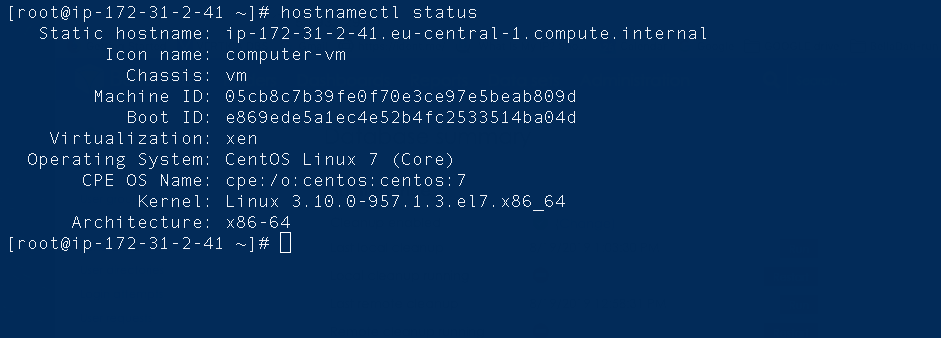
- Setting hostname (each server )
Run command : hostnamectl set-hostname Fully Qualified Domain Name
e.g hostnamectl set-hostname ip-172-31-2-41.eu-central-1.compute.internal ( FQDM for server belladati-main in private network)
![]() Command hostnamectl status yields to :
Command hostnamectl status yields to :
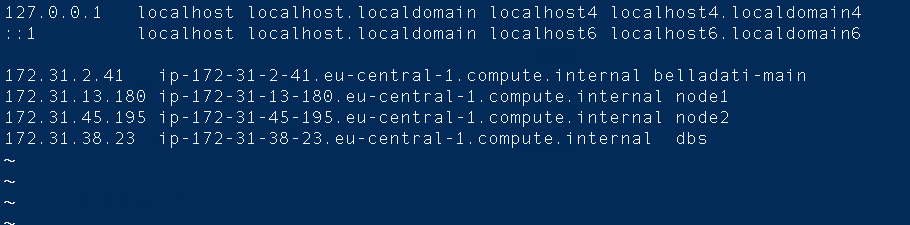
- Setting hosts table for every server
Run command: vim /etc/hosts Modify the file
![]() Modified Hosts table ( /etc/hosts file content on all servers)
Modified Hosts table ( /etc/hosts file content on all servers)
- Modifying PostgreSQL setting on dbs server
Run editor command vim
Setting database connectivity
Server dbs:
Modify file pg_hba.conf
add line: host all all 172.31.0.0/16 md5
Modify file postgresql.conf
listen_addresses = '*' # what IP address(es) to listen on;
![]() If you edit the files on a running system, you have to SIGHUP the server for the changes to take effect, run "pg_ctl reload",
If you edit the files on a running system, you have to SIGHUP the server for the changes to take effect, run "pg_ctl reload",
- Testing connectivity to database
Database engine is located/running on server dbs
Run next command on every server: psql -h 172.31.38.23 -p 5432 -U belladati_dbuser -d belladati_db
run additional psql commands (\l+, \connect, \conninfo etc... \q)
Dbs connectivity

![]() The BellaDati cluster items (The process will deploy application on all machines) need to see/communicate database belladati_db. Database owner/user is belladati_dbuser. This is reason for establishing/allowing communication.
The BellaDati cluster items (The process will deploy application on all machines) need to see/communicate database belladati_db. Database owner/user is belladati_dbuser. This is reason for establishing/allowing communication.
- Testing ssh across servers communication and java commands availability for account cluster (login name)
Run next command on belladati-main server testing every server: ssh -l login name server identification
e.g. : ssh -l cluster dbs, ssh -l cluster node1, ssh -l cluster node2 etc (or IPs or FQDNs)
Run java testing commands on belladati-main server (for each of the servers) ssh -l login name server identification 'java command'
e.g. : ssh -l cluster node1 'java -version' ; ssh -l cluster dbs 'jar' etc.
![]() SSH acaount cluster is going to spread GlassFish AS environment from belladati-main server to every cluster server.This is reason for the communication.
SSH acaount cluster is going to spread GlassFish AS environment from belladati-main server to every cluster server.This is reason for the communication.
- Setting Application Properties parameters on server belladati-main
BellaDati application is running on belladati-main server, installation directory is /usr/local/BellaDati. It yields to next location for the properties file.
Run command: vim /usr/local/BellaDati/glassfish5/glassfish/domains/domain1/applications/belladati/WEB-INF/classes/conf/application.properties
The file application.properties must be modified to cover new cluster communication requirements.
Add lines :
application.actor.server.port=2335
tapestry.clustered-sessions=true
application.servers=belladati-main:2335,node1:2335,node2:2335,dbs:2335
![]() instead of application servers alias names, IP adress or FQDN (see /etc/hosts) could be used.
instead of application servers alias names, IP adress or FQDN (see /etc/hosts) could be used.
Environment setting final notice
- Now, there are four machines operating linux OS, BellaDati application is running on GlassFish AS on one of the machines
- Ssh user cluster can communicate across private network and start java commands from belladati-main on every server
- User belladati_dbuser can connect to dbs belladati_db from arbirary of the future cluster servers
- The parameters for future BellaDati application cluster are set up in the file application.properties on server belladati-main.
Cluster Installation
![]() The processes described here are carried out by root on belladati-main machine.
The processes described here are carried out by root on belladati-main machine.
GlassFish asadmin utility subcommands are prefered but GlassFish Admin Console GUI is used for illustration as well.
- Setting account(user) cluster password
The role of the user cluster is to spread up glassfish environment from belladat-main to all machines devored for clustering. To use the account in next commands, its password alias is created:
run command : asadmin create-password-alias clusterpassword
insert cluster account password
run vim /home/cluster/clusterpassword
add line: AS_ADMIN_SSHPASSWORD=${ALIAS=clusterpassword}
![]() asadmin list-password-aliases shows the name, asadmin delete-password-alias XXXXX delete the password alias
asadmin list-password-aliases shows the name, asadmin delete-password-alias XXXXX delete the password alias
- Node creation
Machine belladati-main directory /usr/local/BellaDati/glassfish5 will be copied to the cluster machine (node1,node2 and dbs), to directory home directory of the user cluster.
The user cluster has ssh connection to the machines. Its password information is in /home/password/clusterpassword file.
The name of GlassFish nodes are defined (node1,node2 and node3 for host "dbs").
run command step by step for hostname node1,node2 and dbs changing operand adequately (node1,node2 and node3):
asadmin create-node-ssh --nodehost node1 --installdir /home/cluster/glassfish --install=true --sshuser cluster --passwordfile /home/cluster/clusterpassword node1
Set of commands to nodes creation:
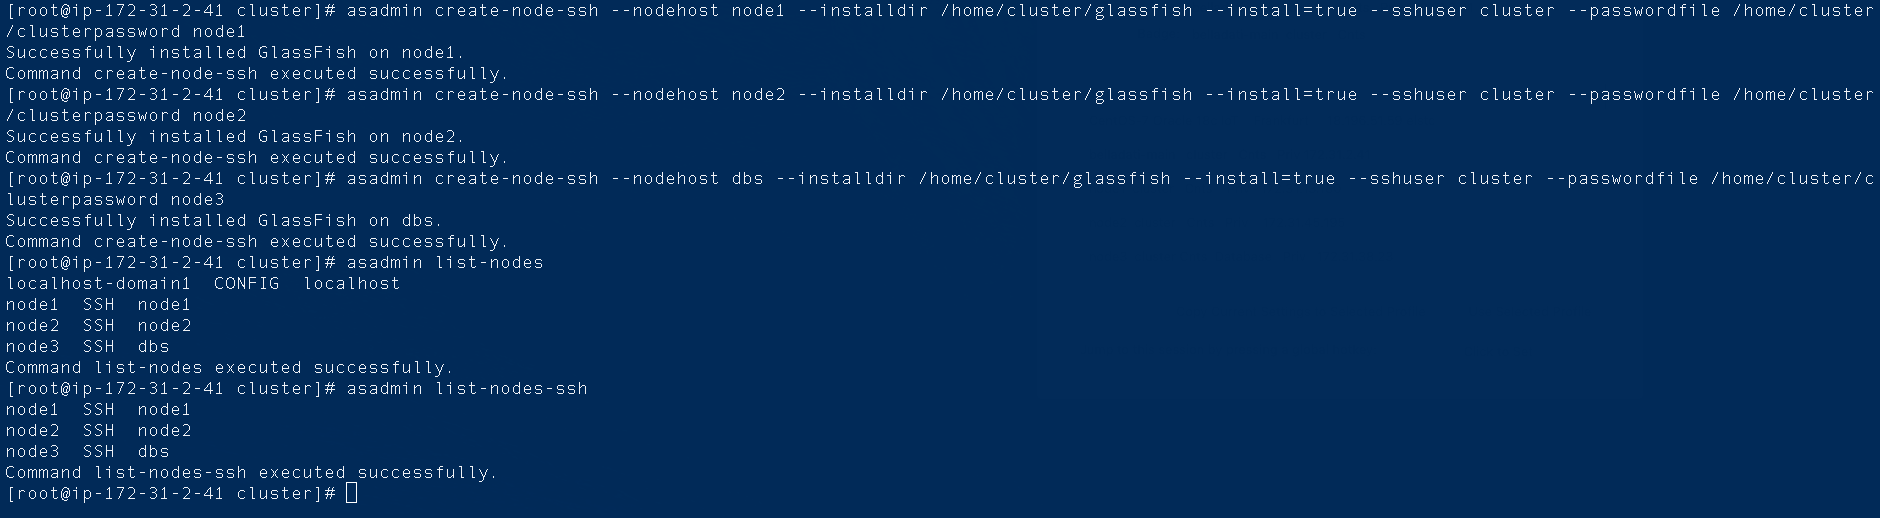
- Node verification - testing connection to node (s)
run command asadmin ping-node-ssh node1(node2,node3)
asadmin list-nodes-ssh ![]() ssh nodes created are listed
ssh nodes created are listed
asadmin list-nodes ![]() this command list all nodes, including original node localhost-domain1 on localhost i.e. on belladati-main
this command list all nodes, including original node localhost-domain1 on localhost i.e. on belladati-main
![]() Have a look at node1, node2 or dbs user cluster home directory. Now there are additional files there - directory glassfish and its files/directories. GlassFish environment is now on all cluster servers.
Have a look at node1, node2 or dbs user cluster home directory. Now there are additional files there - directory glassfish and its files/directories. GlassFish environment is now on all cluster servers.
GlassFiish GUI illustration:

- cluster creation
The base environment/configuration for cluster itself is created now.Name of the cluster is going to be "belladati-cluster" . The step is necessary next GlassFish cluster jvm instances.
run command asadmin create-cluster belladati-cluster
![]() New configuration is added to GlassFish configuration. Its name is belladati-cluster-config. It is necessary to modify it . See next block of the the installation process.
New configuration is added to GlassFish configuration. Its name is belladati-cluster-config. It is necessary to modify it . See next block of the the installation process.
![]() helpfull additional commands: asadmin list-clusters ; asadmin delete-cluster belladati-cluster
helpfull additional commands: asadmin list-clusters ; asadmin delete-cluster belladati-cluster
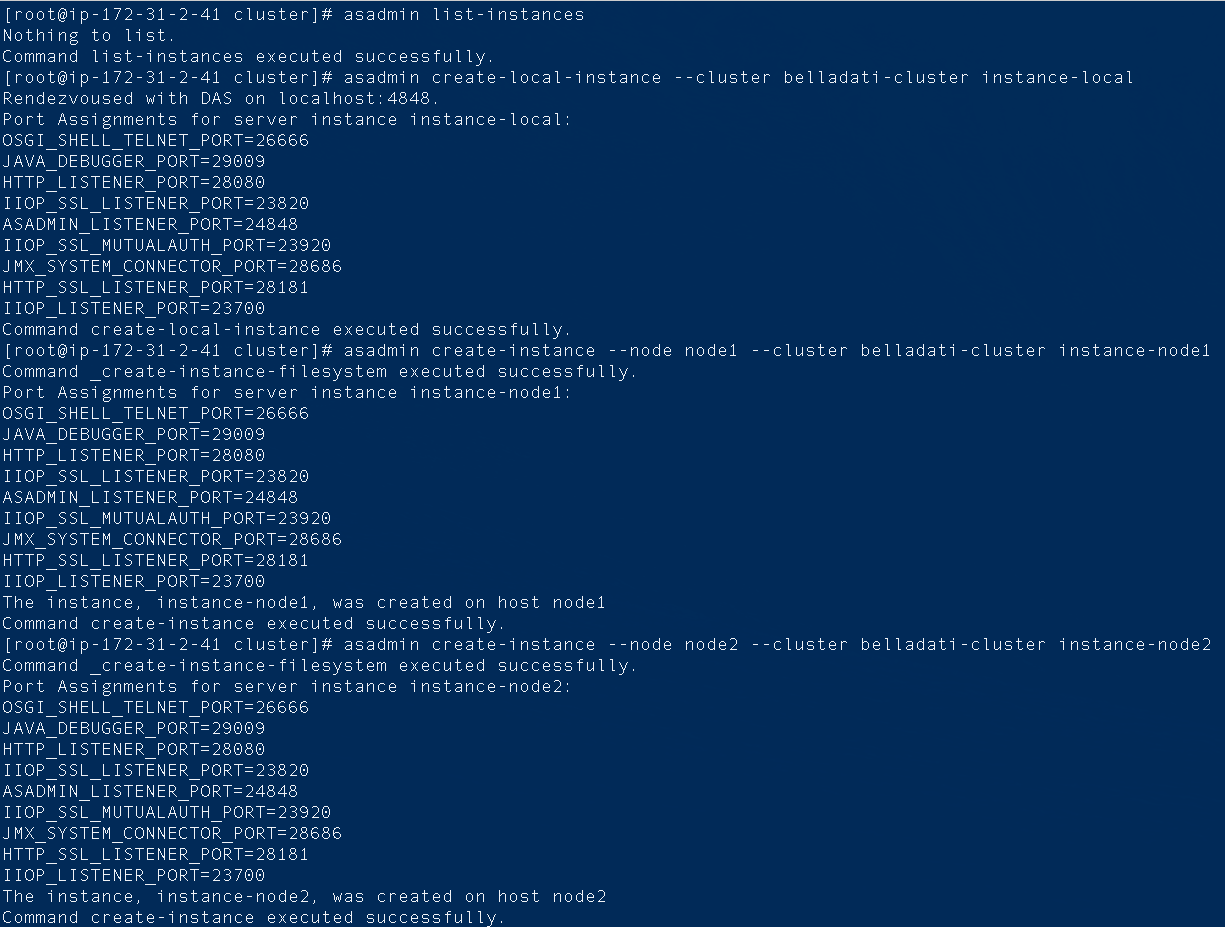
- Creating belladati-cluster instances
now jvm instances of GlassFish AS will be added/created for the cluster
first cluster instance on belladati-main; its name is instance-local
run command asadmin create-local-instance --cluster belladati-cluster instance-local
![]() see /usr/local/BellaDati/glassfish5/glassfish additional files hierarchy appear nodes/localhost-domain1/...
see /usr/local/BellaDati/glassfish5/glassfish additional files hierarchy appear nodes/localhost-domain1/...
unlocal instances
repeatedly run next command for all ssh nodes:
vim /home/cluster/glassfish/config/asenv.conf and insert # before line defining AS_JAVA
![]() reason for doing it is: on the ssh node servers is different PATH for JAVA environment; not the path copying from belladati-main in asenv.conf file
reason for doing it is: on the ssh node servers is different PATH for JAVA environment; not the path copying from belladati-main in asenv.conf file
run command (per each of the ssh i.e. node1,node2 and node3); names for the created instances will be instance-node1, instance-node2 and instance-node3
asadmin create-instance --node node1 --cluster belladati-cluster instance-node1
![]() helpfull commands: for visibility asadmin list-instances, for deleting asadmin delete-instance NAME of the instance to delete
helpfull commands: for visibility asadmin list-instances, for deleting asadmin delete-instance NAME of the instance to delete
Set of commands creating jvm instances:
GlassFish GUI illustration:
Cluster installation final notice
Now, GlassFish nodes and adequate jvm GlassFish instances are installed on every cluster machines. The instances are not running. The instances's ...../glassfish/nodes/instance-XXXX directory does not contain application information. Cluster configuration file is just a copy of default configuration file server-config.
Setting up Cluster Configuration
Configuration file for belladati-cluster is named belladati-cluster-config. Untill now, there is no information regarding resources for the cluster, no information about application to run in cluster. Parameters
defining e.g. thread-pools, heap space for jvm etc. are not valid for running application BellaDati in cluster environment. Next steps will modify the configuration file belladati-cluster-config to change the status.
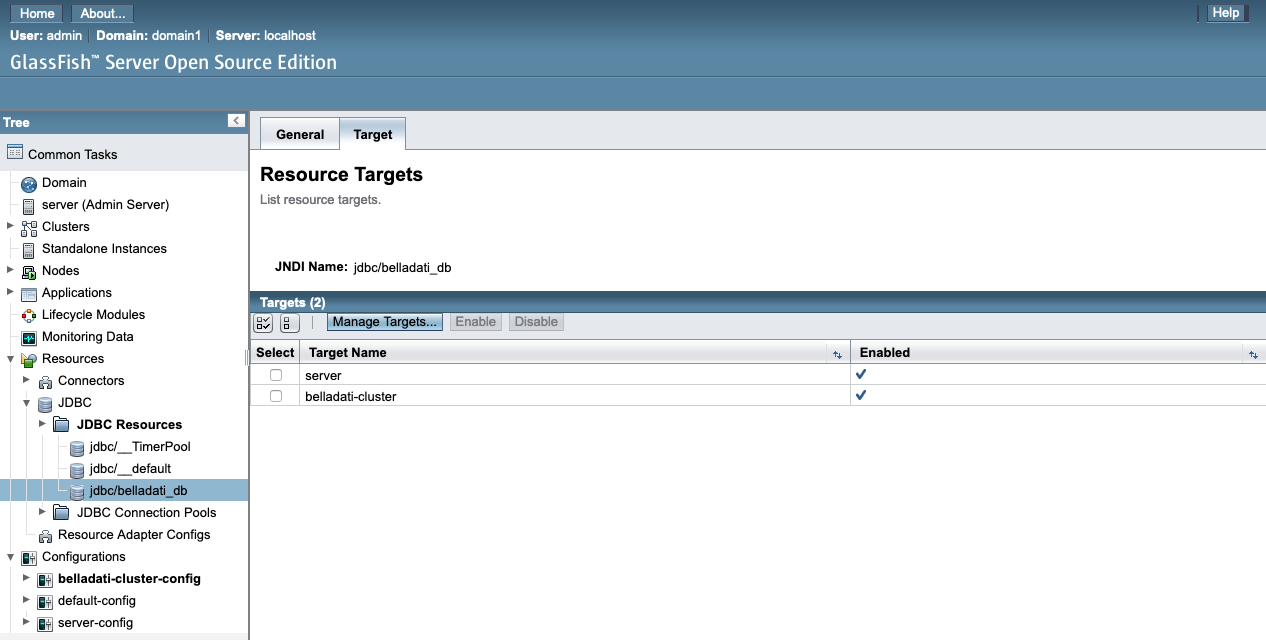
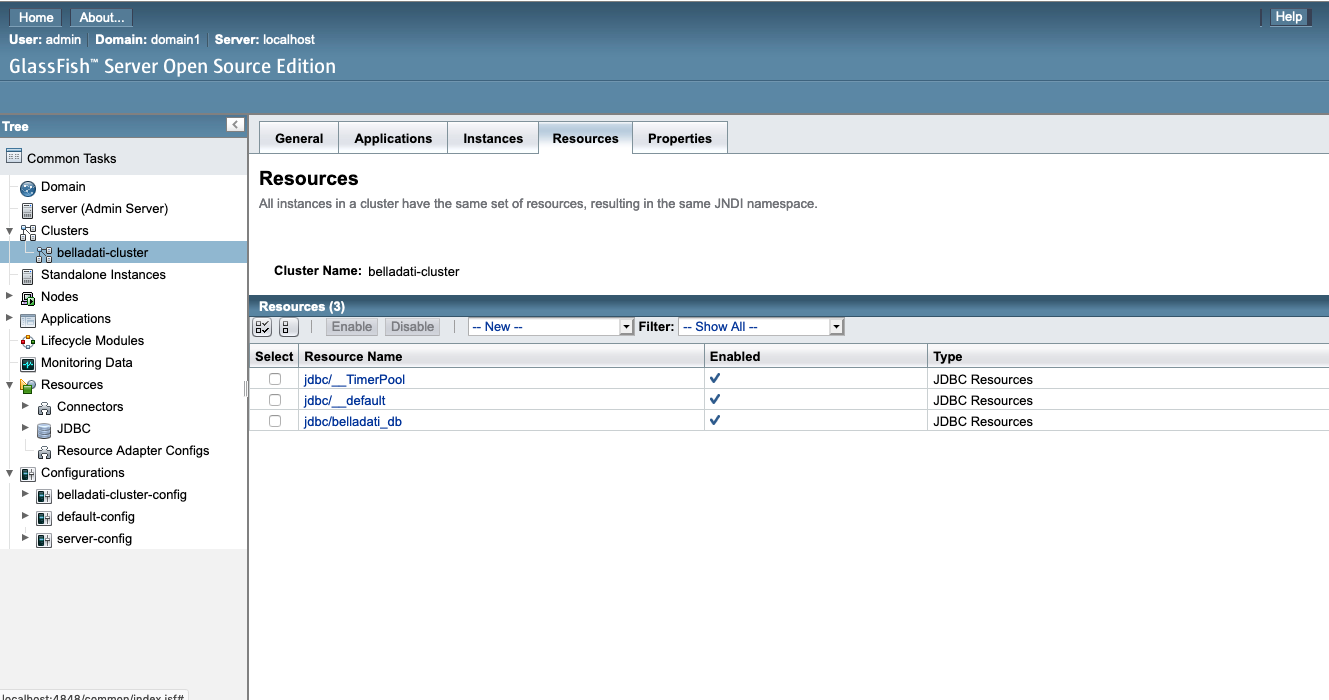
- Setting up resources (JDBC)
For belladati-cluster ("target") reference to jdbc/belladati_db i.e. definition of database for application will be created.
run command asadmin create-resource-ref --target belladati-cluster jdbc/belladati_db
![]() helpfull commands - to see resources : asadmin list-resource-refs belladati-cluster ; to delete resource jdbc/belladati_db: asadmin delete-resource-ref --target belladati-cluster jdbc/belladati_db
helpfull commands - to see resources : asadmin list-resource-refs belladati-cluster ; to delete resource jdbc/belladati_db: asadmin delete-resource-ref --target belladati-cluster jdbc/belladati_db
GlassFish GUI - resource targeting
- Setting up application reference
run command: asadmin create-application-ref --target belladati-cluster belladati
![]() to see the application references asadmin list-application-refs belladati-cluster ; to delete belladati reference asadmin delete-application-ref --target belladati-cluster belladati
to see the application references asadmin list-application-refs belladati-cluster ; to delete belladati reference asadmin delete-application-ref --target belladati-cluster belladati
GlassFish GUI - application belladati targeting
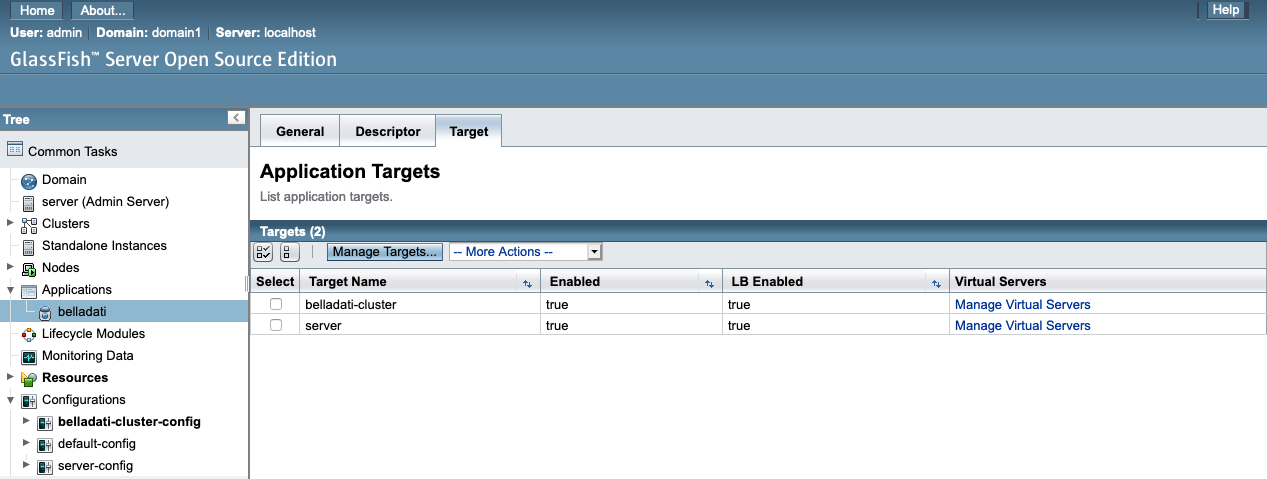
![]() Cluster "belladati-cluster" is able to use database belladati_db and application belladati could be deployed on the cluster environment;
Cluster "belladati-cluster" is able to use database belladati_db and application belladati could be deployed on the cluster environment;
![]() For BellaDati application some parameters are recommended ( see https://support.belladati.com/techdoc/Installing+BellaDati+on+Linux).
For BellaDati application some parameters are recommended ( see https://support.belladati.com/techdoc/Installing+BellaDati+on+Linux).
The parameters need to be set up for cluster too; The fact yields to the following modifications:
- Setting up thread pools
Taking into account recommendation for belladati installation max-thread-pool-size will be changed.
run command asadmin list-threadpools belladati-cluster to see list of threadpools;
modifications will be done threadpools: http-thread-pool and thread-pool-1
http-thread-pool:
run command asadmin get belladati-cluster-config.thread-pools.thread-pool.http-thread-pool* ![]() parameters values before setting up
parameters values before setting up
and run asadmin set belladati-cluster-config.thread-pools.thread-pool.http-thread-pool.max-thread-pool-size=512
thread-pool-1:
run command asadmin get belladati-cluster-config.thread-pools.thread-pool.thread-pool-1* ![]() parameters values before setting up
parameters values before setting up
and run asadmin set belladati-cluster-config.thread-pools.thread-pool.thread-pool-1.max-thread-pool-size=512
GlassFish GUI - thread pools

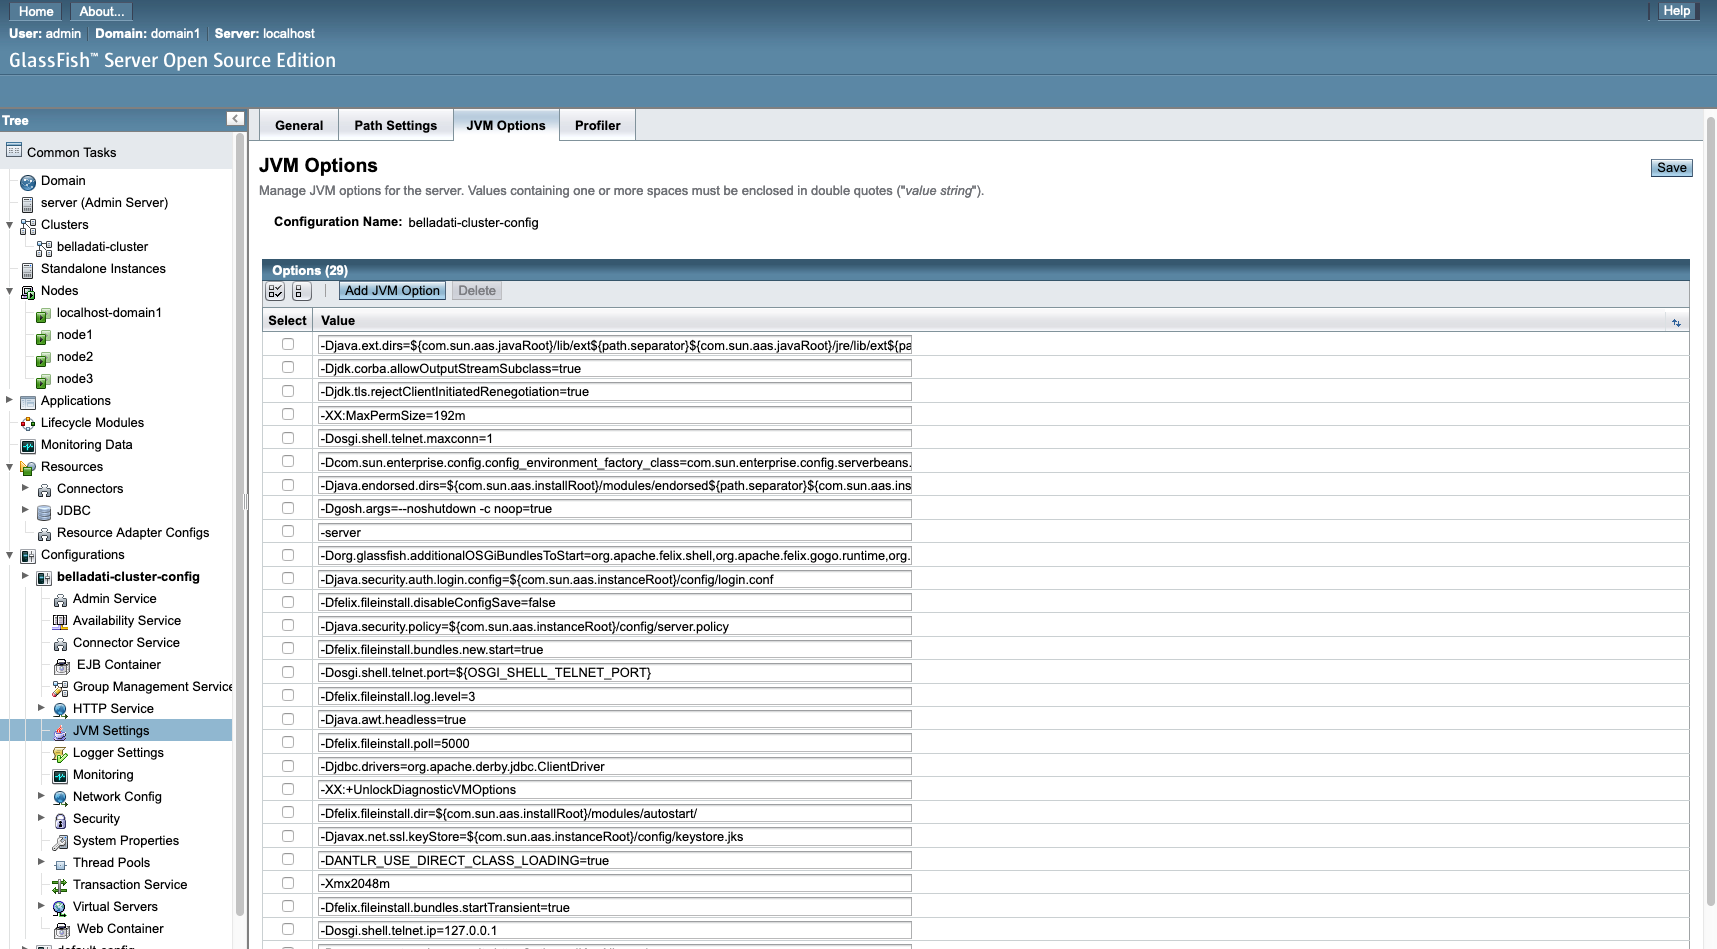
- JVM options setting
Dependently on machine HW specifications there are recommendation to modify so called "heap-space" for running jvm. The parameter regarding is -Xmxnnnnnm. nnnnn is value of RAM size for jvm.
run next command to see all JVM options as defined before modification for belladati-cluster:
asadmin list-jvm-options --target belladati-cluster
run command to delete -Xmx value not valid for cluster:
asadmin delete-jvm-options --target belladati-cluster -Xmx512m ![]() the "-Xmx512m" is default value, i.e. just 512 MB for running jvm
the "-Xmx512m" is default value, i.e. just 512 MB for running jvm
run command to setup new, valid value for -Xmx:
asadmin create-jvm-options --target belladati-cluster -Xmx2048m ![]() the "-Xmx2048m" i.e. 2048 MB for jvm is valid for this cluster. The value is based on given machines HW specification;
the "-Xmx2048m" i.e. 2048 MB for jvm is valid for this cluster. The value is based on given machines HW specification;
GlassFish GUI screen representing JVM options :
Cluster setup final notice
New, modified configuration for cluster is available now. Many changes occurred during the process. GlassFish AS must be restarted.
Run command: asadmin restart-domain
Starting Cluster
![]() helpfull commands to check the cluster environment before starting cluster:
helpfull commands to check the cluster environment before starting cluster:
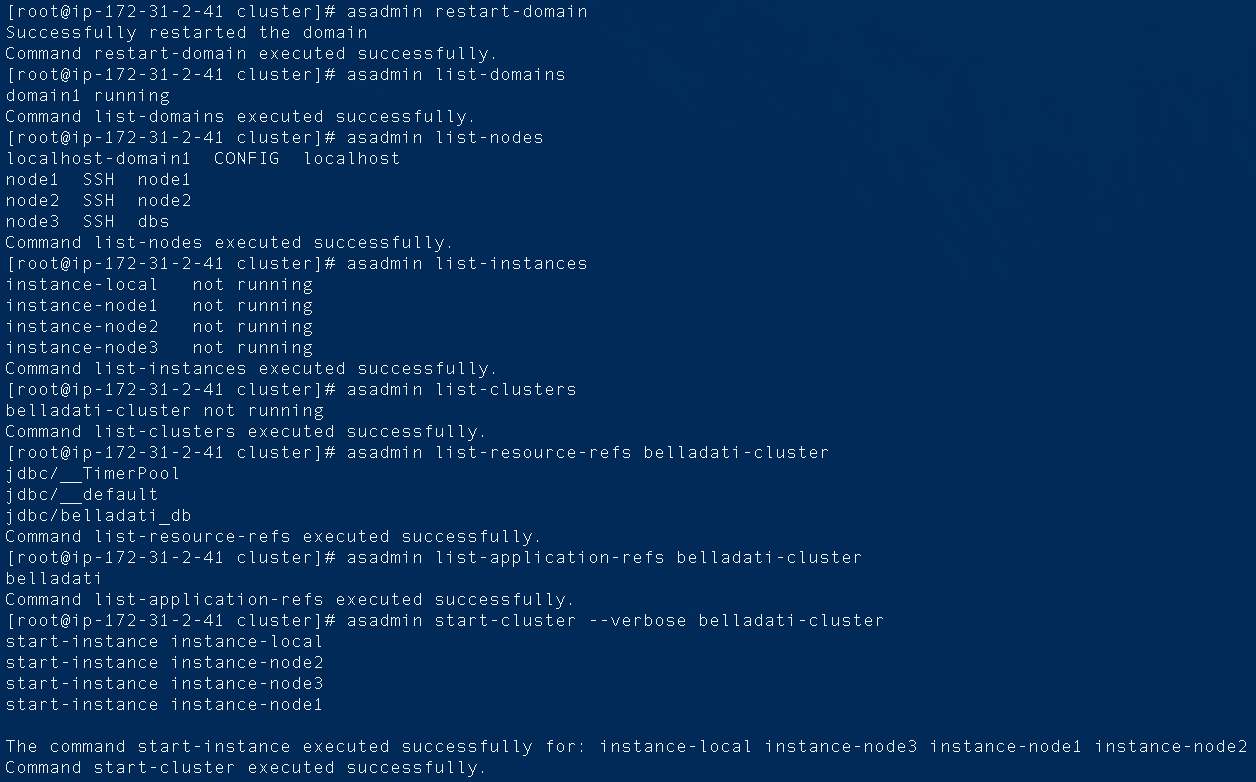
asadmin list-domains ; asadmin list-nodes ; asadmin list-instances ; asadmin list-resource-refs belladati-cluster ; asadmin list-application-refs belladati-cluster
![]() asadmin list-instances belladati-cluster command lists all instances available for cluster belladati-cluster, namely: instance-local, instance-node1, instance-node2 and instance-node3.
asadmin list-instances belladati-cluster command lists all instances available for cluster belladati-cluster, namely: instance-local, instance-node1, instance-node2 and instance-node3.
Set of checking commands, the last one is for starting the cluster belladati-cluster.
![]() The process of starting the cluster can take minutes. Two base ways can be used to start:
The process of starting the cluster can take minutes. Two base ways can be used to start:
run command asadmin start-cluster --verbose belladati-cluster ![]() one command to start all
one command to start all
or
run command asadmin start-instance NAME (instance-local, instance-node1,instance-node2 and instance-node3)
![]() command for the first instance start cluster environment with one instance; the next commands will add instances to the cluster.
command for the first instance start cluster environment with one instance; the next commands will add instances to the cluster.
This command is very illustrative with BellaDati application Monitoring cluster screen. The screen "cluster overview" shows cluster members activity.
![]() Visibility: asadmin list-clusters ; asadmin list-instances beladati-cluster
Visibility: asadmin list-clusters ; asadmin list-instances beladati-cluster
GUI screens -running cluster
The following screens represent graphical views of GlassFish domain admin server (DAS). The DAS can serves to communicate cluster servers and administer the cluster.
The screens are taken from Admin Console GUI for running cluster
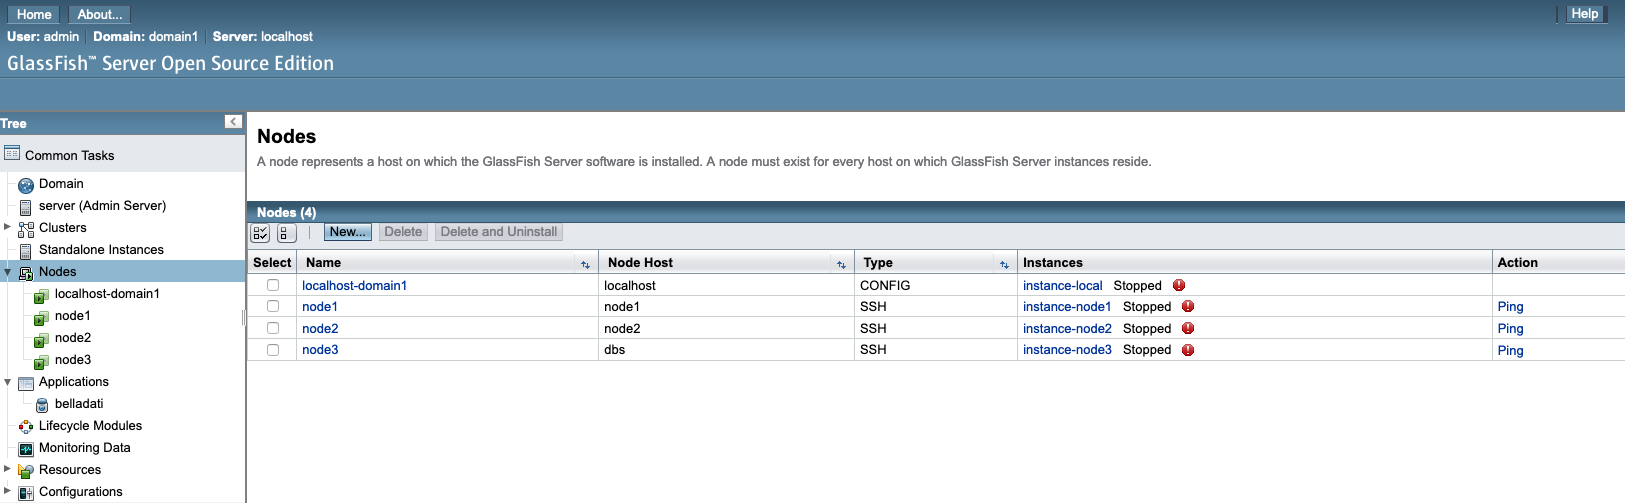
Nodes:

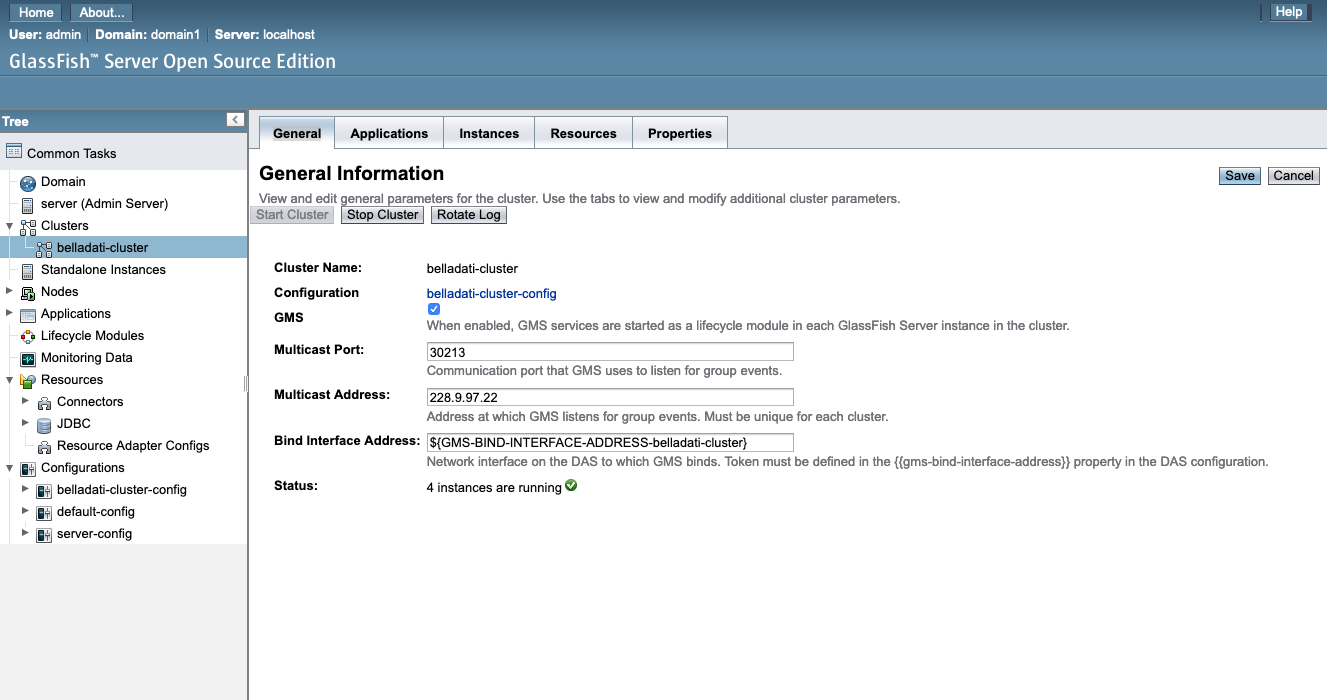
Cluster -general information:
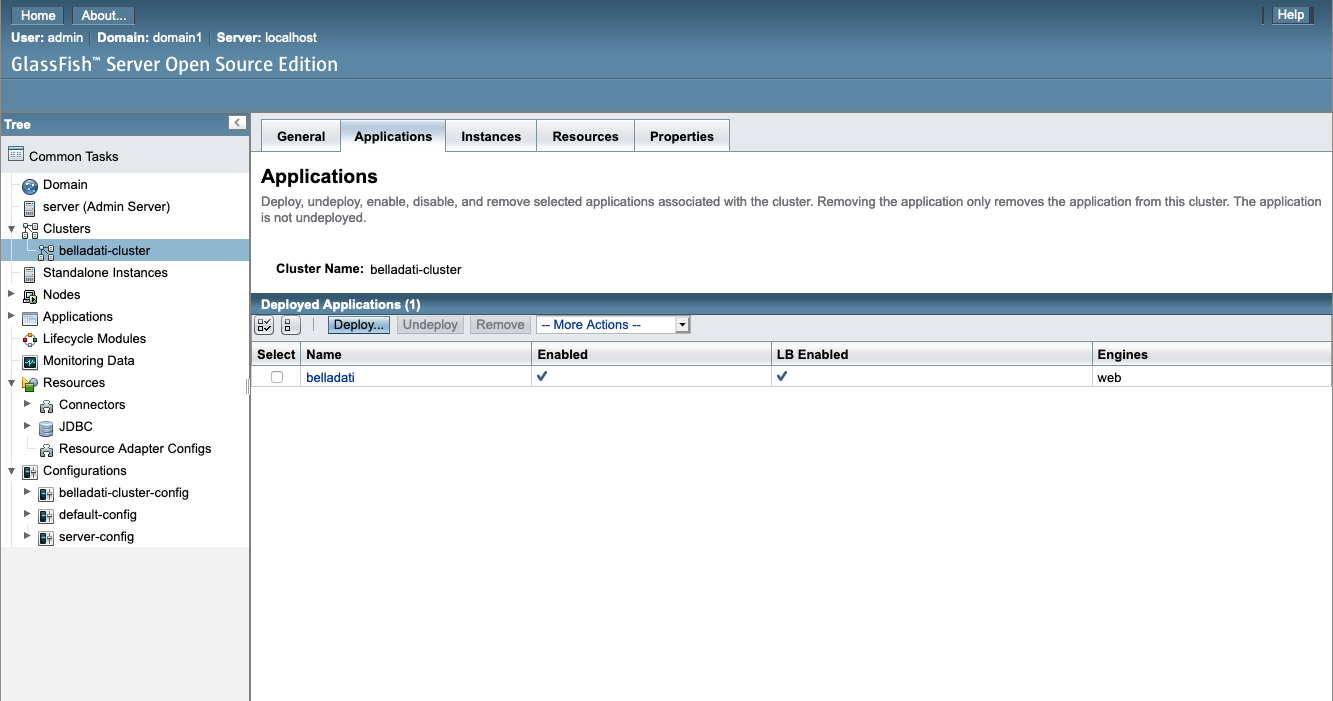
Cluster -application,instances,resources and properties:
 |  |  |  |
|---|
![]() Have a look at .../glassfish/nodes/"node"/instance-XXXX directory: applications config docroot generated lib logs osgi-cache; now, there is belladati directory in applications and application.properties file mentioned is in
Have a look at .../glassfish/nodes/"node"/instance-XXXX directory: applications config docroot generated lib logs osgi-cache; now, there is belladati directory in applications and application.properties file mentioned is in
/home/cluster/glassfish/glassfish/nodes/node1/instance-node1/applications/belladati/WEB-INF/classes/conf; application.properties file was taken during the process from machine belladati-main from /usr/local/BellaDati/glassfish5/glassfish/domains/domain1/applications/belladati/WEB-INF/classes/conf/. This is nice to know. The knowledge is useful for "Updating BellaDati".
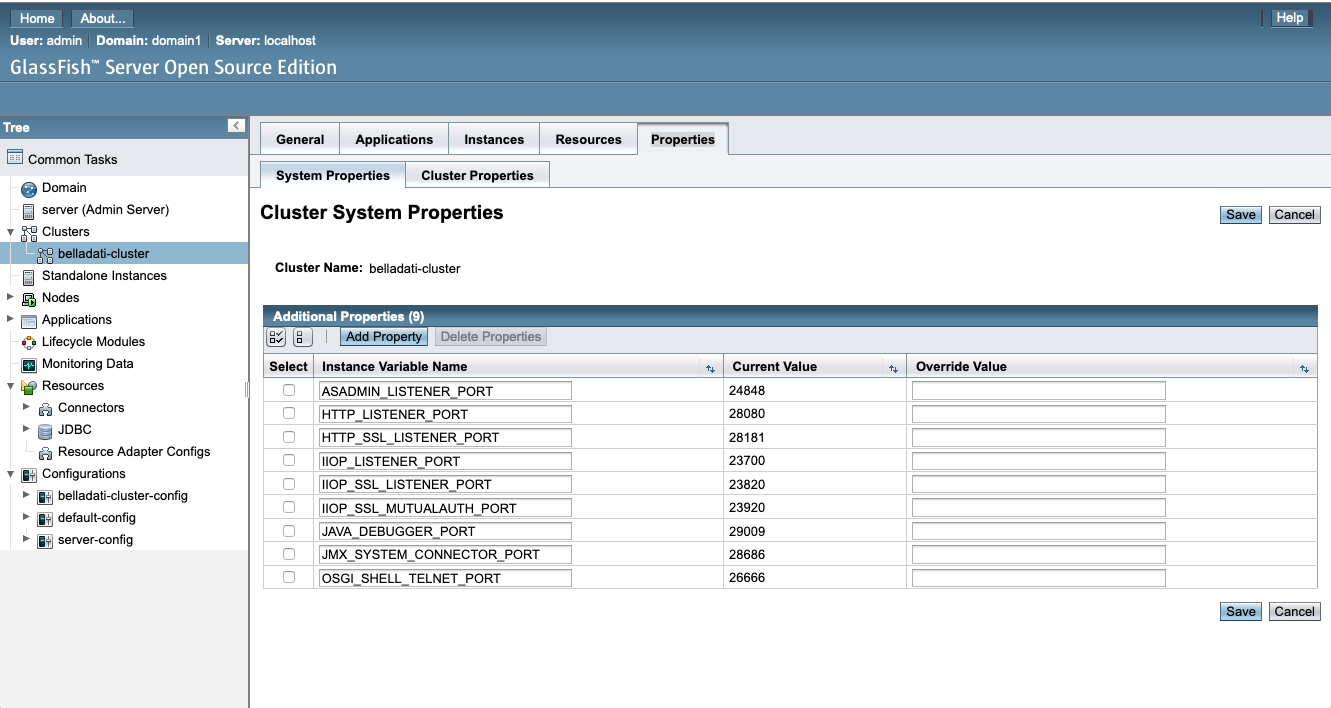
![]() Note properties of cluster belladati-cluster (last screen). INSTEAD of http port 8080 is port 28080. The port is for http://Public IP:28080 to login to application.
Note properties of cluster belladati-cluster (last screen). INSTEAD of http port 8080 is port 28080. The port is for http://Public IP:28080 to login to application.
Modifying BellaDati License
- log in
Application BellaDati is operating in cluster environment. To log into use for machine "belladati-main" port 8080, for "node1" port 28080, for "node2" port 28080 and for machine "dbs" port 28080.
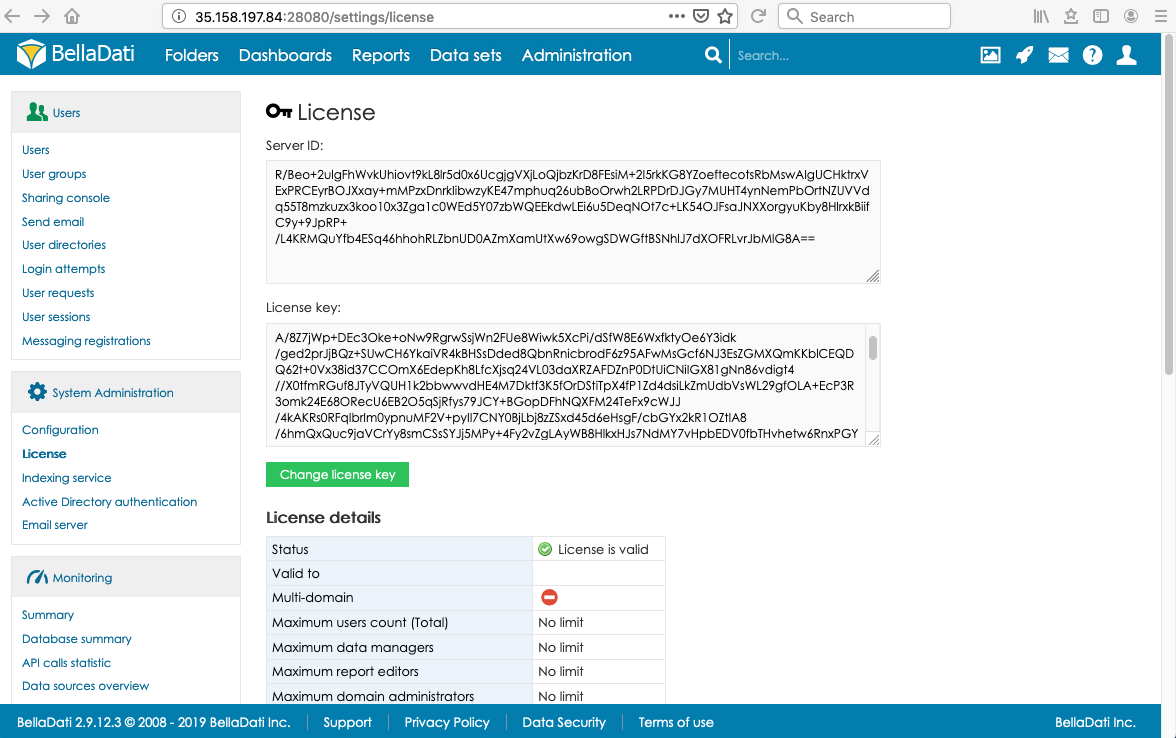
![]() BellaDati license screen for node1,node2 and dbs machine indicate : license is not valid
BellaDati license screen for node1,node2 and dbs machine indicate : license is not valid
![]() BellaDati application license is hw machine dependent; hw has been changed - instead of starting position with BellaDati running on machine belladati-main, there are four machines where BellaDati is deployed now.
BellaDati application license is hw machine dependent; hw has been changed - instead of starting position with BellaDati running on machine belladati-main, there are four machines where BellaDati is deployed now.
- new license
To modify license, copying of Server IDs of the machines (belladati-main, node1,node2 and dbs) and sending the set to BellaDati support is required.
BellaDati support will generate new, valid license. The new license must be implemented on the every cluster machine.
GUI illustration:
 :
:
And for illustration again the very first picture of the document - BellaDati screen cluster:
Overview
Content Tools