Loading camera stream
Introduction
In this section, we will delve into the fundamental concepts of working with video stream services and prepare an HTML template for our example. To stream video from various sources or services, we need to obtain a link to the video feed, which we can later embed within an iframe. In our case, authentication is often required, which is typically achieved through a secure (HTTPS) POST request to the service's server, providing authentication data.
Let's begin with the HTML template required for displaying the video.
<section class="camera-player">
    <iframe id="camera-output" frameborder="0" style="width: 100%; height: 100%"></iframe>
    <div class="bottom-panel">
        <button class="icon-settings"></button>
        <button class="full-screen icon-enlarge"></button>
    </div>
    <div class="controls hidden">
       <!-- Structure of your controls if needed -->
    </div>
</section>
Configuring the View and Authentication Request
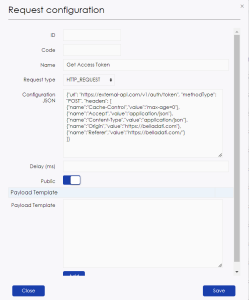
In this section, we will take a closer look at the authentication process. To send a request, you need to create a "Request configuration" by navigating to the "Administration" menu and selecting "Request configuration." If you have the option to create a configuration that suits all domains, you can do this outside of the domain and mark it as "Public" using the checkbox.
Here are the steps to create a new configuration:
- Specify a name for the configuration in the "Name" field.
- Choose the request type from the dropdown menu.
- In the configuration JSON, include the following:
- "url": The URL to which the request will be sent.
- "methodType": The request type (in our case, it's a POST request).
- "headers": Request headers in the format of a JSON array of objects with "name" and "value" fields, e.g., [{"name": "Authorization", "value": "$token"}].
You can also include variables in the request path or JSON configuration by using the "$" sign, like "$variableName" or "$token." If the request body remains static without changes, you can add it as a "Payload Template" and click "Add." You can add multiple static templates if needed.
Once the configuration is ready, click "Save" to save the newly created configuration.
Moving forward, let's put our configuration to work. We will use it in an endpoint to conceal authentication data and return only a temporary access token in the response body. You can find more details on creating and configuring endpoints here.
To make use of the created request configuration, employ the "httpRequestAsync" function. This function takes three parameters and returns a request identifier for further processing. Here are the parameters:
- Request configuration ID (number 1 in the image).
- Payload (which can be null).
- An associative array of key-value pairs for substituting values in the configuration JSON.
Please note that when using the "payload" parameter, templates will not be applied ("Payload Template").
To handle the request, we will need the "serviceResponse" function. It takes three parameters and a callback function. The first parameter is the request ID, generated by the "httpRequestAsync" function. The second parameter specifies the frequency at which the request will be checked for a response, and the third parameter defines the timeout duration after which the request is considered unsuccessful.
Inside the function, you have access to response processing fields such as "responseRetrieved", "httpStatusCode" and "httpBody". Let's examine these fields in the code example below.
def response;
def requestId = httpRequestAsync(255, null, null);
serviceResponse(requestId, 250, 10000) {
  if (!responseRetrieved) {
    response = Response.ok('No response retrieved','text/plain').status(500).build();
    return;
  }

  if (httpStatusCode != 200) {
    response = Response.ok('Something went wrong during the authorization','text/plain').status(httpStatusCode as Integer).build();
    return;
  }

  try {
    response = Response.ok(httpBody as String, 'application/json').build()
  } catch (Exception e) {
    response = Response.ok('Internal server error: ' + e.message, 'text/plain').status(500).build();
  }
}

return response;
After validation, you can return the token separately or the entire response body, as shown above. Save this endpoint as a "BellaDati" endpoint. You can call it using JavaScript at the necessary point in your application.
Next, you should create and describe the logic for all UI components. At the appropriate moment to obtain an access token, invoke the endpoint with a URL structure like `${location.origin}/endpoint/endpointURL`, where "endpointURL" is the URL you specified during creation.
Upon acquiring the access token, we can proceed to interact with the streaming service provider and obtain the URL to embed into the previously prepared iframe. This can be achieved on the client side or by creating a new request configuration.
You can adapt the UI by adding CSS files to the extension.
Loading Data from API
Introduction
In this tutorial, we will explore methods for updating information within a data set using the API. It's worth mentioning that there are two primary ways to load information into a data set:
Connecting over HTTP: This method involves making HTTP requests to load data into the data set. For a comprehensive guide on connecting over HTTP, please refer to this link.
Using ML Studio: The focus of this tutorial will be on this method, where we load information into a data set based on existing data. We will delve into this option in more detail.
Configuring Data Retrieval
Before we dive into the implementation, it's crucial to define the requirements for the resource from which we need to fetch information. In our case, the following requirements apply: we need to send an HTTP GET request to the service's address with an API key and handle the response. The key can be dynamically configured in the domain parameters.
To meet these requirements, we need to create a request configuration that includes a variable for sending the API key.
Navigate to the "Administration" menu and select "Request configuration". Create a new configuration. The JSON configuration will appear as follows:
{"url": "https://api-service.com/v1/forecastPrefWeek?code=$code&key=$apiKey","methodType":"GET"}
Apply the "Public" checkbox to this configuration and save it. In this case, we don't need to send anything in the request body, so we'll leave the "Payload Template" field untouched.
Next, add a domain parameter. Click on your profile icon and select the domain name. On the right, you'll find a button for adding parameters. Add a new parameter with the name "weather_api_key" and the corresponding value.

Now, let's move on to creating an ML script for data processing. Based on existing data, we will send HTTP requests cyclically to retrieve weather information for each region, followed by processing and updating the data. Here's an example of the code.
import org.joda.time.*;

apiKey = currentDomain().getParameter('weather_api_key').getValue();
requestConfigId = 9;

weatherDs = [
  id: 'WEATHER_DATA_WEEKLY',
  col: [
    date: 'L_FORECAST_DATE',
    prefecture: 'L_PREFECTURE_CODE',
    weather: 'L_WEATHER',
    weatherCode: 'L_WEATHER_CODE',
    tempMax: 'M_TEMPERATURE_MAX',
    tempMin: 'M_TEMPERATURE_MIN',
    precipitation: 'M_PRECIPITATION',
  ],
];

siteDs = [
  id: 'CONSTRUCTION_SITES',
  col: [
    gps: 'L_GPS',
    prefectureCode: 'L_PREF_CODE',
    yumakeCode: 'L_YUMAKE_CODE',
    regionCode: 'L_REGION_CODE',
  ],
];

def hasGpsFilter = isNotNullFilter(siteDs.col.gps);
def hasPrefectureCodeFilter = isNotNullFilter(siteDs.col.prefectureCode);
def siteFilter = andFilter(hasGpsFilter, hasPrefectureCodeFilter);

def sites = readDataset(siteDs.id, -1, siteFilter, descSort('ROW_UID'));

if (sites.isEmpty()) {
  return warn('Site list does not contain prefecture codes. Skipping...');
}

def prefectures = sites.collect{ it[siteDs.col.prefectureCode] }.unique(false);

prefectures.each{ code ->
  if (!(code instanceof String)) return;

  def variables = [
    code: code,
   	apiKey: apiKey,
  ];

  def requestId = httpRequestAsync(requestConfigId, null, variables);
  serviceResponse(requestId, 500, 10000) {
    if (!responseRetrieved) {
      return warn("No response retrieved for the prefecture code ${code}");
    }

    if (httpStatusCode != 200) {
      warn("Status code: '${httpStatusCode}'");
      warn("Something went wrong during the weather data getting for the prefecture code: ${code}")
      return;
    }

    def response = jsonToMap(httpBody);

    if (response.errors?.size()) {
      response.errors.each{ warn("Request failed with error: ${it.message ?: 'message'}") }
      return;
    }

    handleResponse(response);
  }
}

void handleResponse(response) {
  response.area.each{ area ->
    def rows = [];
    def prefectureCode = area.areaCode;

    area.forecastDateTime.eachWithIndex{ date, idx ->
      rows.add([
        (weatherDs.col.date): new LocalDate(date.take(10)),
        (weatherDs.col.prefecture): prefectureCode,
        (weatherDs.col.weather): area.weather[idx],
        (weatherDs.col.weatherCode): area.weatherCode[idx],
        (weatherDs.col.tempMax): area.temperatureMax[idx],
        (weatherDs.col.tempMin): area.temperatureMin[idx],
        (weatherDs.col.precipitation): area.precipitation[idx],
      ]);
    }

    def dateFrom = rows.collect{ it[weatherDs.col.date] }.min();
    def dateFromFilter = isGreaterOrEqualFilter(weatherDs.col.date, dateFrom);
    def prefectureFilter = isEqualFilter(weatherDs.col.prefecture, prefectureCode);
    def weatherFilter = andFilter(prefectureFilter, dateFromFilter);

    deleteData(weatherDs.id, weatherFilter);
    storeDataset(weatherDs.id, rows);
  }
}

void warn(String data) {
  println("[WARN] ${data}");
}

void dev(String data) {
  println("[DEV] ${data}");
}
Pay attention to how we retrieve parameters from the current domain at the beginning of the script.
apiKey = currentDomain().getParameter('weather_api_key').getValue();
It's also essential to note the parameter passing for substitution in the JSON request configuration and response processing.
// variables definition
def variables = [
    code: code,
    apiKey: apiKey,
  ];

def requestId = httpRequestAsync(requestConfigId, null, variables);  // passing the variables for substitution in the JSON request configuration
serviceResponse(requestId, 500, 10000) {
  if (!responseRetrieved) {
    return warn("No response retrieved for the prefecture code ${code}");
  }

  if (httpStatusCode != 200) {
    warn("Status code: '${httpStatusCode}'");
    warn("Something went wrong during the weather data getting for the prefecture code: ${code}")
    return;
  }

  def response = jsonToMap(httpBody);

  if (response.errors?.size()) {
    response.errors.each{ warn("Request failed with error: ${it.message ?: 'message'}") }
    return;
  }

  handleResponse(response);
}
Configure automatic data update
To ensure our script runs automatically on a specific schedule, we need to create a data set that will act as the trigger. To achieve the desired data refresh frequency, we'll use another data set from which we'll import data. In this data set, you can have just a single record and configure the import in such a way that you always get a random value.

To connect data sources, you can refer to the documentation here.
Once the data source is connected, you need to set up the import scheduler. Here's how you can do it:
- Go to the "Data set summary" page of the trigger data set and click the "Schedule import" button.
- Fill in all the necessary fields and confirm by clicking "Schedule." If you need to initiate multiple imports, you can create several processes by clicking the "Schedule import" button again.
An exmaple of the result:

Next, to trigger the ML project based on this data set, you need to wrap it in a pipeline. You can find instructions on creating a pipeline here.
Once the pipeline is set up, you need to add the trigger. After setting this up, you may need to refresh the page. In the pop-up window, select the data set that will act as the trigger and click the "Add" button, then close the window.

You can test the trigger's functionality by making changes to the trigger data set.
Overview
Content Tools