Page History
| Sv translation | |||||||||||||||||||||||||||
|---|---|---|---|---|---|---|---|---|---|---|---|---|---|---|---|---|---|---|---|---|---|---|---|---|---|---|---|
| |||||||||||||||||||||||||||
Loading camera streamIntroductionIn this section, we will delve into the fundamental concepts of working with video stream services and prepare an HTML template for our example. To stream video from various sources or services, we need to obtain a link to the video feed, which we can later embed within an iframe. In our case, authentication is often required, which is typically achieved through a secure (HTTPS) POST request to the service's server, providing authentication data. Let's begin with the HTML template required for displaying the video.
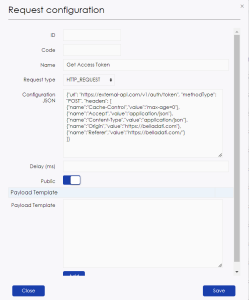
Configuring the View and Authentication RequestIn this section, we will take a closer look at the authentication process. To send a request, you need to create a "Request configuration" by navigating to the "Administration" menu and selecting "Request configuration." If you have the option to create a configuration that suits all domains, you can do this outside of the domain and mark it as "Public" using the checkbox. Here are the steps to create a new configuration:
You can also include variables in the request path or JSON configuration by using the "$" sign, like "$variableName" or "$token." If the request body remains static without changes, you can add it as a "Payload Template" and click "Add." You can add multiple static templates if needed. Once the configuration is ready, click "Save" to save the newly created configuration. Moving forward, let's put our configuration to work. We will use it in an endpoint to conceal authentication data and return only a temporary access token in the response body. You can find more details on creating and configuring endpoints here. To make use of the created request configuration, employ the "httpRequestAsync" function. This function takes three parameters and returns a request identifier for further processing. Here are the parameters:
Please note that when using the "payload" parameter, templates will not be applied ("Payload Template").
To handle the request, we will need the "serviceResponse" function. It takes three parameters and a callback function. The first parameter is the request ID, generated by the "httpRequestAsync" function. The second parameter specifies the frequency at which the request will be checked for a response, and the third parameter defines the timeout duration after which the request is considered unsuccessful. Inside the function, you have access to response processing fields such as "responseRetrieved", "httpStatusCode" and "httpBody". Let's examine these fields in the code example below.
After validation, you can return the token separately or the entire response body, as shown above. Save this endpoint as a "BellaDati" endpoint. You can call it using JavaScript at the necessary point in your application. Next, you should create and describe the logic for all UI components. At the appropriate moment to obtain an access token, invoke the endpoint with a URL structure like ` Upon acquiring the access token, we can proceed to interact with the streaming service provider and obtain the URL to embed into the previously prepared iframe. This can be achieved on the client side or by creating a new request configuration. You can adapt the UI by adding CSS files to the extension. Loading Data from APIIntroductionIn this tutorial, we will explore methods for updating information within a data set using the API. It's worth mentioning that there are two primary ways to load information into a data set:
Configuring Data RetrievalBefore we dive into the implementation, it's crucial to define the requirements for the resource from which we need to fetch information. In our case, the following requirements apply: we need to send an HTTP GET request to the service's address with an API key and handle the response. The key can be dynamically configured in the domain parameters. To meet these requirements, we need to create a request configuration that includes a variable for sending the API key. Navigate to the "Administration" menu and select "Request configuration". Create a new configuration. The JSON configuration will appear as follows:
Apply the "Public" checkbox to this configuration and save it. In this case, we don't need to send anything in the request body, so we'll leave the "Payload Template" field untouched. Next, add a domain parameter. Click on your profile icon and select the domain name. On the right, you'll find a button for adding parameters. Add a new parameter with the name "weather_api_key" and the corresponding value.
Now, let's move on to creating an ML script for data processing. Based on existing data, we will send HTTP requests cyclically to retrieve weather information for each region, followed by processing and updating the data. Here's an example of the code.
Pay attention to how we retrieve parameters from the current domain at the beginning of the script.
It's also essential to note the parameter passing for substitution in the JSON request configuration and response processing.
Configure automatic data updateTo ensure our script runs automatically on a specific schedule, we need to create a data set that will act as the trigger. To achieve the desired data refresh frequency, we'll use another data set from which we'll import data. In this data set, you can have just a single record and configure the import in such a way that you always get a random value.
To connect data sources, you can refer to the documentation here. Once the data source is connected, you need to set up the import scheduler. Here's how you can do it:
An exmaple of the result:
Next, to trigger the ML project based on this data set, you need to wrap it in a pipeline. You can find instructions on creating a pipeline here. Once the pipeline is set up, you need to add the trigger. After setting this up, you may need to refresh the page. In the pop-up window, select the data set that will act as the trigger and click the "Add" button, then close the window.
You can test the trigger's functionality by making changes to the trigger data set. |


| Sv translation | |||||||||||||||||||||||||||
|---|---|---|---|---|---|---|---|---|---|---|---|---|---|---|---|---|---|---|---|---|---|---|---|---|---|---|---|
| |||||||||||||||||||||||||||
カメラストリームの読み込みはじめにこのセクションでは、動画ストリーム・サービスを扱うための基本的な概念を掘り下げ、例として使用する HTML テンプレートを用意します。さまざまなソースやサービスから動画をストリーム配信するには、動画フィードへのリンクを取得する必要があります。この場合、認証が必要になることが多く、通常、サービスのサーバに安全な(HTTPS)POST リクエストを送信し、認証データを提供することで実現されます。 まずは、ビデオを表示するために必要なHTMLテンプレートから始めましょう。
ビューと認証リクエストの設定このセクションでは、認証プロセスについて詳しく見ていきます。リクエストを送信するには、"Administration "メニューから "Request configuration "を選択して、"Request configuration "を作成する必要があります。すべてのドメインに適合するコンフィギュレーションを作成するオプションがある場合、ドメインの外でこれを行い、チェックボックスを使って "Public "としてマークすることができます。 以下は、新しいコンフィギュレーションを作成する手順です:
また、"$variableName "や"$token "のように、"$"記号を使ってリクエストパスやJSON設定に変数を含めることもできます。リクエスト本体が変更されずに静的なままであれば、"Payload Template "として追加し、"Add "をクリックします。必要に応じて、複数の静的テンプレートを追加することができます。 コンフィギュレーションの準備ができたら、"Save "をクリックして新しく作成したコンフィギュレーションを保存します。 次に、この設定を実際に使ってみよう。認証データを隠蔽し、レスポンスボディに一時的なアクセストークンのみを返すエンドポイントにこの設定を使用します。エンドポイントの作成と設定の詳細については、こちらを参照してください。 作成されたリクエスト設定を利用するには、"httpRequestAsync "関数を使用します。この関数は3つのパラメーターを受け取り、さらなる処理のためにリクエスト識別子を返します。以下がそのパラメータです:
payload "パラメーターを使用する場合、テンプレートは適用されませんのでご注意ください("Payload Template")。
Tリクエストを処理するには、"serviceResponse "関数が必要です。この関数は3つのパラメータとコールバック関数を受け取る。最初のパラメータは、"httpRequestAsync "関数で生成されたリクエストIDです。2番目のパラメータは、リクエストが応答をチェックする頻度を指定し、3番目のパラメータは、リクエストが失敗したとみなされるタイムアウト時間を定義します。 関数内部では、"responseRetrieved"、"httpStatusCode"、"httpBody "といったレスポンス処理フィールドにアクセスできます。以下のコード例で、これらのフィールドを調べてみましょう。
バリデーションの後、上記のように、トークンを個別に返すことも、レスポンスボディ全体を返すこともできます。このエンドポイントを "BellaDati "エンドポイントとして保存します。アプリケーションの必要な箇所でJavaScriptを使って呼び出すことができます。 次に、すべてのUIコンポーネントのロジックを作成し、記述します。アクセストークンを取得する適切なタイミングで、`${location.origin}/endpoint/endpointURL`のようなURL構造でエンドポイントを呼び出します。 アクセストークンを取得したら、ストリーミングサービス・プロバイダーとやり取りを行い、事前に用意したiframeに埋め込むためのURLを取得します。これは、クライアント側で行うか、新しいリクエスト設定を作成することで実現できます。 拡張機能にCSSファイルを追加することで、UIを適応させることができます。 APIからデータをロードはじめにこのチュートリアルでは、APIを使用してデータセット内の情報を更新する方法を探ります。データセットに情報をロードするには、主に2つの方法があることに触れておきましょう:
データ検索の設定実装に入る前に、情報を取得するリソースの要件を定義することが重要です。この場合、以下の要件が当てはまります。サービスのアドレスにAPIキーでHTTP GETリクエストを送信し、レスポンスを処理する必要があります。キーはドメイン・パラメータで動的に設定できます。 これらの要件を満たすには、APIキーを送信するための変数を含むリクエスト・コンフィギュレーションを作成する必要があります。 Administration "メニューに移動し、"Request configuration "を選択します。新しいコンフィギュレーションを作成します。JSONコンフィギュレーションは以下のように表示されます:
この設定に "Public "チェックボックスを適用し、保存します。この場合、リクエストボディに何も送る必要はないので、"Payload Template "フィールドはそのままにしておきます。 次に、ドメインパラメータを追加します。プロフィールアイコンをクリックし、ドメイン名を選択します。右側に、パラメータを追加するためのボタンがあります。weather_api_key "という名前と対応する値で新しいパラメータを追加します。
次に、データ処理のためのMLスクリプトの作成に移りましょう。既存のデータを基に、周期的にHTTPリクエストを送り、各地域の気象情報を取得し、その後、データを処理し更新します。以下はコードの例です。
スクリプトの冒頭で、現在のドメインからどのようにパラメーターを取得しているかに注目してください。
JSONリクエストのコンフィギュレーションとレスポンス処理における、置換のためのパラメータ・パッシングにも注意する必要があります。
自動データ更新の設定スクリプトが特定のスケジュールで自動的に実行されるようにするには、トリガーとなるデータセットを作成する必要があります。目的のデータ更新頻度を達成するために、データをインポートする別のデータセットを使用します。このデータセットでは、レコードを1つだけ持ち、常にランダムな値を取得するようにインポートを設定することができます。 データソースを接続するには、こちらのドキュメントを参照してください。 データソースを接続したら、インポート・スケジューラーを設定する必要があります。ここではその方法を説明します:
結果の一例:
次に、このデータセットに基づいてMLプロジェクトを起動するために、パイプラインでラップする必要があります。パイプラインの作り方はこちらをご参照ください。 パイプラインを設定したら、トリガーを追加する必要があります。設定後、ページを更新する必要があるかもしれません。ポップアップ・ウィンドウで、トリガーとなるデータ・セットを選択し、"Add "ボタンをクリックし、ウィンドウを閉じます。
トリガーのデータセットに変更を加えることで、トリガーの機能をテストすることができます。 |
Overview
Content Tools